evrBridge User Manual Version 1.1.0 — Windows
Table of Contents
What is evrBridge
evrBridge is a Windows application that reads the technical metadata embedded in your camera files and exports it as a CSV file ready to be imported directly into DaVinci Resolve. In a single click it extracts camera settings — ISO, aperture, shutter speed, white balance, gamma, lens, timecode and more — from every video and photo file in a folder, and organises everything into a structured spreadsheet that Resolve can read natively.
It was created to bring to Windows the same metadata extraction workflow that evrExpanse users enjoy on macOS. evrExpanse is the full-featured sibling application for macOS, covering offloading, transcoding and export for multiple platforms beyond DaVinci Resolve. evrBridge focuses on one thing and does it well: getting your camera metadata into Resolve on Windows, as fast and automatically as possible.
What evrBridge does
- Scans a folder (and all its subfolders) for video and photo files
- Detects the camera brand automatically and applies the correct extraction logic for each manufacturer
- Exports a single DaVinci Resolve-compatible CSV file with one row per clip
Supported file formats
evrBridge processes the following file types:
MOV MP4 MXF MKV JPG / JPEG PNG TIF / TIFF DNG HEIC AVIF NEV R3D ARW CR2 CR3 NEF RAF RW2
Supported cameras
evrBridge includes dedicated metadata processors for the following manufacturers and systems:
- Sony — XDCAM (MXF), Alpha mirrorless (MOV/MP4), with RTMD embedded data support
- Canon — Cinema MXF, EOS MOV, XF series with companion XML and JPG sidecar support
- Nikon — MOV/MP4/NEV/R3D
- ARRI — MXF/MOV with full ARRI metadata block
- Blackmagic Camera App — MOV/MP4, Android/iOS based cameras
- Panasonic — MXF/MOV with Panasonic XML fallback
- Fujifilm — MOV/MP4
- Z-Cam — MOV/MP4 with Z-Cam specific metadata
- Kinefinity — MOV with Kinefinity tags
- GoPro — MP4 with embedded track data
- iPhone / iOS — MOV/MP4 shot with iPhone or third-party iOS apps (Mcpro24fps)
- Atomos — recorded externally via Atomos recorders
- Generic — any other camera or format not listed above; evrBridge still extracts all standard metadata fields available
System Requirements
| Requirement | Details |
|---|---|
| Operating System | Windows 10 or later (64-bit) |
| .NET Runtime | .NET 10 (included in the installer) |
| Disk space | ~50 MB |
| Internet connection | Required only for license activation |
| DaVinci Resolve | Any version supporting CSV metadata import |
Installation
- Download the evrBridge installer from evrapp.gumroad.com or from the official evrBridge page.
- Run the
.exeinstaller and follow the on-screen steps. - Once installed, launch evrBridge from the Start menu or the desktop shortcut.
Note: Windows may display a SmartScreen security warning before the installer launches. This is expected behaviour for independently distributed software. See Windows SmartScreen shows a warning when launching the installer in the Troubleshooting section for instructions on how to proceed.
Auto-update
evrBridge checks for updates automatically at launch. When a new version is available, a notification will appear and you can install it with one click without leaving the app.
Activation
When you launch evrBridge for the first time, you will be asked to activate it. evrBridge offers three license types:
| License | Duration | Notes |
|---|---|---|
| Trial | 15 days | Full functionality, no file limit. After expiry: 1 file per run |
| Full (Paid) | Permanent | Purchased on Gumroad |
Starting a trial
If you have received a trial license key, enter your email address and the key in the activation window and click Activate. The trial gives you full access to all features for 15 days, with no limit on the number of files you can process per run.
Once the 15 days have elapsed, evrBridge enters a limited mode: you can still use the app, but each run will process only one file at a time. To restore full functionality, purchase and activate a paid license.
Purchasing a full license
Click the Buy License → button in the activation window, or visit evrapp.gumroad.com directly. After purchase, Gumroad will send you a license key by email.
Activating a paid license
- Open evrBridge.
- If the activation window does not appear automatically, go to Help → License Information.
- Enter the email address you used on Gumroad and your license key.
- Click Activate.
A confirmation message will appear and the status badge in the top-right corner of the main window will show Licensed in green.
Offline grace period
evrBridge validates your license online periodically. If your machine has no internet connection, the app will continue to work normally for up to 7 days. After that period, an internet connection is required to revalidate.
Viewing license information
Go to Help → Manage License to see your current license status, the email it is registered to, the activation date, and options to activate a new key or deactivate the current one.
Deactivating / moving to another machine
To move your license to a different Windows PC, open Help → License Information and click Deactivate. This removes the license from the current machine. You can then activate evrBridge on the new machine using the same email and license key.
Note: Trial history is preserved on deactivation. A trial license already used on a machine cannot be reused on the same machine even after deactivation.
Using evrBridge
The evrBridge interface is intentionally minimal. The entire workflow is three steps: select a folder, choose where to save, press Process.
Step 1 — Select a folder
When evrBridge opens you will see the empty state with the message "Select a folder to scan for video/photo files".
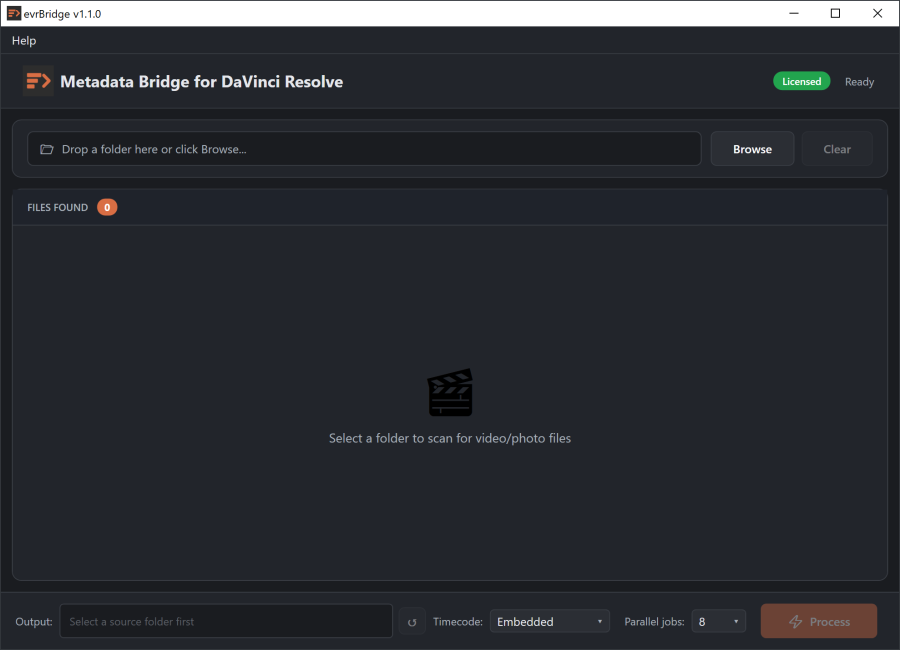
You have two options:
- Drag and drop a folder directly into the path field at the top of the window.
- Click Browse to open a folder picker dialog.
evrBridge will immediately scan the selected folder and all its subfolders recursively. The file list will populate with every recognised media file found, showing the File Name, Extension, Size and full Path for each clip. The orange badge next to FILES FOUND shows the total count.
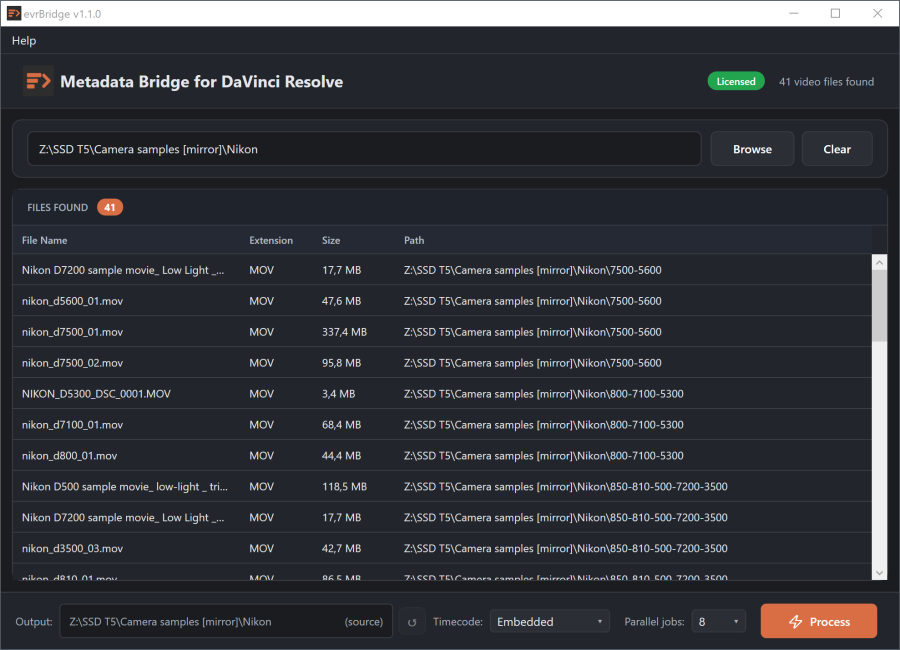
Step 2 — Choose where to save the CSV
By default, evrBridge saves the CSV inside the source folder, in a subfolder named evrB_[FolderName]_Metadata. The file name follows the pattern FolderName_YYYYMMDD_HHMMSS_dvr.csv.
To save the CSV to a different folder, click the Output path field in the action bar and select the desired folder. The path updates to show the custom destination. To return to the default (source folder), click the ↺ reset button.
Your output folder choice is remembered between sessions.
Step 3 — Timecode mode
The Timecode dropdown in the action bar controls how the Start TC column is generated:
- Embedded (default) — reads the timecode written by the camera. If no timecode is embedded, the field is left empty.
- Time of day — derives the timecode from the recording time (hours, minutes, seconds, frame field 00). This is useful for synchronising material from cameras or photos that do not embed a timecode track.
- Start at zero — sets every clip to
00:00:00:00.
The End TC column is always computed by adding the clip duration to the Start TC.
For photos, Start TC is empty in Embedded mode (photos have no timecode track), the recording time in Time of day, and 00:00:00:00 in Start at zero. End TC and duration are always empty for photos since they have no frame count.
Your timecode mode choice is remembered between sessions.
Step 4 — Set parallel jobs (optional)
The Parallel jobs dropdown in the bottom-right corner (default: 4) controls how many files are processed simultaneously. On machines with more CPU cores you can increase this value to speed up processing. On slower machines or spinning drives, a lower value may be more stable.
Your parallel jobs choice is remembered between sessions.
Step 5 — Process
Click the Process button (orange, bottom-right). The button label changes to Processing... and a progress bar appears at the bottom of the window. The status bar at the top shows the current count, for example "Processing 14 of 41 files...".
You can click Cancel at any time to stop the operation.
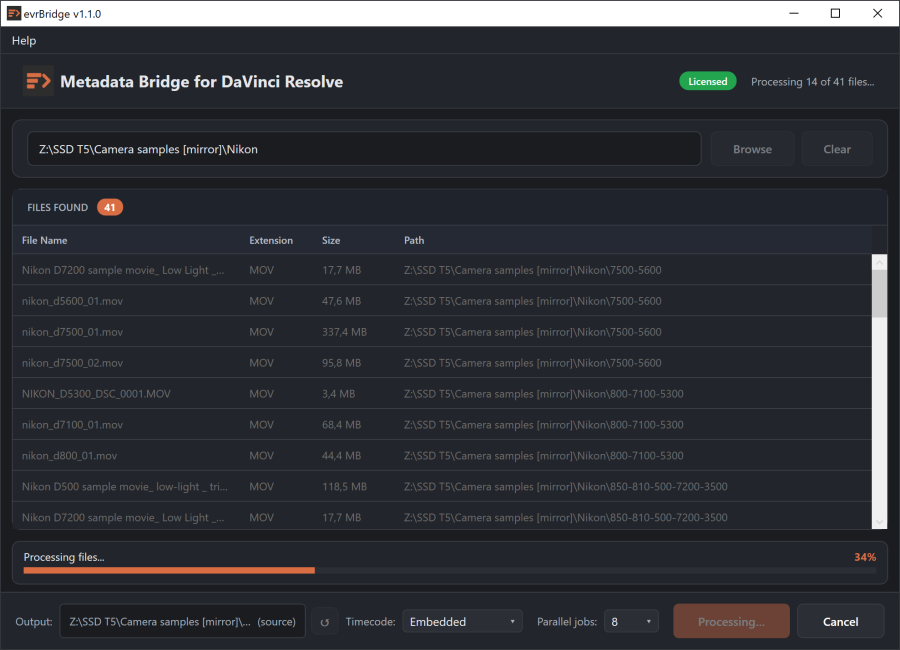
Step 6 — Done
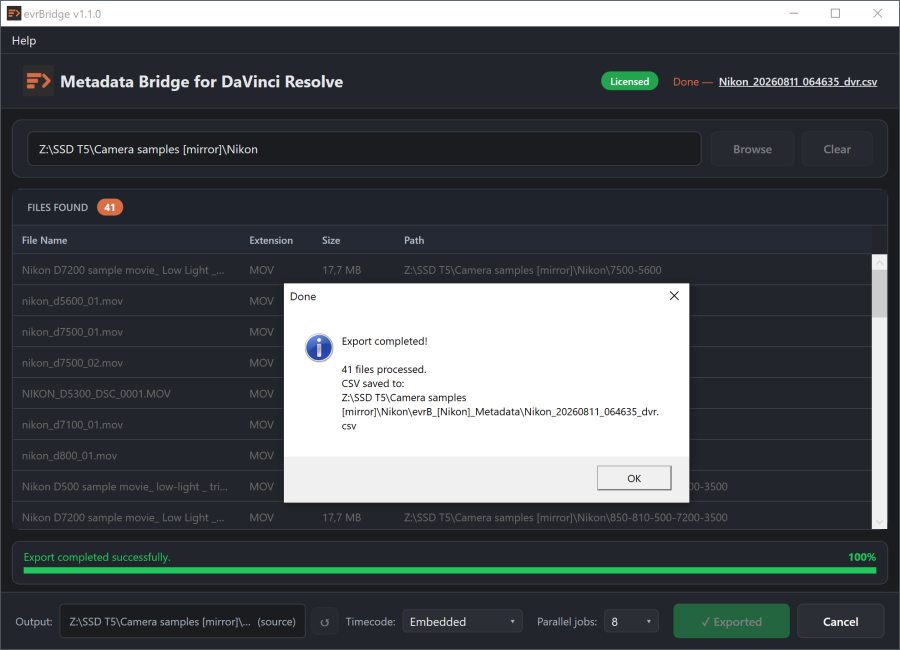
When processing is complete:
- The progress bar turns green and shows "Export completed successfully."
- A dialog appears confirming how many files were processed and showing the full path of the saved CSV file.
- Click OK to dismiss the dialog.
- The button changes to ✓ Exported (green).
- At the top of the window, next to the Done label, the CSV filename appears as a clickable link — click it to open the file directly in your file manager or spreadsheet application.
What is extracted
For each file, evrBridge extracts and writes to the CSV all available metadata, including:
- File name, directory and creation date
- Clip name, reel number, scene, take and camera number
- Camera manufacturer, model, serial number and firmware
- Frame rate, codec, bit depth and average bitrate
- ISO, aperture, shutter speed and shutter angle
- White balance (Kelvin and tint)
- Gamma notes and color space notes
- Lens type, focal length and lens serial number
- LUT used, sensor area captured
- Timecode (first frame, last frame, duration)
- GPS location (when available)
- XMP metadata (rating, keywords, label, description)
Fields that are not available for a given file are left empty — no placeholder text is written.
Importing the CSV into DaVinci Resolve
Once you have the _dvr.csv file, importing it into DaVinci Resolve takes less than a minute.
Step 1 — Open your project in DaVinci Resolve
Make sure your clips are already imported into the Media Pool before proceeding.
Step 2 — Open the CSV import dialog
In the Media Pool, right-click on an empty area (or on the bin where your clips are) and select:
Select the Media Pool you want to import to (indicated by a red line).
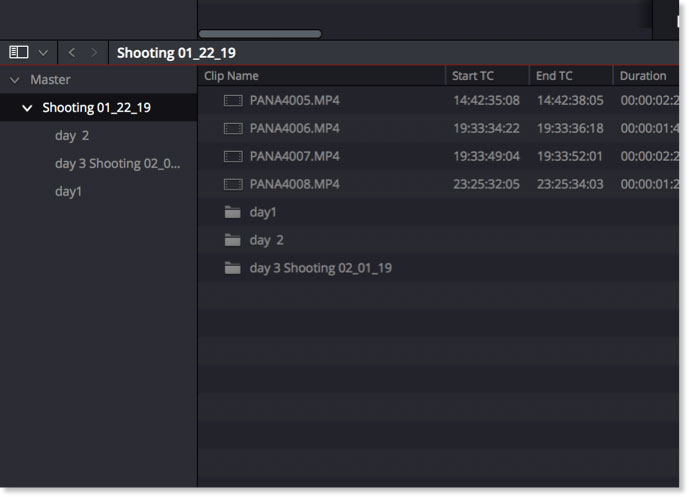
File > Import Metadata To > Media Pool...
Alternatively, to import metadata only for selected clips, choose File > Import Metadata To > Selected Clips...
Step 3 — Select the CSV file
Navigate to the evrB_[FolderName]_Metadata subfolder inside your source folder and select the _dvr.csv file generated by evrBridge.
Step 4 — Match and confirm
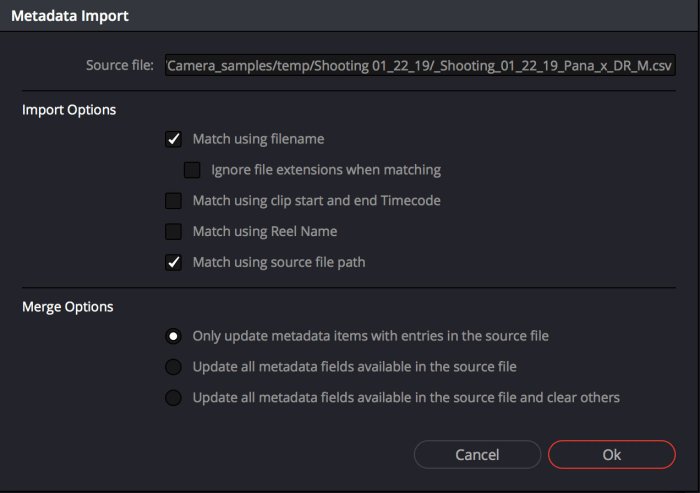
By default, DaVinci Resolve tries to match using both filename and clip start/end timecode.
- Uncheck “Match using clip start and end Timecode”
- Check “Match using source file paths”
This ensures clips are matched correctly, since imported metadata may not include timecode.
Select how you want metadata to be updated:
- Only update metadata items with entries in the source file (recommended): Only updates metadata fields with valid entries in the CSV; all other fields remain unchanged.
- Update all metadata fields available in the source file: Overwrites all referenced fields for matching clips, regardless of value.
- Update all metadata fields available in the source file and clear others: Overwrites referenced fields and clears any other metadata fields not included in the CSV.
The metadata fields will populate automatically in the Media Pool columns for each matched clip.
Viewing metadata in the Media Pool
To see the imported metadata, right-click on any column header in the Media Pool and enable the columns you want to display — for example Camera, Scene, Take, Reel Number, ISO, Aperture, Gamma Notes, and so on.
CSV field reference
The table below lists every column written by evrBridge and its meaning in DaVinci Resolve.
| CSV Column | Description |
|---|---|
| File Name | Clip file name with extension |
| Clip Directory | Full folder path of the source file |
| Date Recorded | Creation date and time from the file |
| Start TC | First frame timecode of the clip |
| End TC | Last frame timecode (Start TC + duration) |
| Clip Number | Clip name as recorded by the camera |
| Reel Number | Reel or magazine number |
| Scene | Scene name or number |
| Take | Take number |
| Camera # | Camera identifier (A, B, C...) |
| Comments | General comments from the camera |
| Camera FPS | Recording frame rate |
| Codec Bitrate | Average bitrate of the video stream |
| Media Type | Video codec (e.g. H.264, ProRes, XAVC) |
| Camera Format | Video bit depth (e.g. 8-bit, 10-bit, 12-bit) |
| Gamma Notes | Log curve or gamma profile (e.g. S-Log3, C-Log3, BRAW) |
| Color Space Notes | Color gamut (e.g. S-Gamut3.Cine, BT.709) |
| Camera Manufacturer | Camera brand |
| Camera Serial # | Camera body serial number |
| Camera Type | Camera model name |
| Camera Firmware | Firmware version at time of recording |
| ISO | Sensor sensitivity value |
| Camera Aperture | Aperture / f-number |
| Shutter | Combined shutter display (speed + angle) |
| Shutter Speed | Shutter speed (e.g. 1/50) |
| Shutter Angle | Shutter angle in degrees (e.g. 180°) |
| Camera Aperture Type | Iris type (e.g. F-stop, T-stop) |
| White Balance Tint | CC tint correction value |
| White Point (Kelvin) | Color temperature in Kelvin |
| Lens Type | Lens model name |
| Focal Point (mm) | Focal length (35mm equivalent) |
| Lens Number | Lens serial number |
| Lens Notes | Lens firmware or additional lens data |
| Camera Notes | Additional camera metadata and flags |
| Sensor Area Captured | Sensor crop mode (e.g. Full Frame, Super 35) |
| LUT Used | In-camera or monitoring LUT name |
| Keywords | XMP subject/keyword tags |
| Flags | Rating flags from camera or XMP |
| Location | GPS coordinates (latitude, longitude) |
| Camera Position | Camera position label |
| Distance | Focus distance from image plane |
Tips
- File name matching is case-insensitive in most Resolve versions, but make sure your clips in the Media Pool have not been renamed after ingestion.
- If a clip shows no metadata after import, check that the file name in the CSV matches exactly the file name shown in the Media Pool (including the extension).
- You can run evrBridge again on the same folder at any time — each run generates a new CSV with a timestamp in the filename, so previous exports are never overwritten.
- The CSV subfolder (
evrB_[FolderName]_Metadata) is created inside the source folder. If your source is on a read-only volume, click the Output path field to select a writable destination.
Troubleshooting
Windows SmartScreen shows a warning when launching the installer
This is expected behaviour for software distributed outside the Microsoft Store by an independent developer. Windows SmartScreen displays a "Windows protected your PC" warning when it does not recognise the publisher — this does not mean the app is unsafe.

To proceed with the installation:
- Click More info in the SmartScreen dialog.
- Click Run anyway.
- The installer will proceed normally.

This warning appears because evrBridge is currently distributed without an Extended Validation (EV) code signing certificate. EV certificates eliminate the SmartScreen warning entirely and are planned for a future release. In the meantime, you can verify the authenticity of the installer by downloading it exclusively from the official evrBridge page at evrapp.cloud/evrbridge or directly from evrapp.gumroad.com.
The status badge shows "Trial Expired" and I cannot process files
Your 15-day trial has ended. evrBridge will still run, but only one file per run will be processed. To restore full batch processing, go to Help → License Information, purchase a full license at evrapp.gumroad.com, and enter your new key.
Activation fails with "Email does not match the license key"
The email you entered must be the same address you used when purchasing on Gumroad. Check for typos and make sure you are not using an alias or a different email account.
Activation fails with "No internet connection"
evrBridge needs an internet connection to validate your license. Check your network and try again. If you are behind a corporate proxy or firewall, contact your IT administrator to allow outbound HTTPS connections.
"A trial license has already been used on this machine"
Each machine can use one trial license. If your trial has expired, you need to purchase a full license to continue using evrBridge on that machine.
FILES FOUND shows 0
Make sure the selected folder contains files with a supported extension. Hidden files and files starting with a dot are intentionally excluded. Subfolders are scanned automatically.
Some metadata fields are empty in the CSV
Not all cameras embed all metadata fields. For example, older cameras may not record ISO or white balance in a machine-readable format. Fields that cannot be extracted are left blank — this is expected behaviour, not an error.
Processing is very slow
Try reducing the Parallel jobs value (e.g. from 16 to 8). On spinning hard drives, high parallelism can cause disk contention and actually slow things down. Also check that the source drive has enough free space — evrBridge writes a small temporary file for each ExifTool call.
The CSV imports into Resolve but clips do not match
Resolve matches clips by file name. Verify that:
- The clips in your Media Pool have not been renamed.
- You are importing the correct CSV (check the timestamp in the filename).
- The File Name column in the CSV matches the name shown in the Resolve Media Pool exactly.
I need to process files on a macOS machine
evrBridge is a Windows-only application. If you work on macOS, take a look at evrExpanse, which provides the same metadata extraction and DaVinci Resolve CSV export — along with offloading, transcoding and multi-platform delivery — natively on macOS.