evrExpanse User Manual v.3.6.1 - updated October 20, 2023
Table of Contents
- Installation
- How to use
- Metadata Export
- Transcode Master File
- Processing and Results
- Media Files and Camera Specifications
- How to import CSV file in DaVinci Resolve
- How to import in Final Cut Pro
- How to import in Assimilate Scratch
- How to import ALE file in Avid Media Composer
- How to import CSV file in Silverstack
Installation
How to Install evrExpanse
Install evrExpanse. Open the DMG file and drag & drop evrExpanse.app to the Applications folder.

Uninstalling evrExpanse
To uninstall evrExpanse from your system, follow these steps:
- Locate the evrExpanse application in the /Applications folder.
- Drag the evrExpanse.app file to the Trash bin.
- Alternatively, you can right-click on the evrExpanse.app file and select "Move to Trash."
Please note that uninstalling evrExpanse will remove the application from your system while retaining the application preferences.
 Prerequisites
- Python 3
- ASC MHL component
You must have Python 3 and the ASC MHL component installed. While Python 3 will have to be installed manually after downloading it from the official site web page, ASC MHL tool can be downloaded and installed with a simple click if need it (recommended).
Starting from version 3.6.1 of evrExpanse, we are pleased to inform our users that the prerequisite of installing Python 3 and the ASC MHL module is no longer necessary. This release introduces a self-contained application, eliminating the need for external dependencies during the installation process. We have streamlined the installation experience to make it more accessible and user-friendly, ensuring that you can get started with evrExpanse hassle-free. All the powerful functionalities of evrExpanse are fully maintained in this release, and you won't need to compromise on any capabilities or features. Enjoy the enhanced user experience with the simplified installation process.

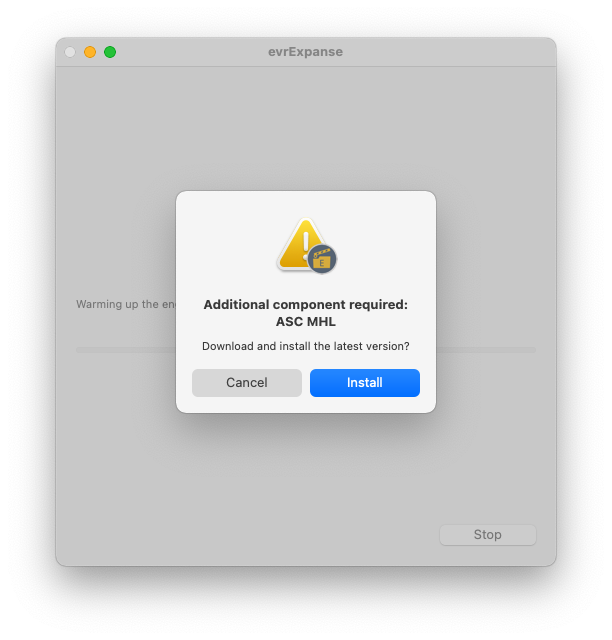
In case you want to proceed with the manual installation, click Cancel button, open Terminal application and run the following command (see also ASC MHL repository):
pip3 install --upgrade ascmhlIf you experience problems installing ASC MHL manually or automatically using the Install button on evrExpanse, you may need to update Python 3. Go to https://www.python.org/downloads/ and install the latest release available. In case you are prompted to install the command line developer tools module, do it by clicking on the Install button. Close and re-open evrExpanse.

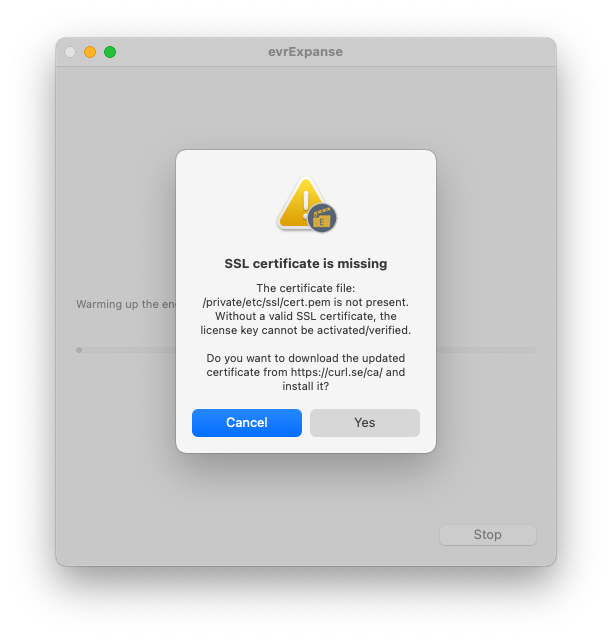
In case the SSL certificate to access the Gumroad server has expired on the host computer it is possible to automatically install the certificate from the repository https://curl.se/docs/caextract.html
Activating the License
Open the evrExpanse application

Upon clicking the Run button, a pop-up window will appear. If you have a paid license key, insert it into the corresponding field and click Activate.

To run the application in Demo mode, simply click on the "Try Out" button without the need to insert any license key.
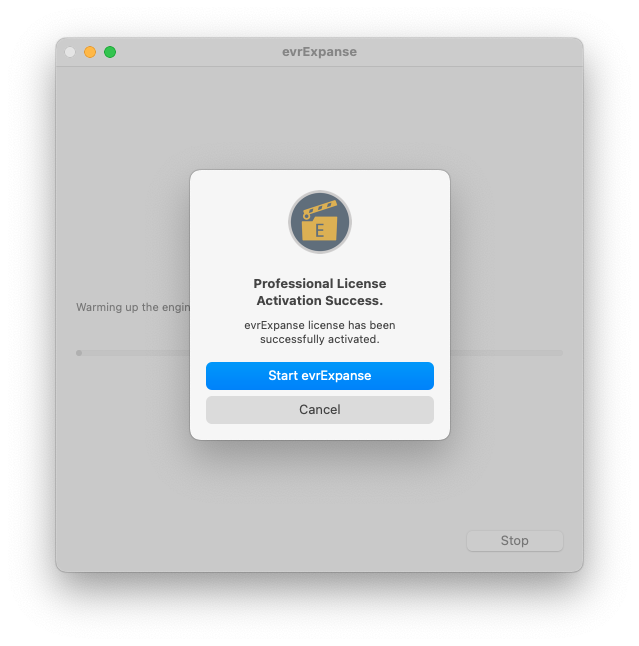
If the inserted license key is validated, a message confirming the successful validation will appear.
Deactivating the License

To deactivate the license, follow these simple steps:
- Open the Preference panel in the application.
- Locate the "Deactivate License" button.
- Click on the "Deactivate License" button.
- A confirmation message will appear, asking if you want to proceed.
- After confirming your decision, a new message will appear, confirming the successful deactivation of the license.

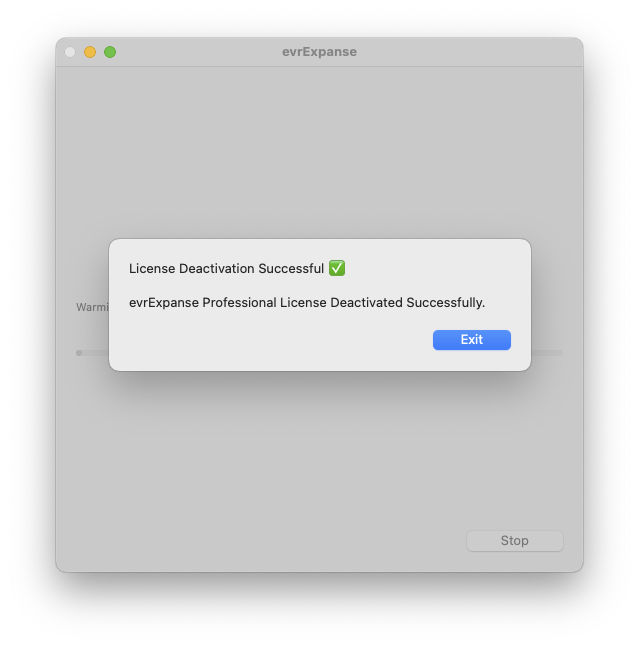
By deactivating the license, you will revert to the default demo license and lose access to any premium features or benefits associated with the licensed version.
How to use
After clicking the Run button the main window will pop up.

evrExpanse provides two primary processes: Export and Transcode
- Metadata Export: This process allows you to extract metadata from various sources, such as different types of cameras, and import it into your preferred NLEs (Non-Linear Editing Systems) like Final Cut Pro®, DaVinci Resolve®, Assimilate SCRATCH®, Avid Media Composer®, and Pomfort Silverstack®. It streamlines your metadata management, enabling a smoother editing workflow.
- Transcode Master Files: With this process, you can transcode multimedia files into intermediate codecs, including ProRes®, DNxHR®, GoPro CineForm®, DPX®, and OpenEXR®. It supports formats such as MOV, MP4, MXF, and GoPro .360. The transcoded files retain the embedded Master file metadata and Finder Tag, ensuring seamless integration and compatibility within your production pipeline.
Combined Process: Transcode Plus©
In addition to the independent functions, evrExpanse offers a combined process called Transcode Plus. With Transcode Plus, you can seamlessly transcode your media files while simultaneously extracting metadata. This comprehensive workflow saves time and effort, ensuring a more efficient media processing experience.
After initiating a process by pressing a button, if any issues, conflicts, or discrepancies arise due to selected options, evrExpanse includes a variety of warning and alert messages to offer crucial information and guidance to users. These notifications play a vital role in helping users make informed decisions, take appropriate actions, and ensure consistency within their workflow.
![]()
Metadata Export
Main GUI
Selected Folder
To select the folder containing the media files that will undergo processing in evrExpanse, you have the convenient option of using drag and drop functionality from the Finder. Simply locate the desired folder in your Finder window, click and hold the folder, then drag it over to the designated area within evrExpanse.
Selected Export Format
Select the export format for the metadata file.
The available options are: Final Cut Pro (FCPXML or FCPXMLD), DaVinci Resolve (CSV), Media Composer (ALE), Silverstack (CSV), evrExpanse (CSV), Sony Real Time Metadata (CSV) and Assimilate SCRATCH integration.
Media Composer ALE Settings
Check the default values of Format, FPS or Bin Name. By default, the value of Bin Name is automatically filled with the name of the selected folder, but can be changed.
Assimilate SCRATCH Integration
By selecting the "Insert the selected files with exported metadata into an existing SCRATCH project" option, you can send an XML file to the SCRATCH Watch folder. This XML file contains references to the media files along with their associated metadata. When the SCRATCH project is loaded, it will automatically load and process the XML file, incorporating the media files and metadata into the project.
Additionally, a copy of the XML file will be saved in a folder within the processed folder. The name of this folder will be the name of the processed folder preceded by "evrE". This allows for easy identification and organization of the XML files associated with the processed media files.
Enabling this option streamlines the integration of exported metadata into an existing SCRATCH project, ensuring that the media files and metadata are seamlessly incorporated for further editing and processing in SCRATCH.

Preferences
Final Cut Pro XML
In the main window, clicking on the "Preferences..." button takes you to the "Metadata Export Settings" section where you can choose the desired Final Cut Pro FCPXML format (FCPXML v 1.9 or FCPXMLD v 1.10).
ASC Media Hash List Integration
Within the same window, you have the option to enable or disable the creation of ASC Media Hash lists. ASC Media Hash lists are checksum files that provide a unique fingerprint for each media file based on its content. These hash lists can be used for various purposes, such as verifying the integrity and authenticity of media files during post-production workflows.
By enabling the creation of ASC Media Hash lists, evrExpanse will generate a separate hash list file for each processed media file. These hash lists can be saved alongside the media files or in a designated folder for easy access and reference.
On the other hand, if you choose to disable the creation of ASC Media Hash lists, evrExpanse will not generate these checksum files during the processing of media files.
The option to activate or deactivate ASC Media Hash list creation provides flexibility and control over the generation of these important checksum files. Depending on your specific workflow and requirements, you can choose to include or exclude ASC Media Hash lists as needed.
Please note that ASC Media Hash lists can be beneficial for ensuring data integrity and verifying file authenticity, especially in collaborative post-production environments where multiple users are working with the same media files.

Preferences: General Settings
Assimilate SCRATCH Integration
In the General Settings section of evrExpanse, you have the ability to modify the SCRATCH Watch folder, which is already pre-configured with the default location. This allows you to specify the folder where evrExpanse will send the media files and their associated metadata for automatic processing within SCRATCH.
Additionally, you can customize the SCRATCH project name, group, and timeline settings. It is crucial to provide a valid and existing SCRATCH project name to ensure the successful completion of the upload to SCRATCH. Therefore, it is important to verify and double-check the accurate name of the project within SCRATCH that you intend to send the media files and their metadata to.
Failure to provide the correct project name can result in incomplete or unsuccessful transfer of the media and metadata to SCRATCH.
By customizing these settings in the General Settings section, you can streamline the integration between evrExpanse and SCRATCH, ensuring a seamless and efficient transfer of media files and their associated metadata for further processing and editing within the SCRATCH environment.
ASC Media Hash List
Within the ASC Media Hash List (MHL) settings of evrExpanse, you have the option to define the Creator's Info and choose the desired hash encoding format. The Creator's Info allows you to provide relevant information about the creator or author of the media files.
In terms of hash encoding formats, you can select from various options such as xxHash (64-bit), the latest XXH3 with 64-bit and 128-bit variants, MD5, SHA1, SHA256, and C4. These hash encoding formats determine the algorithm used to generate the unique identifiers for the media files in the ASC MHL.
By specifying the Creator's Info and selecting the appropriate hash encoding format, you can customize the ASC MHL configuration according to your specific needs and requirements. This ensures accurate and reliable identification of media files using the chosen hash algorithm, facilitating data integrity verification and preservation during the post-production workflow.

When ASC MHL files are created any exceptions are saved in the log file evrExpanse.log in the processed folder.

To initiate the Metadata Export process in evrExpanse, it is essential to meet the minimum requirement of enabling either one of the export formats or the SCRATCH integration. This requirement ensures that the exported metadata is saved in a compatible format or integrated into the SCRATCH workflow seamlessly.
Enabling ASC MHL integration is now a minimum requirement for metadata export in evrExpanse 3.0.1. This means that if you want to create MHL files for a folder, you can simply select the folder and process it without having selected any of the export formats. However, if you want to export metadata in addition to creating MHL files, you will need to select at least one of the export formats or integrations (SCRATCH/ASC MHL) in the main window.
Transcode Master File
Main GUI
Selected Source Folder
To select the Source folder containing the media files you want to transcode in evrExpanse, you have the convenient option of using drag and drop functionality from the Finder. Simply locate the desired Source folder in your Finder window, click and hold the folder, then drag it over to the designated area within evrExpanse.
![]()
Selected Destination Folder
To select the Destination folder containing the media files transcoded by evrExpanse, you have the convenient option of using drag and drop functionality from the Finder. Simply locate the desired Destination folder in your Finder window, click and hold the folder, then drag it over to the designated area within evrExpanse.
Transcoding Mode
Smart
This option will perform smart transcoding consisting of checking the Master video codec and audio format and deciding whether to transcode or pass-thru the stream. If the Master video codec is already an intermediate or mezzanine codec such as ProRes, DNx or CineForm, a pass-thru will be performed instead of re-transcoding. If the source audio codec is PCM (16 bit / 24 bit / 32 bit), then the Master audio stream will be pass-thru. If it is not PCM, a transcoding will be performed at the set value (16 bit / 24 bit / 32 bit).
Audio and video streams are treated independently and they can be transcoded to the desired format or passthrough. Audio streams are mapped 1:1, meaning that the transcoded files will have the same number of audio channels as the master ones.
From tests performed with Smart Transcode enabled, the whole process is up to 7x faster (2x to 7x depending on the codec profile and storage speed) on media already encoded in ProRes / DNxHR / CineForm.

Manual
The Manual mode is the classic transcoding with audio and video streams transcoded at the selected settings.
Passthrough
The Passthrough transcoding option enables 100% quality pass-through of Master audio and video streams, embedding metadata in native format and in XMP format (supported by Adobe Premiere Pro). In this mode the output container is set to quicktime except for MP4 input files which is maintained as MP4 for codec compatibility.
Although one of the peculiarities of evrExpanse is to embed the metadata of the Master files in the transcoded copies, there is an option for those times you want to speed up the transcoding: Bypass embedding of the Master file metadata.
Note that by enabling this option the transcoded file does not have all the metadata of the master file.
Transcode A/V Settings
Video Codec:
Select the ProRes / DNxHR / CineForm / DPX / EXR profiles of your choice. Available profile are those specified in the Apple ProRes white paper and in the Avid DNxHR specification.
- Apple ProRes
Codec type: hardware accelerated (CPU+GPU)
Pixel format:- YUV 4:2:2 - 10-bit (ProRes 422 Proxy, ProRes 422 LT, ProRes 422, ProRes 422 HQ)
- YUV 4:4:4:4 - 10-bit (ProRes 4444, ProRes 4444 XQ) with support for alpha channel
- Avid DNxHR
Codec type: software accelerated (CPU)
Pixel format:- YUV 4:2:2 - 8-bit (DNxHR LB, DNxHR SQ, DNxHR HQ)
- YUV 4:2:2 - 10-bit (DNxHR HQX), YUV 4:4:4 - 10-bit (DNxHR 444)
- GoPro CineForm:
Codec type: software accelerated (CPU)
Pixel format:- YUV 4:2:2 - 10-bit (low, medium, high, film1, film2, film3+ )
- RGB 4:4:4 - 12-bit (RGB 444)
- DPX:
Codec type: software accelerated (CPU)
Pixel format:- RGB 10/12/16 bit per channel
- RGBA 8 bit per channel
- EXR:
Codec type: software accelerated (CPU)
Compression: Uncompressed/Zip1/RLE
Pixel format:- RGB half/float (16/32 bit)
- RGBA half/float (16/32 bit)
Audio Codec
Available audio formats are: PCM 16/24/32 bit. When DPX or EXR codec is selected, the audio tracks of the master file (if any) will be transcoded/exported into a separate WAV file from the DPX/EXR file sequence. Each audio track can be mono/stereo/multichannel depending on how the audio tracks are formatted in the master file.
GoPro .360 resolution
Available video resolution are: 4K (4096x2048), 5.6K (5376x2688). This option is designed to select the preferred Equirectangular resolution of the exported 360 video if any raw GoPro .360 video is processed.
everExpanse can also process the GoPro 360 proprietary file format which uses a 360-degree video projection type (Equi-Angular Cubemap projection or EAC) not directly compatible with the type of projection (Equirectangular) supported by streaming platforms or video editing applications. evrExpanse is able to converts these raw .360 files to equirectangular projection video and transcodes them to intermediate codecs embedding the master file EXIF metadata for uploading to YouTube or 360 editors, such as DaVinci Resolve, Adobe Premiere Pro, or Final Cut Pro.
Destination File Name
Within this field, you can personalize the name of the transcoded files by appending additional text to the end of the original file name (if desired). For instance, if the source file name is "A005C039_201101OZ.mov" and you choose to add the text "CamA", the resulting file name will follow this format:
If the "Preserve Source File Name" option is disabled:
[SourceFileName]_evrE_[CodecName_CodecProfile]_YourText.mov (for example, A005C039_201101OZ_evrE_DNxHR_CamA.mov).If the "Preserve Source File Name" option is enabled:
[SourceFileName]_YourText.mov (for example, A005C039_201101OZ_CamA.mov).This feature allows you to easily differentiate and identify the transcoded files based on your specific requirements or preferences. By adding your desired text at the end of the file name, you can provide additional information or context related to the transcoded files.
Preferences
Disable Source File Metadata Embedding in Destination File
This option allows you to control whether the metadata from the source file is included in the destination file during the transcoding process.
When this option is checked, the metadata from the source file will not be copied over to the destination file. This means that the destination file will only contain the metadata specific to the transcoding process.
On the other hand, if this option is unchecked, the metadata from the source file will be preserved and embedded in the destination file. This ensures that the destination file retains all the metadata from the original source file, in addition to any new metadata generated during the transcoding process.
By choosing to check or uncheck this option, you have control over how metadata is handled during the transcoding process. Unchecking this option can result in a slightly faster transcoding process, allowing you to customize the metadata integration based on your specific needs.
YUV Format Preservation in Smart Mode
This option provides you with control over the transcoding process when using the Smart Mode feature. When this option is enabled, evrExpanse will analyze the input file and if it detects that the file is already in the YUV format, it will bypass the transcoding process and directly copy the video stream to the destination files.
By selecting this option, you can save time and resources by avoiding unnecessary transcoding of files that are already in the YUV format. This can be particularly useful when working with files that are already optimized for your intended output, ensuring that the quality and characteristics of the original file are preserved.
Enabling this option ensures that evrExpanse intelligently handles files in the YUV format, providing a more efficient and streamlined workflow for your transcoding needs.
Maintain Final Cut Pro Compatibility in Smart Mode
When this option is enabled and the selected transcoding mode is Smart, it allows you to enable the transcoding of CineForm and DNx codecs if they are detected in the source file. This option is specifically designed to be compatible with Final Cut Pro, as FCP does not support media with CineForm or DNx codecs. By checking this option, you ensure that only ProRes profiles are selected as the codec for transcoding, ensuring seamless compatibility with Final Cut Pro. This feature simplifies the transcoding process and ensures that your media files are ready for smooth import and editing in Final Cut Pro without any codec-related issues.
Rotate Transcoded Files According to Source Metadata.
Once enabled, evrExpanse will automatically apply the necessary rotation to the transcoded files based on the metadata retrieved from the source. This ensures that the orientation is preserved accurately. Please note that this new feature is available exclusively in version 3.2.4 or later. To update to the latest version, click on "evrExpanse" in the main menu and select "Check for Updates..".
The Rotate Transcoded Files (Auto-Rotation) feature is applicable only when a transcoding process occurs in Manual mode or Smart mode. If Passthru mode is selected or if transcoding is not performed in Smart or Manual mode, the feature will not be applied. It specifically relies on the transcoding process to retrieve the necessary metadata and apply the appropriate rotation to the transcoded files.
![]()
![]()
Preserve Source File Name in Transcoded File
This option in evrExpanse 3 provides you with the ability to maintain the original source file name for your transcoded files. This feature ensures that the transcoded files carry the same name as the source files, making it easier for you to identify and organize your media assets.
When enabled, evrExpanse 3 will retain the original file name of the source file during the transcoding process. This means that if your source file is named "example_video.mp4", the resulting transcoded file will also be named "example_video.mov". By preserving the file name, you can effortlessly associate the transcoded file with its corresponding source file.
When disabled, evrExpanse 3 will rename the transcoded files using the default naming [SourceFileName]evrE[CodecName_CodecProfile]
Please note that this option is designed to maintain file name consistency for transcoded files. If you require a different naming convention or customization, you can explore additional options within evrExpanse 3's settings.
ASC Media Hash List Integration
In the Transcode Master Settings, you have the option to enable or disable the creation of ASC Media Hash lists. These hash lists provide a unique fingerprint for each media file based on its content and can be used for various purposes, such as verifying file integrity and authenticity during post-production workflows.
Enabling the creation of ASC Media Hash lists in evrExpanse results in a separate hash list file being generated for each processed media file. These hash lists can be saved alongside the media files or in a specific folder for easy access and reference.
On the other hand, disabling the creation of ASC Media Hash lists means that evrExpanse will not generate these checksum files during the media file processing.
The option to activate or deactivate ASC Media Hash list creation gives you flexibility and control over the generation of these important checksum files. Depending on your workflow and specific needs, you can choose to include or exclude ASC Media Hash lists accordingly.
Please note that ASC Media Hash lists can be beneficial for ensuring data integrity and verifying file authenticity, especially in collaborative post-production environments where multiple users are working with the same media files.
Transcoding A/V Settings
CPU Load
This option is designed to balance the load on CPU threads to leave room for other processes to run during the transcoding process.
Hardware-accelerated codecs are less affected by this option as the transcoding process relies on the balance between CPU and GPU.
Available audio formats are: Auto (full), High, Medium, Low
evrExpanse is a multi-threaded application and the selected CPU load profiles will help to balance the workload for your needs. On Auto (full), evrExpanse will decide the best CPU load balancing which can go up to 100%. The other options will force to use the selected CPU load.
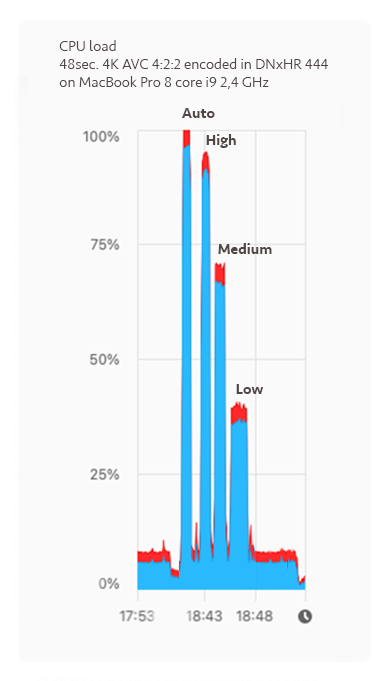
From the tests performed, the best performance is achieved with Auto or High profiles on systems up to 8 cores. On systems with a higher number of CPU cores it is better to try less extreme profiles such as High or Medium. However, you must also take into account the dissipation capacity of your Mac as the CPU performance is heavily affected by overheating (Thermal Throttling).
The Preferences buttons
In the preferences panel there are three buttons (from left to right): Deactivate Licence, User Manual and Return to Main Window
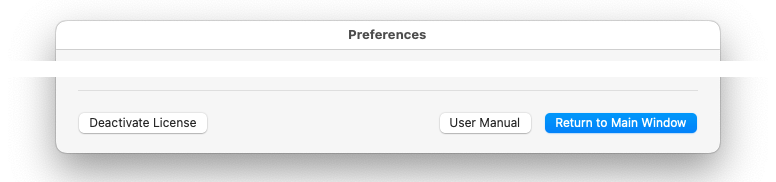
Deactivate Licence
User Manual
In order to ensure a smooth user experience, we recognize the significance of comprehensive documentation. To facilitate easy access to information and guidance, we have introduced a User Manual Button in the Preference panel. This convenient addition allows you to explore our detailed User Manual (this) with just a single click.
Return to Main Window
When clicked, it seamlessly guides the user back to the main interface or primary window of evrExpanse, ensuring easy access to essential features and functions. Additionally, this button has an added functionality of automatically saving any selected preferences or settings made by the user. This ensures that your customized preferences are retained and applied when returning to the main window, saving you time and effort.
Processing and Results
Transcode and Export Workflow
evrExpanse offers two primary processes: Export and Transcode, which can be utilized independently based on your requirements. Additionally, there is an integrated process called Transcode Plus, which combines the Transcode and Export Metadata tasks into a single streamlined workflow.
Using Transcode and Export Processes
You have the flexibility to choose between using Transcode and Export Metadata processes individually or sequentially, depending on your workflow. Here are two examples:
Metadata Export
If your objective is to export the metadata of the Master files for importing into NLEs, you can use the Metadata Export process. This will generate metadata files compatible with your chosen NLE software, facilitating seamless integration and efficient editing.
Transcode and Metadata Integration
In some cases, it may be necessary to transcode the Master files to an intermediate codec before importing them into NLEs, while also ensuring the metadata integration. In such scenarios, you can follow these steps:
- Perform the Master Files Transcoding process: This involves transcoding the Master files to the desired intermediate codec, optimizing them for editing within your NLE software. Configure the transcoding settings to meet your specific requirements.
- Perform the Export Metadata process: After the transcoding is complete, use the Export Metadata process on the transcoded files. This ensures that the transcoded files retain the metadata inherited from the original Master files, enabling seamless integration with your NLE software.
Transcode Plus: Automating the Workflow
If you wish to combine the Transcode and Export Metadata tasks within a single workflow, you can easily do so by clicking on Transcode Plus. This feature allows you to transcode files while simultaneously extracting metadata from the transcoded files in a sequential manner. Before applying Transcode Plus, ensure that you have selected all the necessary settings for both transcoding and metadata export to achieve the desired outcome. Note that the selected files folder for metadata export corresponds to the destination folder chosen in Transcode settings.
Results
During each process a progress bar will be displayed.

If you need to stop the batch process, click the Stop button. When clicking the End button in the following warning message, wait for the current file to be processed. It is strongly recommended to wait for the process to shut down properly, usually a few seconds.

When the process is finished, the exported/transcoded files will be available inside the selected folder.

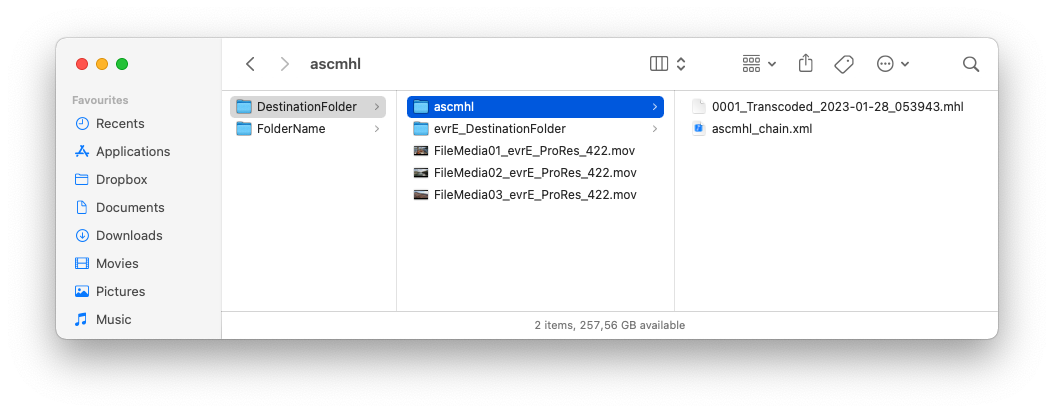
After the process is finished, both for the Export Metadata and for the Transcode Master File, a folder is created inside the processed folder with the name evrE_FolderName.
In this folder you will find the metadata exported in the chosen formats and ready to be processed by the respective NLEs.
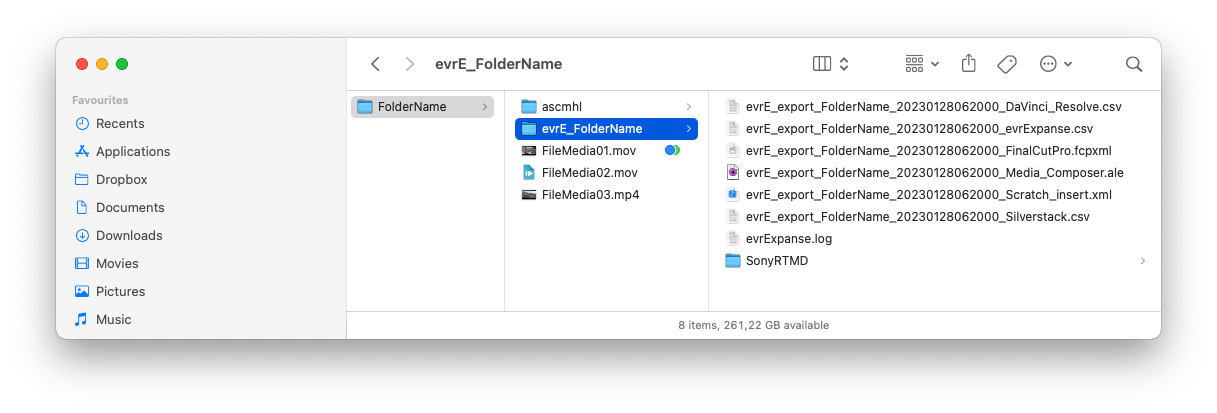
or you will find the files transcoded in the format and with the chosen options.
![]()
and for both processes, if required, you will find an ascmhl folder, with the MHL files inside.
Also a log file (evrExpanse.log) will be saved.
![]()
Warnings and Alerts
evrExpanse incorporates a range of warning and alert messages to assist users in achieving consistent output from each process. These notifications serve as valuable indicators, providing guidance and necessary actions to ensure optimal results throughout the workflow.
evrExpanse utilizes warning messages to notify users about potential issues or concerns that may affect the output or require attention. These warnings serve as reminders or suggestions to help users avoid common pitfalls or optimize their workflow.
On the other hand, alert messages in evrExpanse indicate critical issues or errors that require immediate attention. These alerts signify situations that may disrupt the process or compromise the desired outcome. Addressing these alerts promptly is essential to ensure smooth operation and achieve the desired results.
Metadata Export Alerts❗
⚠️ Metadata Export folder not selected
This alert message indicates that the user has not selected the source folder containing the media files for which the metadata should be exported. In order to export metadata, it is necessary to specify the folder where the media files are located. This alert serves as a reminder to the user to select the appropriate source folder so that the metadata export process can be performed accurately.
⛔ SCRATCH Project name is empty
This alert message indicates that the user has not entered a name for the SCRATCH project. In order to export metadata or perform other operations related to SCRATCH integration, it is necessary to provide a valid project name. This alert serves as a reminder to the user to enter a project name to ensure that the metadata export or other actions can be executed successfully within the specified SCRATCH project.
⚠️ Export format or integrations not selected
This alert message indicates that the user has not specified the desired export format or chosen any integrations for the metadata export process. When exporting metadata, it is necessary to select the appropriate export format and any desired integrations to ensure that the exported metadata is compatible with the intended workflow or application.
⛔ SCRATCH Whatch folder not found
This alert message indicates that the specified watch folder for SCRATCH, which is the designated folder where SCRATCH expects to find XML file to process, cannot be located. The watch folder is a crucial component for seamless integration between evrExpanse and SCRATCH.
⚠️ Compatible media not found in selected folder
This alert message indicates that there are no suitable media files in the selected folder for processing in evrExpanse. Specifically, it refers to the absence of media files with the extensions .MOV, .MP4, or *.MXF, which are the supported file formats for processing in evrExpanse.
Transcode Warnings ⚠️
⚠️ Transcoding to Master Folder
This warning message is displayed as a precautionary measure when selecting the option to transcode files to the Master folder. It serves as a reminder to the user to confirm their intention to perform the transcoding process directly in the Master folder.
⚠️ Detected already transcoded file in Master folder
This warning message appears when evrExpanse detects the presence of a file in the Master folder that has already been transcoded. It serves as a cautionary notification to the user, asking them to confirm whether they want to proceed with the transcoding process despite the existence of the previously transcoded file.
Transcode Alerts❗
⚠️ Source files folder not selected
This alert message indicates that the user has not selected a valid and existing folder as the source for the media files to be processed.
When this alert appears, it means that the user has not specified the folder containing the media files that need to be processed by evrExpanse. The source folder is where evrExpanse will look for the original media files on which transcoding will be performed.
⚠️ Destination files folder not selected
This alert message indicates that the user has not chosen a valid and existing folder as the destination for the processed files.
When this alert appears, it means that the user has not specified the folder where evrExpanse should save the transcoded media files. The destination folder is where the output files will be stored after the processing is complete.
⚠️ Compatible media not found in selected folder
This alert message indicates that there are no suitable media files in the selected folder for processing in evrExpanse. Specifically, it refers to the absence of media files with the extensions .MOV, .MP4, or *.MXF, which are the supported file formats for processing in evrExpanse.
⚠️ Final Cut Pro compatibility in Smart Mode requires ProRes
This alert message indicates that the selected transcoding option, which aims to maintain compatibility with Final Cut Pro when using the Smart Mode feature, requires the use of the ProRes codec.
Transcode Plus Alerts❗
⚠️ Sony Real Time Metadata Export not supported
This alert indicates that the real-time metadata export feature for Sony cameras is not supported in the Plus transcoding process. Sony cameras often provide additional metadata that can be useful for post-production workflows. However, in this case, the system does not support exporting this real-time metadata during the transcoding process.
⚠️ Transcoding to DPX or EXR is not supported
This alert informs the user that using Transcode Plus process to the DPX or EXR file formats is not currently supported. DPX and EXR are high-quality image formats commonly used in professional visual effects and compositing workflows. If the user attempts to use Transcode Plus process to these formats, they will receive this alert indicating that it is not possible.
⚠️ Source File Metadata Embedding Disabled
This alert message notifies the user that the option to embed the metadata from the source file into the transcoded files is currently disabled when using the Transcode Plus feature.
Transcode Plus combines the transcoding and metadata export processes into a single workflow. However, if the source file metadata embedding option is disabled, it means that the metadata from the source file will not be preserved or included in the transcoded files during the Transcode Plus process.
The alert is necessary to inform the user that disabling the source file metadata embedding option during the Transcode Plus process does not make sense. If the intention is to solely transcode the files without exporting metadata from the transcoded files, it is recommended to use the regular Transcode process instead.
Media Files and Camera Specifications
evrExpanse supports a wide range of media file types including MOV, MP4, and MXF formats. Additionally, it is compatible with various camera models from popular manufacturers such as Panasonic, Nikon, Sony Alpha, Fujifilm, Canon, Sony XDCAM*, Z Cam, Kinefinity**, Atomos (Ninja & Inferno), McPRO24fps, GoPro, FiLMIC PRO, Apple iPhone, and ARRI.
While the Export Metadata feature is specifically tailored to the cameras mentioned above, the Transcoding functionality is available for all supported file types, including MOV, MP4, and MXF.
For an up-to-date and comprehensive list of cameras supported by evrExpanse, please refer to our Camera Compatibility Tables.
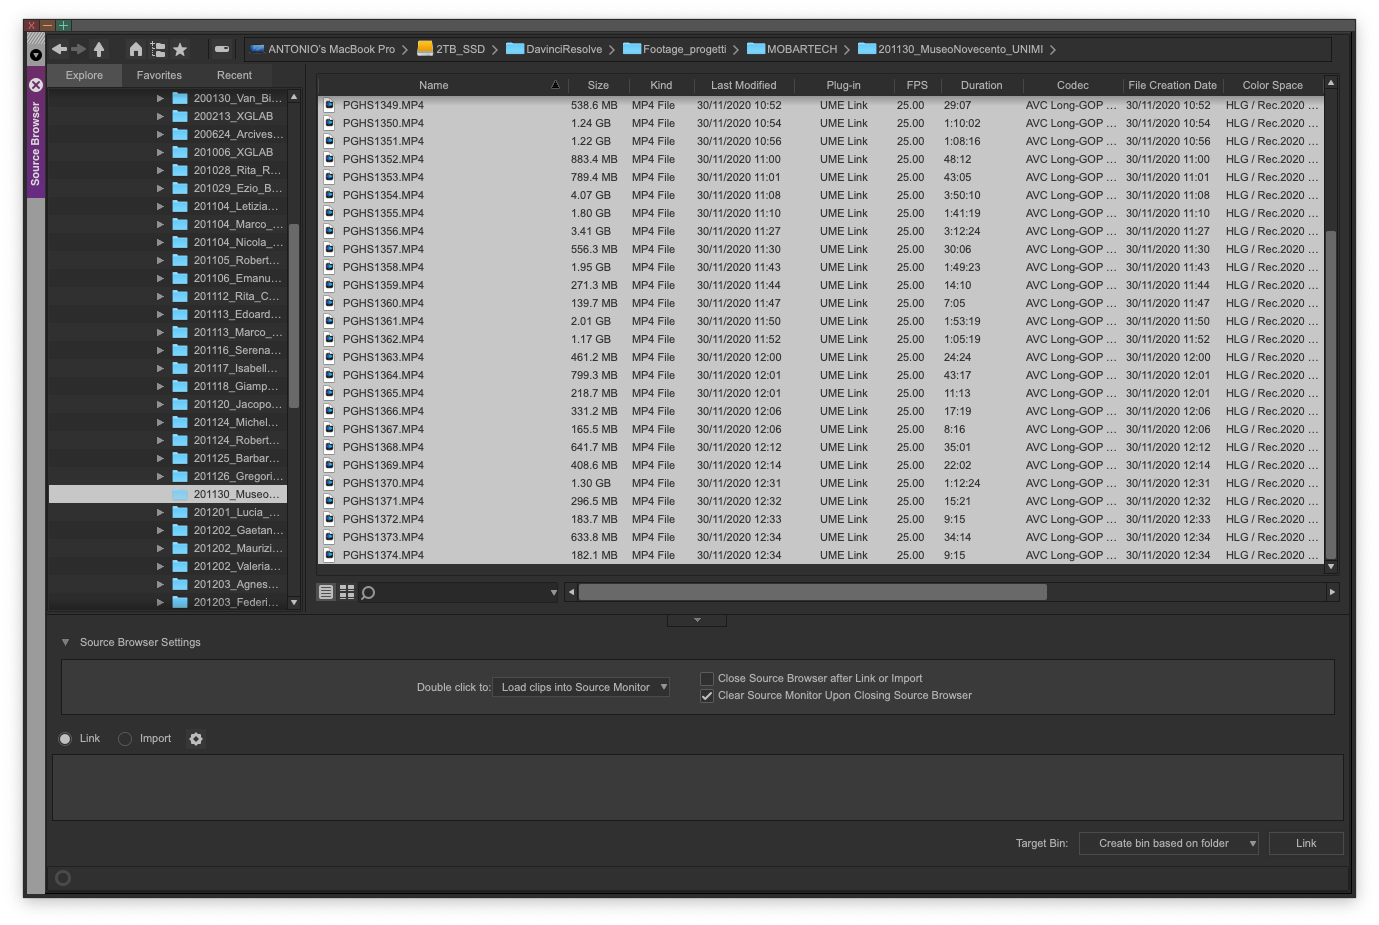
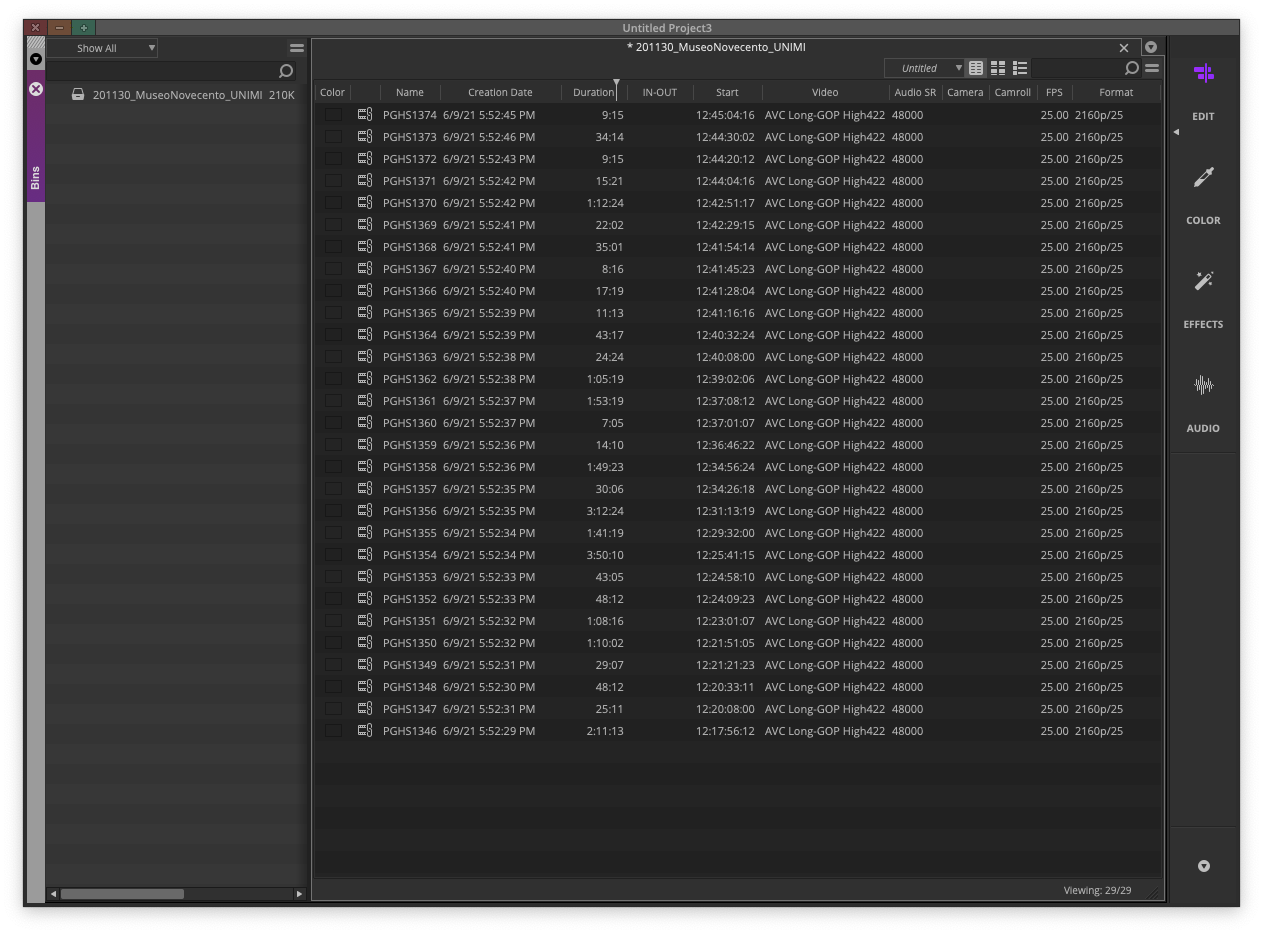
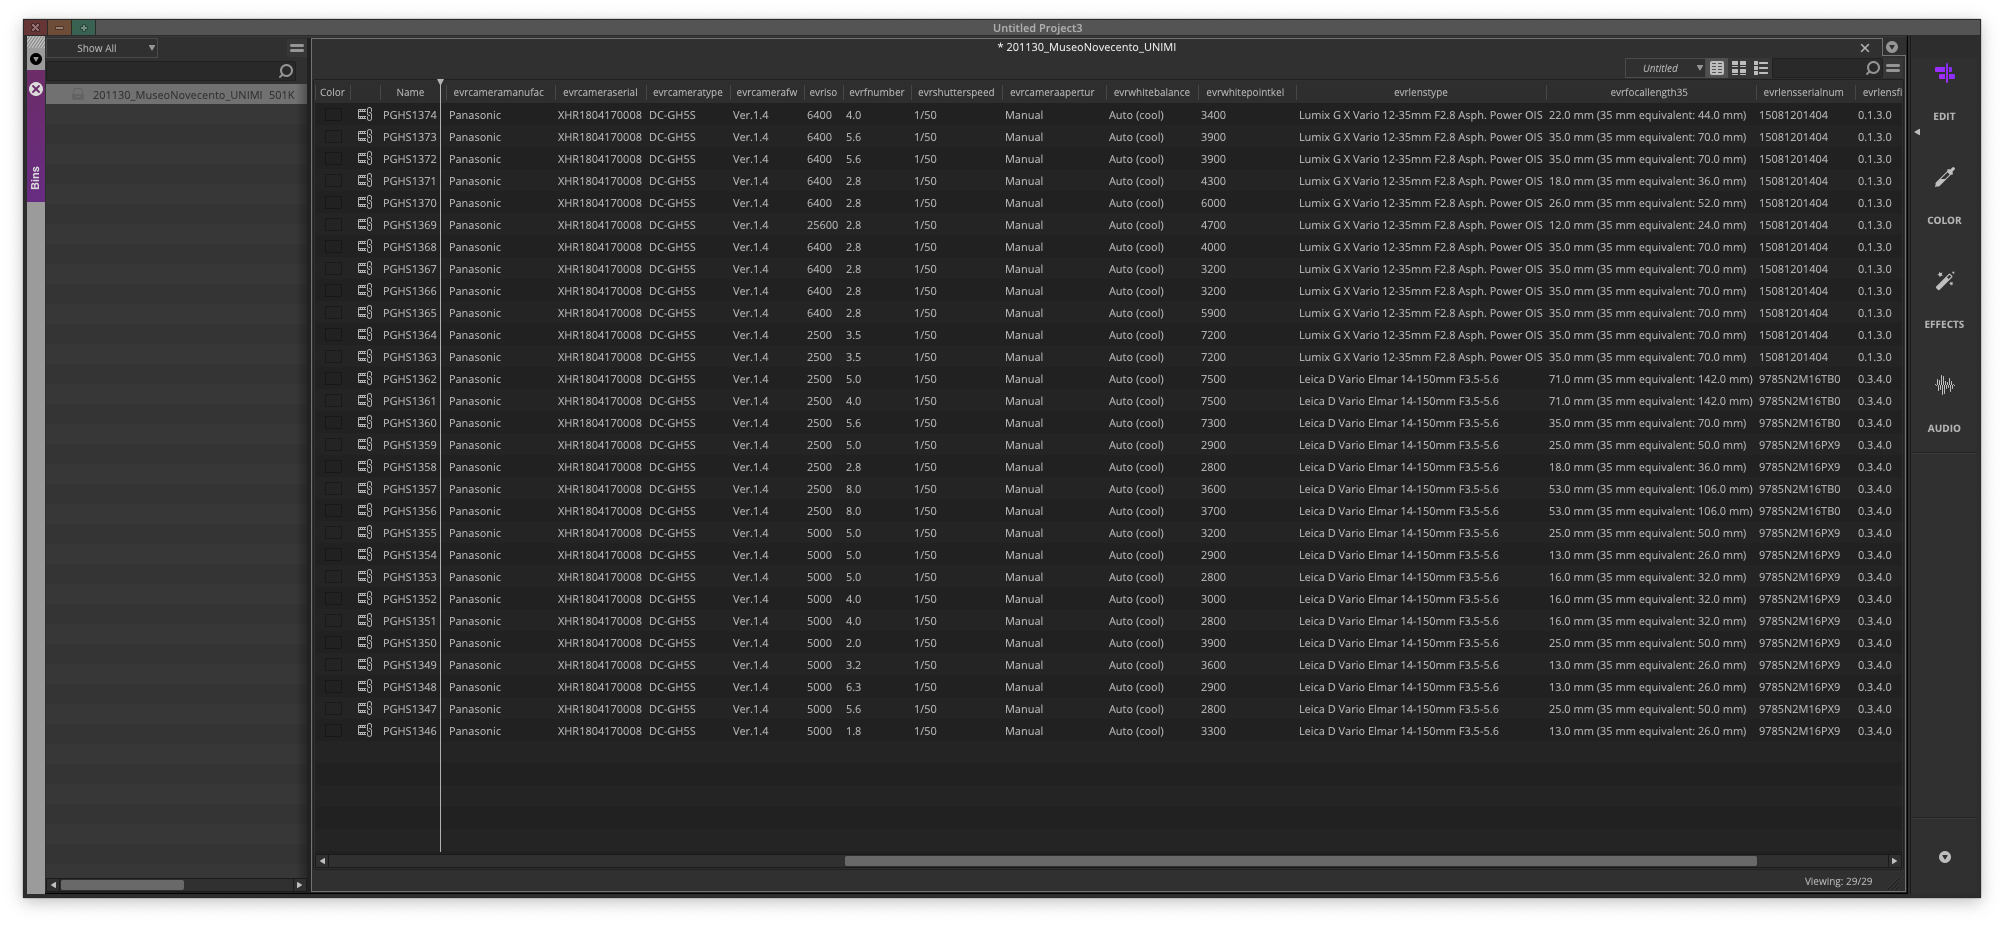
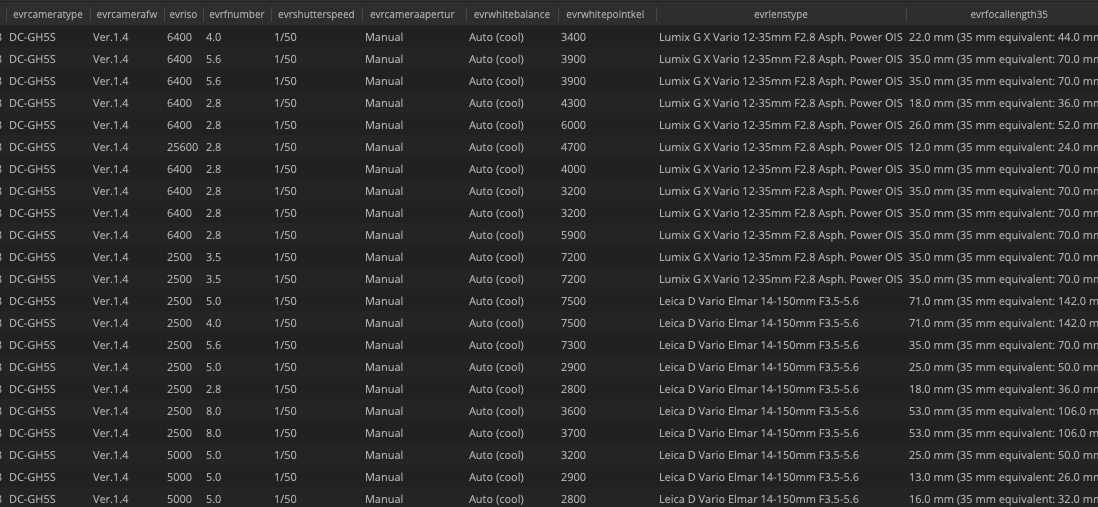
How to import CSV file in DaVinci Resolve
To import a CSV file containing metadata into DaVinci Resolve, follow these steps:
Open a project in DaVinci Resolve, which should already have clips that you want to populate with imported metadata. Make sure the Media Pool is selected (indicated by a red line).
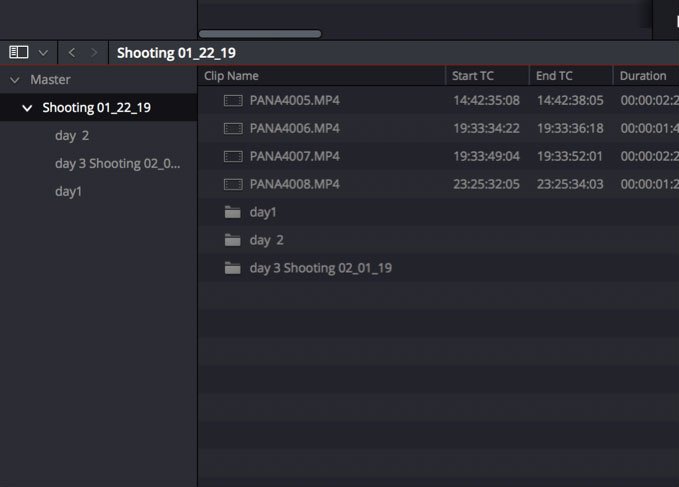
Choose File > Import Metadata To > Media Pool... to import metadata to potentially every clip in the Media Pool, or choose File > Import Metadata To > Selected Clips... to only import metadata to clips you selected.
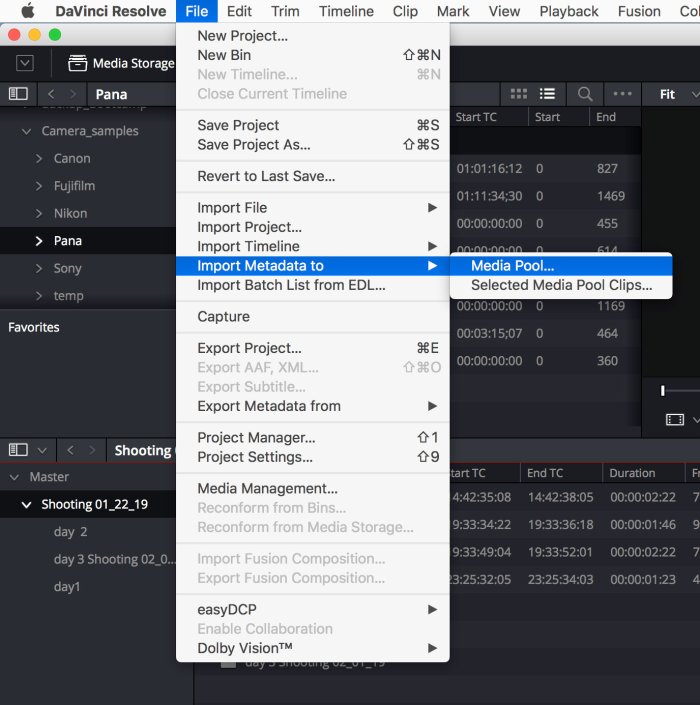
When the Import Metadata dialog appears, choose the metadata CSV file generated by evrExpanse, and click Open.
When the Metadata Import dialog appears, by default, DaVinci Resolve tries to use “Match using filename” and “Match using clip start and end Timecode” to match each line of metadata in the CSV file with a clip in the Media Pool, but because "clip start and end Timecode" are not present in imported metadata you have to uncheck “Match using clip start and end Timecode” and (optionally) check “Match using source file paths".
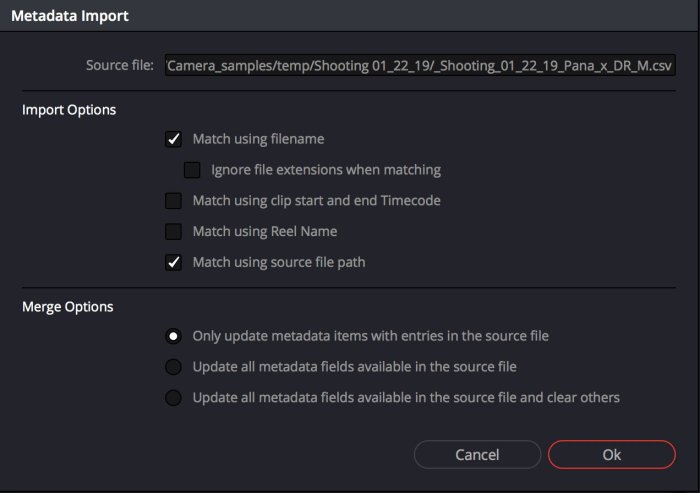
Next, choose which Merge Option you want to use in the Metadata Import dialog.
There are three options:
- Only update metadata items with entries in the source file (recommended).
The default setting. Only updates a clip’s metadata if there’s a valid entry in the imported CSV file. Other clip metadata fields are left as they were before the import. - Update all metadata fields available in the source file: For each clip that corresponds to a line of metadata in the imported CSV file, every single metadata field referenced by the CSV file is overwritten, regardless of whether or not there’s a valid entry for that field.
- Update all metadata fields available in the source file and clear others: For each clip that corresponds to a line of metadata in the imported CSV file, every single metadata field referenced by the CSV file is overwritten, regardless of whether or not there’s a valid entry for that field.
Furthermore, metadata fields that aren’t referenced by the imported CSV file are cleared of
When you’re finished choosing options, click OK and all available metadata from the source CSV file will be imported.
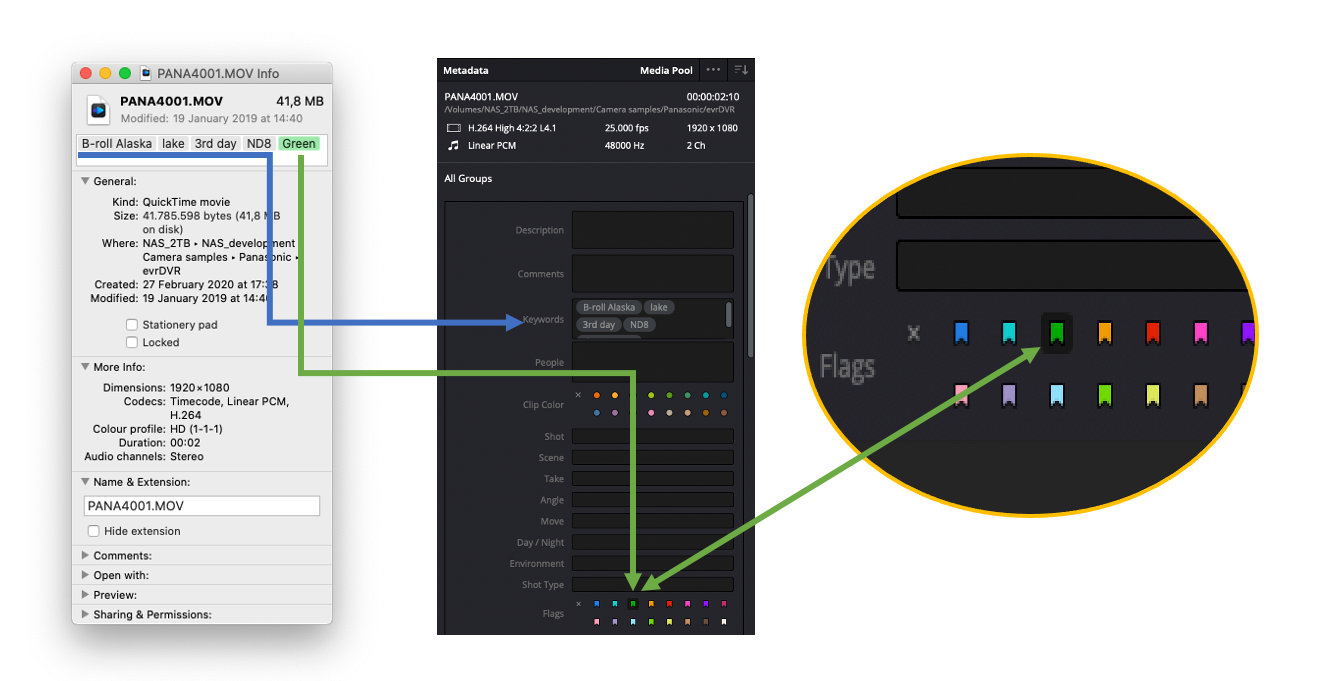
When media files are tagged using the macOS Finder Tag, the associated information will be displayed in the Keyword window and the Flags section within DaVinci Resolve.
This integration allows for seamless transfer of tags from the macOS Finder to DaVinci Resolve, providing easy access to the tagged information. In the Keyword window, you can view and manage the tags applied to the media files, enabling efficient organization and categorization of your assets. Additionally, in the Flags section, you can quickly identify flagged files based on the tags assigned to them.
How to import in Final Cut Pro
Importing media and its metadata into Final Cut Pro with FCPXML is pretty easy and straight forward. Just double-click on the exported file (.FCPXML or .FCPXMLD) and Final Cut Pro will automatically start and ask which library to import the files into.
Alternatively you can import the FCPXML file from the application itself.

When you select media from the browser, you will see the metadata in the information inspector. All metadata will be bundled into a new Metadata View called evrExpanse.
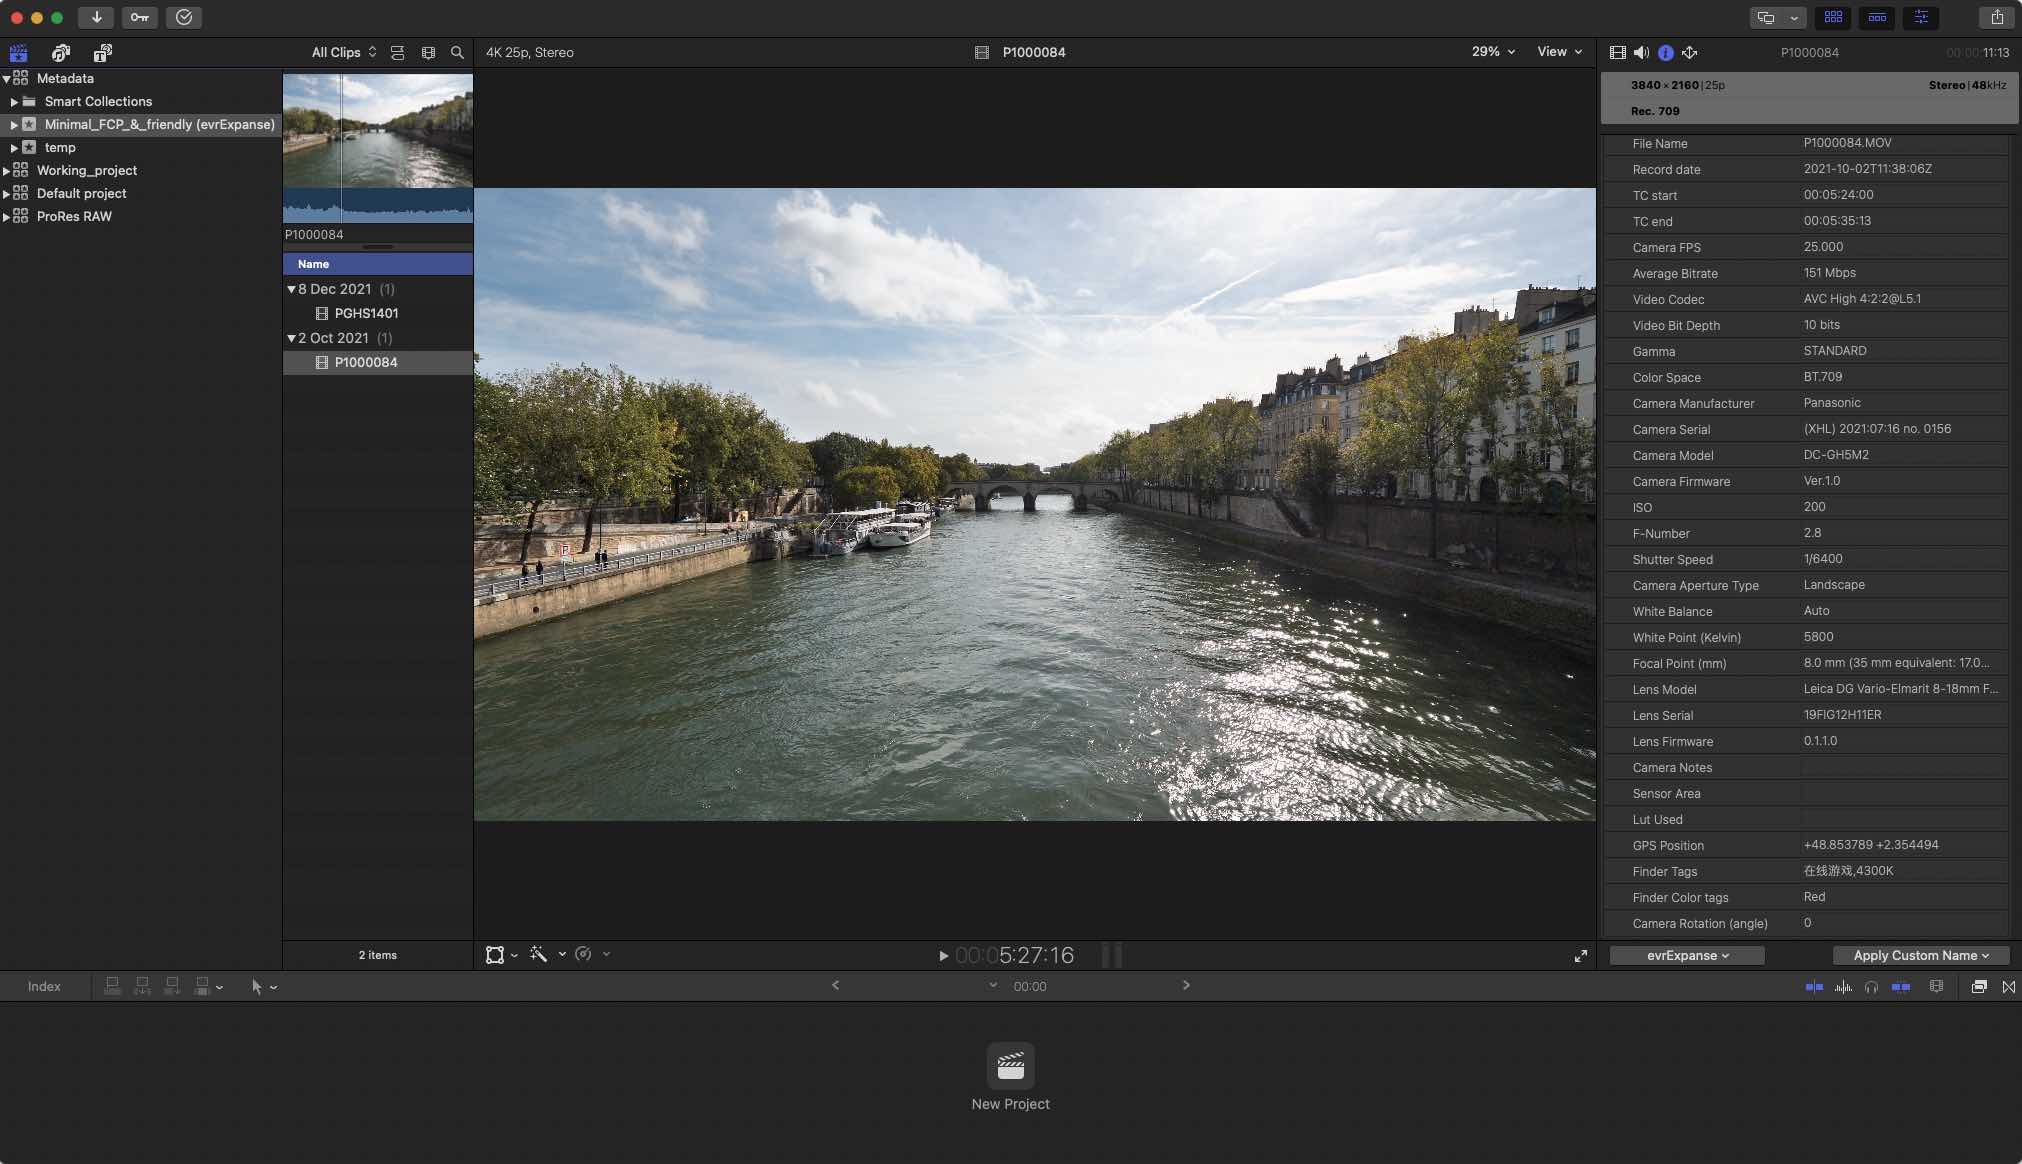
All media files already present in an FCP event and/or in a timeline, inherit the imported metadata of the corresponding processed files.
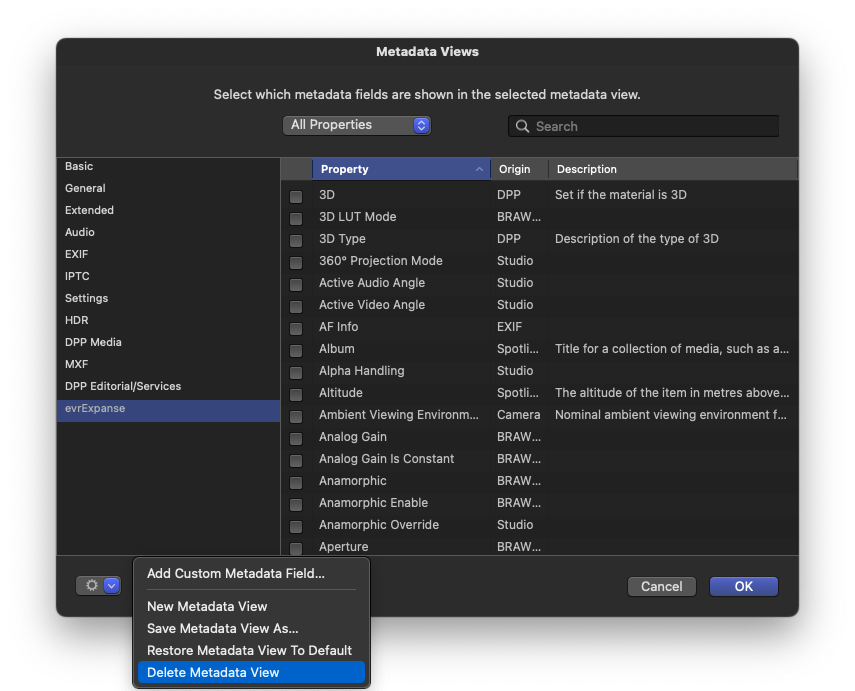
If you open the Metadata Views window by selecting "evrApp Properties" you will be able to add the imported metadata to your liking in any existing view.
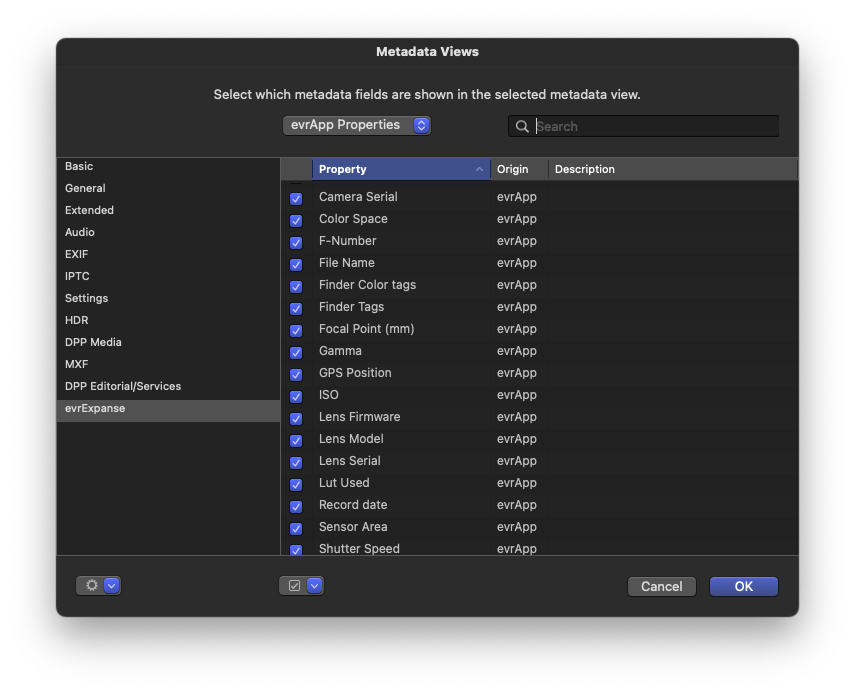
When a new update of evrExpanse introduces newly handled metadata that is exposed to Final Cut Pro, it is important to update the evrExpanse's Metadata View in order to view this metadata in the Inspector Info. To ensure the updated Metadata View is applied in Final Cut Pro, please follow these steps:
- Select the current Metadata View in Final Cut Pro and delete it.
- Close Final Cut Pro.
- Open evrExpanse and simply click the Run button.
- Open Final Cut Pro again.
By following these steps, the latest Metadata View, including the newly handled metadata, will be automatically loaded in Final Cut Pro. This ensures that you can access and view the updated metadata information within the Inspector Info panel. It is recommended to stay up-to-date with evrExpanse's press releases to be aware of any new updates and enhancements related to metadata handling.
How to import in Assimilate Scratch
The import of multimedia files and related metadata in Assimilate SCRATCH is even simpler and more direct than in Final Cut Pro. In this case the integration is direct: once the export process is finished, the XML file, generated by evrExpanse, is stored in the SCRATCH Watch folder which will load it as soon as the application is started and the relative project is opened.
Make sure the project name to SCRATCH is set correctly in the evrExpanse settings and you're done! SCRATCH history populated with processed media and corresponding metadata displayed in the right panel.
A copy of the XML file is also saved in the processed files folder (evrE_FolderName) in case the XML file needs to be uploaded to another workstation.
After SCRATCH processes the XML file in the watch folder, it will write a log to the Scratch_insertlogFolderName.log file located inside the processed folder evrE_FolderName
How to import ALE file in Avid Media Composer
After having created the .ale file in evrExpanse, go to the Avid Media Composer and import the clips if not done so far. They should thereon be available as master clips.
Select the bin in the Avid Media Composer which contains the relevant clips.
Select those clips and choose “Input > Import Media…” from the context menu in the bin.
Open the “Options”, then click on “Options…” navigate to the Shot Log tab and select
“Merge events with known master clips”.
Navigate to the ALE file you created before and click “Open”.
Avid Media Composer now matches master clips and metadata information from the .ale file according to their TimeCode, Bin Name and Name of clip.
The information from the .ale file is attached within additional columns in the bin table. Some of the columns are already known by the Avid Media Composer, all unknown information will be added as custom columns.
If you cannot see any custom columns, perform the following steps:
- Close and re-open the bin
- Right-click in the free space of the bin window and click on “Choose columns…” in the context menu.
- Then select and unselect columns, the custom columns from the imported .ale file you will find at the end of the list.
How to import CSV file in Silverstack
After having created the .csv file in evrExpanse, go to the Silverstack Composer and import the clips if not done so far.
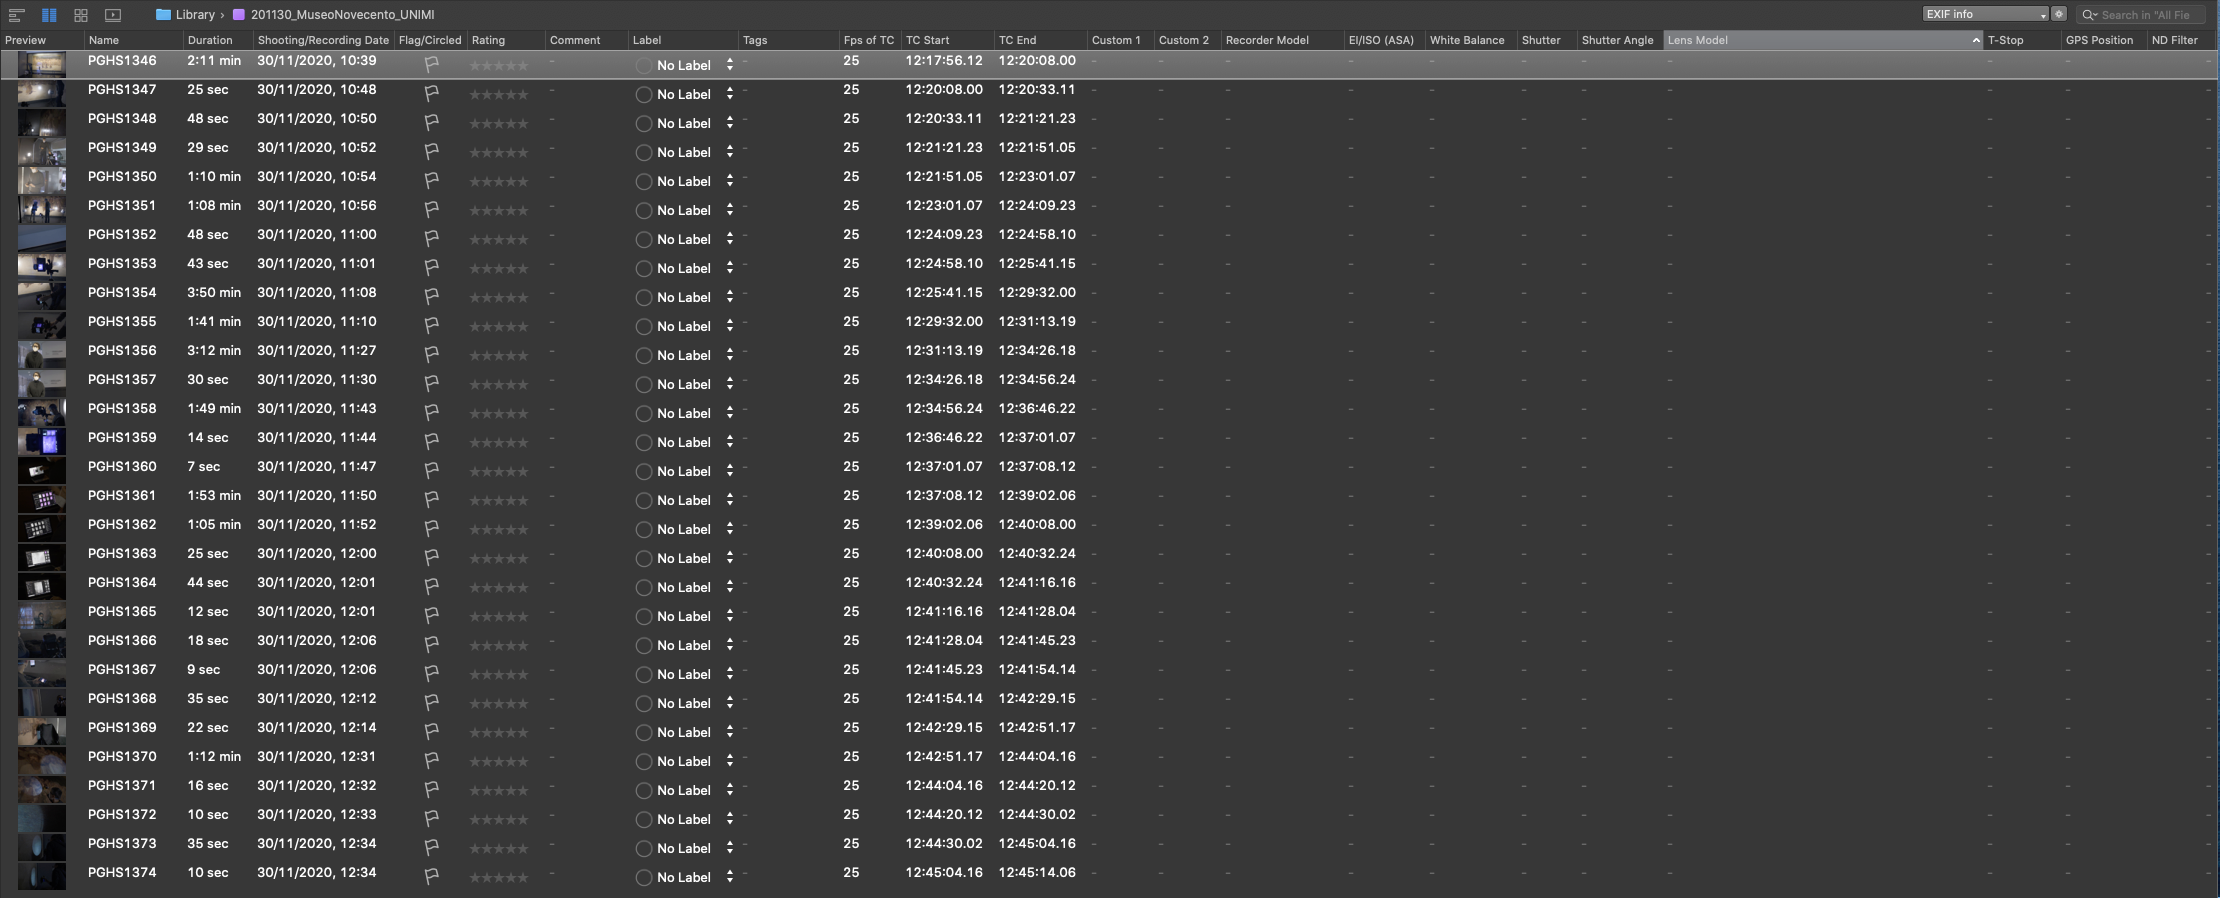
To be able to import metadata evrExpanse will use the Drylab CSV import feature in Silverstack.
Select the folder or bin in the library of Silverstack that you want to import metadata for.
Then, in the “Import” menu button in the toolbar select the option Drylab CSV:
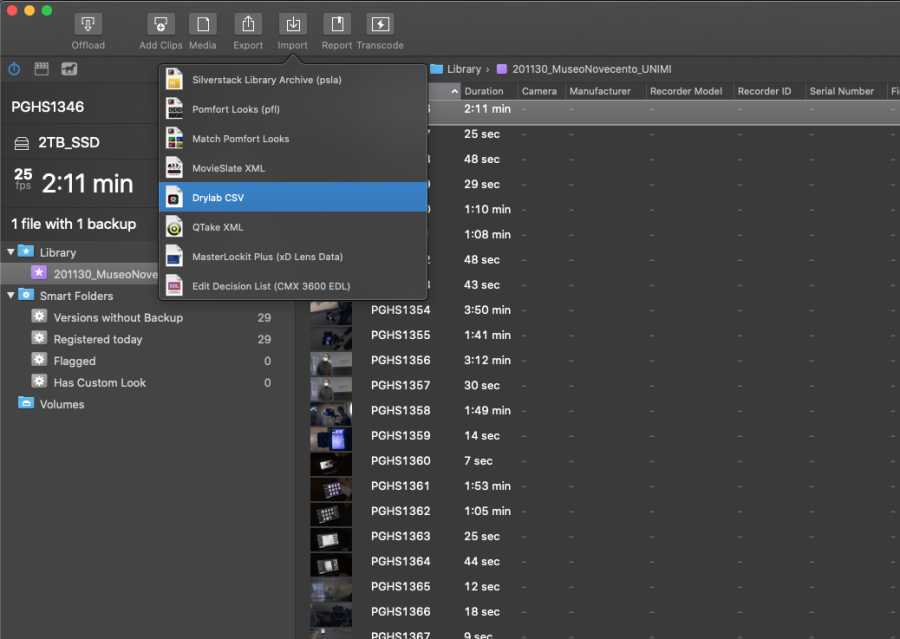
When the Finder dialog points you to select a file, choose the CSV file exported from evrExpanse and select “Open”.
There are two options to match the events in the CSV to the clips in the library:
- by Clip Name
- by Creation Date
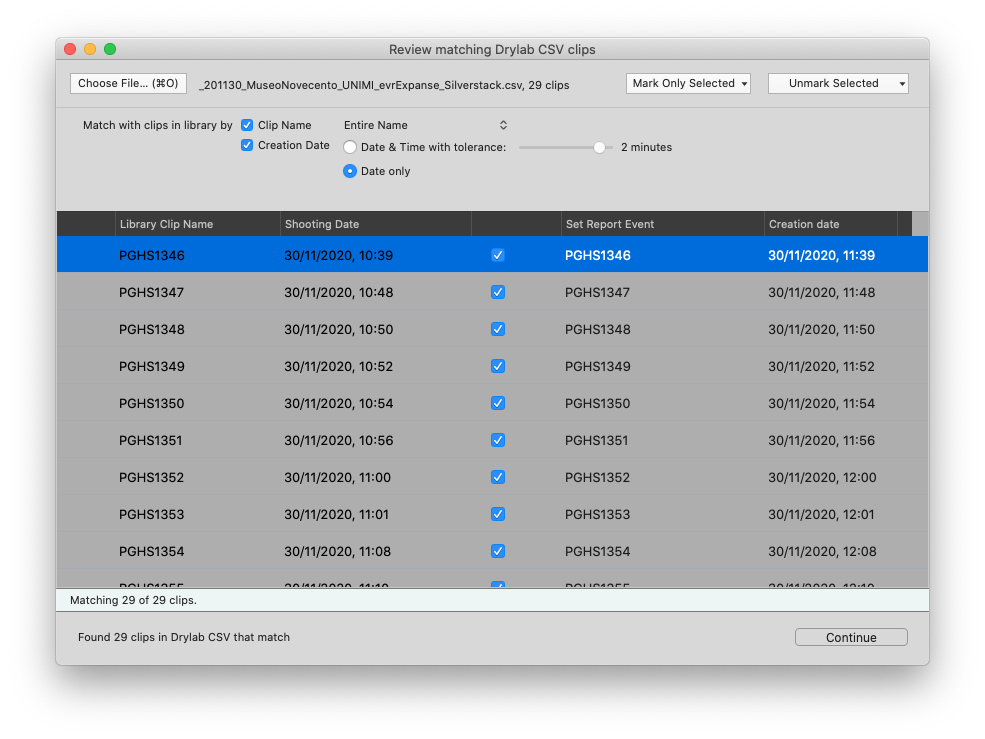
Select Clip Name and Creation Date (Date only) and click “Continue”.
Import Section: In this step you can select or unselect the metadata that should be imported from the CSV to the Silverstack library.
evrExpanse metadata are under the sections:
- Camera Settings
- Lens and Filter
- Comment and Caption
- Append Tags
- Day Number + Day Date (as Custom 1)
Insert/Update Behavior: Choose if you only want to insert new metadata if a fields is empty or you want to force an overwrite.
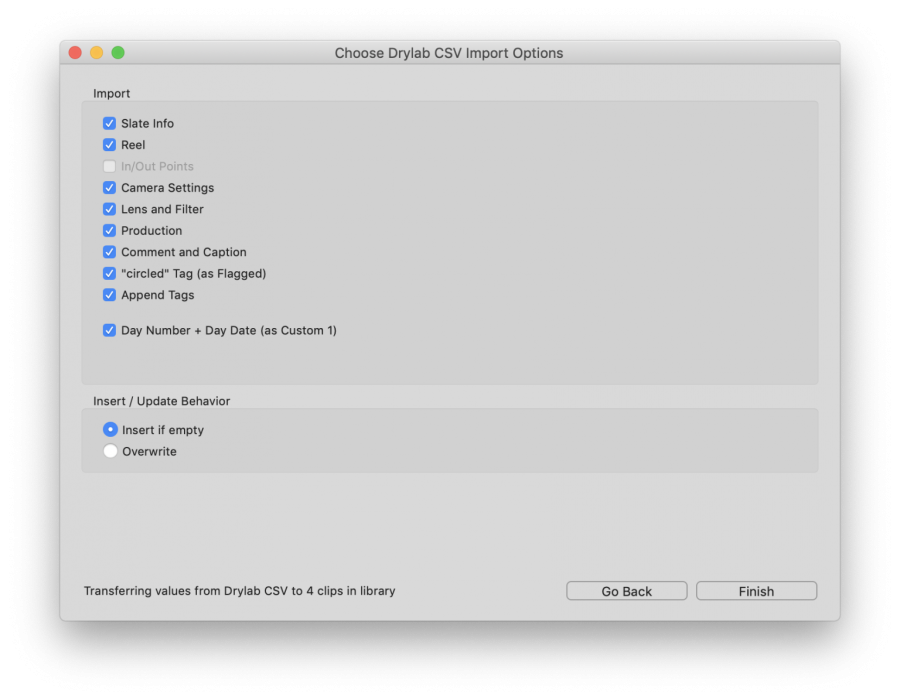
Select the option in bold and click "Finish"
If the media files have been tagged using the macOS Finder Tag, the information will be reported in Tags column in Silverstack.
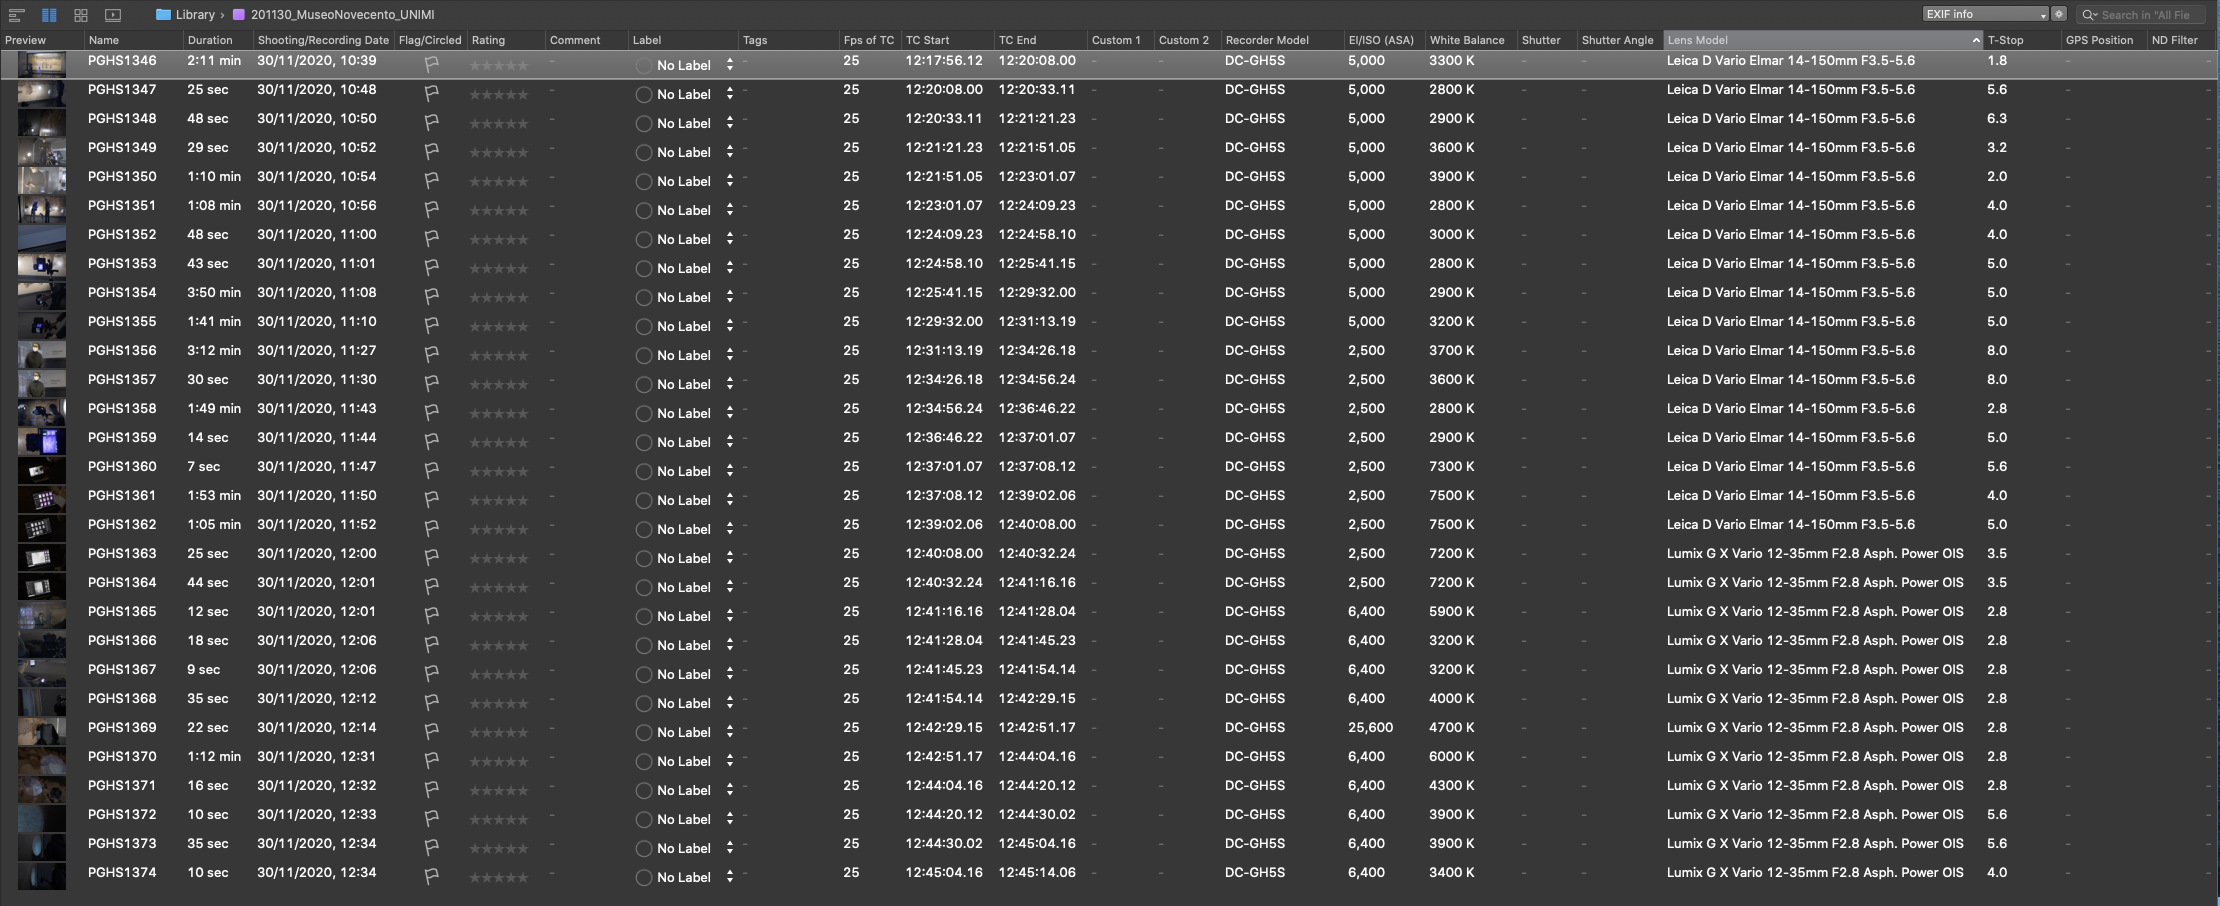
This is the list of metadata (in bold those exportable by evrExpanse) whose fields are mapped in the Silverstack library (sorted by Silvertack metadata section):
| DryLab/evrExpanse CSV | Silverstack | |
| Field | Section | Field |
| tStop | Camera Settings | T-Stop |
| iso | Camera Settings | ISO |
| colorTemperature | Camera Settings | White Balance |
| latitude | Camera Settings | GPS Position |
| longitude | Camera Settings | GPS Position |
| cameraName | Camera Settings | Model |
| lens | Lens and Filter | Model |
| shotNotes | Comment and Caption | Comment |
| cameraTakeNotes | Comment and Caption | Comment |
| tags | Append Tags | Tags |