evrExpanse User Manual v.6.4.0
Table of Contents
- Installation
- How to use
- Preferences
- Media Files and Camera Specifications
- How to import CSV file in DaVinci Resolve
- How to import in Final Cut Pro
- How to import in Assimilate Scratch
- How to import ALE file in Avid Media Composer
- How to import CSV file in Silverstack
- Canon XF Utility Integration Workflow
Installation
How to Install evrExpanse
Open the DMG file and drag & drop evrExpanse.app to the Applications folder.

Uninstalling evrExpanse
- Locate the evrExpanse application in the /Applications folder.
- Drag the evrExpanse.app file to the Trash bin.
- Alternatively, you can right-click on the evrExpanse.app file and select "Move to Bin."
Please note that uninstalling evrExpanse will remove the application from your system while retaining the application preferences.
Grant Permissions
To ensure evrExpanse works correctly, macOS must grant it specific permissions.
If not already enabled, follow the steps below to configure Full Disk Access and Automation permissions.
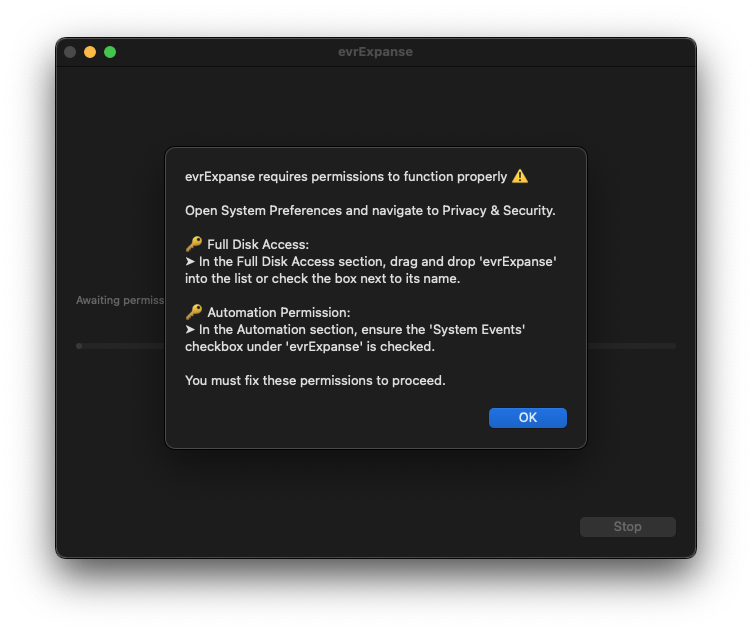
Full Disk Access
- Open System Settings → Privacy & Security → Full Disk Access
- Click the lock to make changes, then enter your admin password if prompted
- Drag
evrExpanseinto the list, or enable the toggle next to its name
Automation Permission
- Go to Privacy & Security → Automation
- Under
evrExpanse, check the box for System Events
Activating the License
Open the evrExpanse application, a startup window will open.
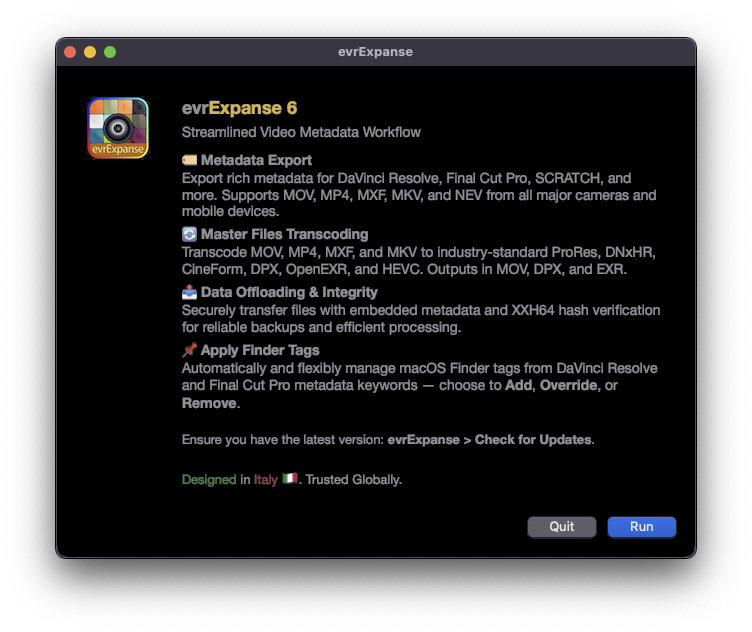
Upon clicking the Run button, a pop-up window will appear.

If you have a license key, please enter it along with the email address used for the purchase, then click Activate. Demo licenses also require activation.

If the inserted license key is validated, a message confirming the successful validation will appear.
Deactivating the License
Deactivating a license is an essential step, particularly during an upgrade from a type of license to another one. This process seamlessly reverts evrExpanse to its initial state, prompting users to activate a new license upon startup.
To deactivate the license, follow these simple steps:
- Open the Preference panel in the application.
- Locate the "Deactivate License" button.
- Click on the "Deactivate License" button.
- A confirmation message will appear, asking if you want to proceed.
- After confirming your decision, a new message will appear, confirming the successful deactivation of the license.

Deactivating the license will revert it to an unactivated state, removing access to all premium features and benefits of the licensed version.
How to use

After clicking the Run button the main window will pop up.

Media Workflows
evrExpanse offers flexible tools to manage key stages of your media pipeline.
📘 Available Process Workflows
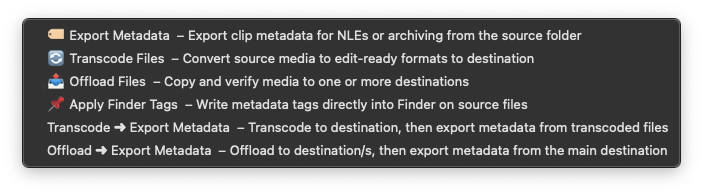
Process Type options available in evrExpanse.
🏷️ Export Metadata
Extract metadata from a variety of sources—including multiple camera types—and import it into NLEs such as Final Cut Pro®, DaVinci Resolve®, Avid Media Composer®, Assimilate SCRATCH®, and Pomfort Silverstack®.
This enhances metadata management and improves editorial workflows.
🔄 Transcode Master Files
Convert source files into intermediate codecs such as ProRes®, DNxHR®, GoPro CineForm®, HEVC (H.265), DPX®, or OpenEXR®, with support for MOV, MP4, MXF, and MKV containers.
Embedded metadata and Finder Tags are preserved for seamless integration downstream.
📤 Offload Data
Securely transfer and back up media using the xxh64 checksum to verify data integrity.
This ensures your assets are safely offloaded and archived.
📌 Apply Finder Tags
Automatically create and manage macOS Finder Tags from metadata exported by DaVinci Resolve, Final Cut Pro, or evrExpanse — or by scanning metadata directly from files in a selected folder.
Finder Tags can be added, replaced, or removed, providing complete control over how metadata is reflected in macOS Finder.
Transcode / Offload ➜ Export Metadata
These workflows combine Transcode + Metadata Export or Offload + Metadata Export into a single streamlined operation, improving overall efficiency while maintaining complete metadata continuity throughout the process.
Available Combined Workflows:
- Transcode ➜ Export Metadata
Processes files from the Source folder, saves transcoded files to the Destination folder, and then automatically exports metadata from the transcoded files.
→ Source + Destination folders → [Start Process] - Offload ➜ Export Metadata
Copies files from the Source folder to one or more Destination folders, then exports metadata from the primary destination.
→ Source + Destination/s folders → [Start Process]
Before You Begin
Make sure all Transcoding / Offloading and Metadata Export settings are correctly configured in the Preferences panel.
Sealing Processed Folders
evrExpanse can seal folders produced during Export Metadata, Transcode, and Offload by generating industry-standard MHL or ASC MHL hash lists for authenticity and long-term integrity.
Both formats include sealing history awareness: if previous .mhl files exist, evrExpanse performs verification against past records to detect changes or discrepancies. Any issue is reported immediately at process completion, with full details logged in the Event Log for traceability.
Zero-Byte File Alert
Before any process begins, evrExpanse scans for and alerts you to any zero-byte files, which can indicate corruption or incomplete transfers. This safeguard applies to Transcode, Metadata Export, and Offload workflows.

Alerts are triggered before processing begins.
You can click “View Zero-Byte Files” to open a TextEdit document listing all affected file paths.
The tool continuously monitors for zero-byte files and includes them in the final report.


This proactive check helps maintain media integrity by ensuring that all processed files are complete and usable.
Quick Actions
evrExpanse offers five macOS Quick Actions that let you quickly set key folder paths—Source, Destination, and up to three additional Offload Folders—directly from Finder, without opening the app. These actions are added to your macOS Services (Quick Actions) menu and can be downloaded here: Download Quick Actions.
Available Quick Actions:
→ Set as 📁 Source Folder
→ Set as 📂 Destination Folder
→ Set as 📦 + Offload 1 Folder
→ Set as 📦 + Offload 2 Folder
→ Set as 📦 + Offload 3 Folder
How to Use:
Right-click any folder in Finder.
Go to Quick Actions and choose the desired option.
Examples:
- To set a media source: right-click
ExternalDrive/Media/Day_02/and select Set as 📁 Source Folder. - For your output folder: right-click
RAID/MainProject/Exports/and select Set as 📂 Destination Folder. - For backups: right-click your backup folder and choose one of the Offload actions. Repeat as needed for Offload 2 and 3.
Each Quick Action updates evrExpanse’s configuration file with the selected path. When you launch the app, your folder selections are already set—streamlining setup for Transcoding, Offloading, or Metadata Export.
Note:
If you use a Quick Action while evrExpanse is open, changes won’t appear immediately. To refresh, go to Preferences and then return to the main window.
To Remove a Quick Action:
Open ~/Library/Services/, find the relevant .workflow file (e.g., Set as 📂 Destination Folder.workflow), and move it to the Trash. The Quick Action will disappear from Finder.
Export Metadata
Export Metadata Workflow
- Select Source Folder
Drag and drop the folder containing your media files from Finder into the Source area of evrExpanse. - Select Process
From the Process Type drop-down menu, choose Export Metadata. - Check Export & Workflow Format Options
Review and adjust the export format settings as needed. - (Optional) Check ALE Settings for Media Composer
If you selected a Media Composer export, configure the ALE Settings. - Start Process
Click Start Process to begin the export.

Selected Export Format
Select the export format for the metadata file.
The available options are: Final Cut Pro (FCPXML or FCPXMLD), DaVinci Resolve (CSV), Media Composer (ALE), Silverstack (CSV), evrExpanse (CSV), Sony Real Time Metadata (CSV), SCRATCH Integration (.XML), and Extract LUT File from media (.CUBE).
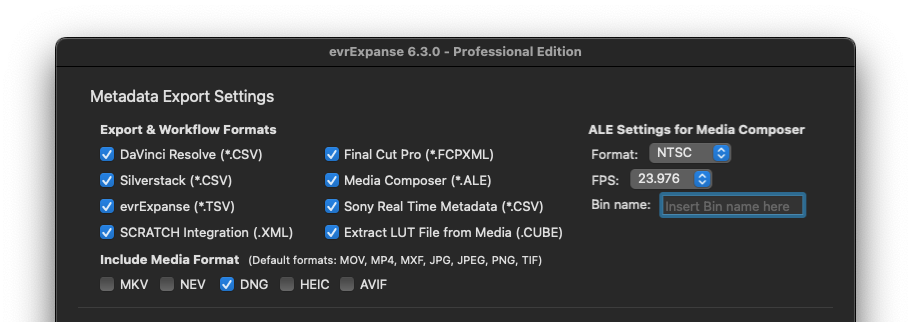
Media Composer ALE Settings
Check the default values of Format, FPS or Bin Name.
Assimilate SCRATCH Integration
When enabled, SCRATCH Integration automatically sends an .xml file with your media and metadata to the SCRATCH Watch Folder for immediate import on project load.
A copy of the file is also saved locally in evrE_[ProcessedFolderName] for easy reference.
Include Optional Media Formats
By default, the following file types are always included: MOV, MP4, MXF, JPG, PNG, and TIF.
Optional formats (MKV, NEV, DNG, HEIC, AVIF) can be enabled as needed.
Note: Not all optional formats are supported by every NLE. For example,
NEVfiles are compatible with DaVinci Resolve but not with Final Cut Pro.
Transcode Master File
Transcode Workflow
- Select Source Folder
Drag and drop the folder containing your media files from Finder into the Source area of evrExpanse. - Select Destination Folder
Drag and drop the folder where you want your transcoded files saved into the Destination area. - Select Process
From the Process Type drop-down menu, choose Transcode. - Check Transcode Options
Review codec, bit rate, metadata embedding, and other options. - Start Process
Click Start Process to begin transcoding your media files.
💡 Tip: To extend the workflow, select process Transcode ➜ Export Metadata. This will automatically run Export Metadata on the transcoded Destination once transcoding is complete.
![]()
![]()
Transcoding Mode
Smart
Smart Mode in evrExpanse analyzes the source file and decides whether to transcode or pass through the video and audio streams:
- Video: If the codec is an intermediate or mezzanine format (e.g., ProRes, DNxHR, CineForm), Smart Mode passes the video through without re-transcoding. If "Optimize for Final Cut Pro in Smart Mode" in the Preferences panel is enabled, only ProRes video is passed through for Final Cut Pro compatibility.
- Audio: If the audio is PCM (16-, 24-, or 32-bit), it is passed through. Otherwise, evrExpanse transcodes it to the selected PCM bit depth..
This mode avoids unnecessary re-transcoding and preserves quality whenever possible.
Manual
Manual Mode gives you full control: both audio and video are transcoded using your chosen codecs, bitrates, and settings.
Rewrap
Rewrap Mode passes through both audio and video at full quality, embedding metadata in the native and XMP formats (for Adobe Premiere Pro support). The output is in QuickTime (.MOV) format, except for MP4 input files, which remain in MP4 to maintain compatibility.
Include Source Metadata
The Include Source Metadata option lets you control how metadata is managed during transcoding.
When enabled:
- All source metadata is embedded in the transcoded file, preserving important camera information like CreateDate, camera model, lens info, and more.
- Finder Tags and file Flags from the source are also embedded, supporting Smart Collections and future reference.
- The filesystem creation date of the transcoded file is updated to match the original camera CreateDate, ensuring correct capture time in NLEs like Final Cut Pro and DaVinci Resolve.
When disabled:
evrExpanse skips metadata integration, which may slightly speed up transcoding and is ideal when only output-specific metadata is needed or original metadata is not relevant.
Transcode A/V Settings
Video Codec:
Select your preferred ProRes, HEVC, DNxHR, CineForm, DPX, or EXR profile. Available profiles follow the Apple ProRes white paper and Avid DNxHR specification.
- Apple ProRes
Codec type: hardware accelerated (Apple VideoToolbox)
Pixel format:- YUV 4:2:2 - 10-bit (ProRes 422 Proxy, ProRes 422 LT, ProRes 422, ProRes 422 HQ)
- YUV 4:4:4:4 - 10-bit (ProRes 4444, ProRes 4444 XQ) with support for alpha channel
- Avid DNxHR
Codec type: software accelerated (CPU)
Pixel format:- YUV 4:2:2 - 8-bit (DNxHR LB, DNxHR SQ, DNxHR HQ)
- YUV 4:2:2 - 10-bit (DNxHR HQX), YUV 4:4:4 - 10-bit (DNxHR 444)
- GoPro CineForm:
Codec type: software accelerated (CPU)
Pixel format:- YUV 4:2:2 - 10-bit (low, medium, high, film1, film2, film3+ )
- RGB 4:4:4 - 12-bit (RGB 444)
- DPX:
Codec type: software accelerated (CPU)
Pixel format:- RGB 10/12/16 bit per channel
- RGBA 8 bit per channel
- EXR:
Codec type: software accelerated (CPU)
Compression: Uncompressed/Zip1/RLE
Pixel format:- RGB half/float (16/32 bit)
- RGBA half/float (16/32 bit)
- HEVC (H.265) [available in Manual mode only]
Codec type: hardware accelerated (Apple VideoToolbox)
Pixel format:- YUV 4:2:0 8-bit per channel (High, Medium, Low)
- YUV 4:2:0 10-bit per channel (High, Medium, Low)
Downscale Video Resolution
This option applies only in Manual Mode, resizing the output video only if the source exceeds the selected target, ensuring quality, compatibility, and reduced file size.
- As Source – Keeps original resolution.
- Downscale Profile – Precise control with:
- Standard: 720p / 1080p (maintains aspect ratio).
- Scaling: 50% (Half), 25% (Quarter).
- Common Heights: 1440px 🖥️ QHD, 2160px 🖥️ 4K, 4320px 🖥️ 8K.
- Vertical: 1280px 📱 HD, 1920px 📱 FHD, 3840px 📱 4K, 7680px 📱 8K.
- DCI Scope: 858px 🎥 2K, 1716px 🎥 4K, 3432px 🎥 8K.
HEVC Bitrate
evrExpanse provides two bitrate modes for HEVC transcoding:
1. Custom Bitrate
Enter your own bitrate in the Transcoding Options for full control over quality and file size.
2. Automatic Profiles
Choose High, Medium, or Low, and evrExpanse automatically calculates the optimal bitrate based on resolution and frame rate.
- High = 24,000 Kbps reference for 4K UHD @ 30fps
- Medium = 50% of High
- Low = 25% of High
Values scale automatically for other resolutions, frame rates, and aspect ratios.
10-bit HEVC Support
evrExpanse supports HEVC encoding up to 10-bit.
- If the source is 10-bit, Auto preserves it.
- If the source is 8-bit, evrExpanse outputs 8-bit, avoiding unnecessary conversion.
Audio Codec
evrExpanse supports PCM audio in 16-bit, 24-bit, and 32-bit formats.
You can re-encode audio to any of these PCM formats, or
Use Passthrough mode to copy the original audio stream without re-encoding, preserving its original format and quality.
Audio is transcoded in a 1:1 configuration with the source, keeping the same number of tracks and channels as the original.
For image sequence formats (like DPX or EXR), audio tracks are exported separately as a WAV file, since audio can’t be embedded in these formats.
Burn-in Metadata Overlay
The Burn-in Metadata option overlays key metadata directly onto the video during transcoding, embedding it permanently into the output file. Common uses include displaying timecodes, camera settings, or applied 3D LUTs for quick reference during review or post-production.

This feature is especially valuable for collaboration, quality control, and workflows where visual access to metadata is essential.
3D LUT Application and Smart LUT Finder Features
evrExpanse adds advanced color grading tools with its 3D LUT Application and Smart LUT Finder features.
3D LUT Application
Burn a 3D LUT directly into your transcoded files for consistent color across all outputs.
Options include:
- Use Sidecar LUT: Automatically applies a LUT from the same folder as your media, matching filenames.
- Custom LUT Folder: Select a folder of LUTs, which are auto-matched to your media files.
- Apply LUT File: Use a single, user-defined LUT for all files in the batch, ensuring uniform color grading.
Smart LUT Finder
Smart LUT Finder simplifies color grading by automatically detecting and applying the correct LUT using video file metadata.
How It Works:
- Sidecar File Detection:
evrExpanse looks for a sidecar.cubeLUT file with a name that starts with your media file name.
Example: Forvideo123.mp4, valid LUT files include:
video123.cube,video123_lut.cube,video123_custom.cube. - Metadata-Based Extraction:
For supported cameras (Kinefinity, McPro24fps, ARRI), if no matching sidecar is found, evrExpanse reads the video metadata to locate and extract the correct LUT.
Note:
Metadata-Based Extraction only works if "Include Source Metadata" is enabled during transcoding. This ensures the needed metadata is available for proper LUT handling.
Destination File Name
You can customize the name of transcoded files by adding custom text to the end of the original file name.
Example:
If your source file is A005C039_201101OZ.mov and you add "CamA":
- If "Preserve Source File Name" is disabled:
[SourceFileName]_evrE_[CodecName_CodecProfile]_YourText.mov
Example:
A005C039-201101OZ_evrE_DNxHR_CamA.mov - If "Preserve Source File Name" is enabled:
[SourceFileName]_YourText.mov
Example:
A005C039-201101OZ_CamA.mov
This feature helps you quickly identify transcoded files and add context or notes for easier organization.
Duplicate Source File Name
When source files from different folders share the same name, naming conflicts can occur.
- If "Preserve Source Folder Structure" is enabled, evrExpanse keeps the original folder hierarchy, so files remain in separate subfolders and conflicts are avoided.
- If disabled, all transcoded files go into a single output folder. In this case, files with the same name could overwrite each other.
To prevent this, evrExpanse automatically renames duplicates using this format:
[SourceFileName]_(checksum_DupRefx)_YourText.mov
This guarantees every transcoded file has a unique name, even if the originals were identical.
Breakdown of the Naming Convention:
- SourceFileName: Original file name.
- checksum: A unique xxh64 hash of the original file, distinguishing files with the same name but different content.
- X (DupRef): A unique reference number for each transcoding process.
- YourText: Optional custom text you can add.
Example:
For a source file named A005C039-201101OZ.mov, the destination file might be:
A005C039-201101OZ_(38efdc3d5595ff1d_DupRef3)_CamA.mov
This convention helps:
- Identify identical files (same checksum, different DupRef):
Clip0001_(38efdc3d5595ff1d_DupRef3)_CamA.mov
Clip0001_(38efdc3d5595ff1d_DupRef7)_CamA.mov - Distinguish different files with the same name (different checksums):
Clip0001_(38efdc3d5595ff1d_DupRef3)_CamA.mov
Clip0001_(3799dc67f0aaeafc_DupRef5)_CamA.mov
This ensures every transcoded file in the destination folder is unique and easy to identify, preventing data loss or accidental overwriting.
Offload
Offload Workflow
- Select Source Folder
Drag and drop the folder containing your media files from Finder into the Source area of evrExpanse. - Select Destination Folder(s)
Drag and drop one or more folders where you want your media files to be copied. evrExpanse supports up to three additional destinations (4 in total). - Select Process
From the Process Type drop-down menu, choose Offload Files. - Start Process
Click Start Process to begin securely offloading your media files.
💡 Tip: To extend the workflow, select process Offload ➜ Export Metadata. This will automatically run Export Metadata on the offloaded Destination once the copy and verification are complete.

evrExpanse gives you full control over where your files are offloaded, with support for:
- One primary Destination Folder
- Up to three additional Offload Destinations
This allows you to copy media to a working drive and multiple backups simultaneously.
When you click Start Process, evrExpanse will:
- Verify the Source folder
- Apply your selected Preferences (e.g., skip hidden files, preserve Finder Tags)
- Transfer files to all enabled destinations
- Verify the transfer at each step to ensure data integrity
Offload Summary Reports
After offloading, evrExpanse provides a clear summary based on your configuration
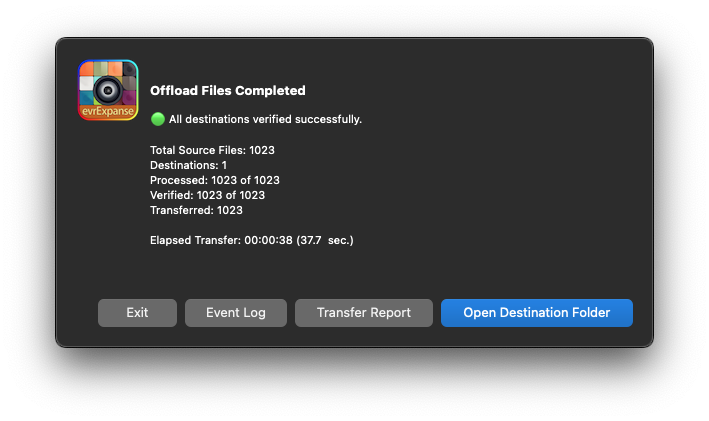
Single Destination:
You’ll see a compact summary window with verification status, total files, processed and verified counts, and options to:
- Open Destination Folder
- Open Transfer Report
- Open Event Log
Multiple Destinations:
When using more than one destination, evrExpanse displays an overview indicating all folders were processed and verified.
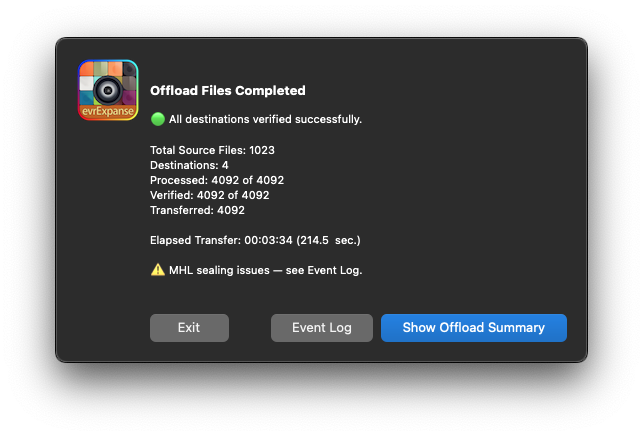
Click Show Offload Summary to view a detailed breakdown for each destination, making it easy to confirm offload success at a glance.
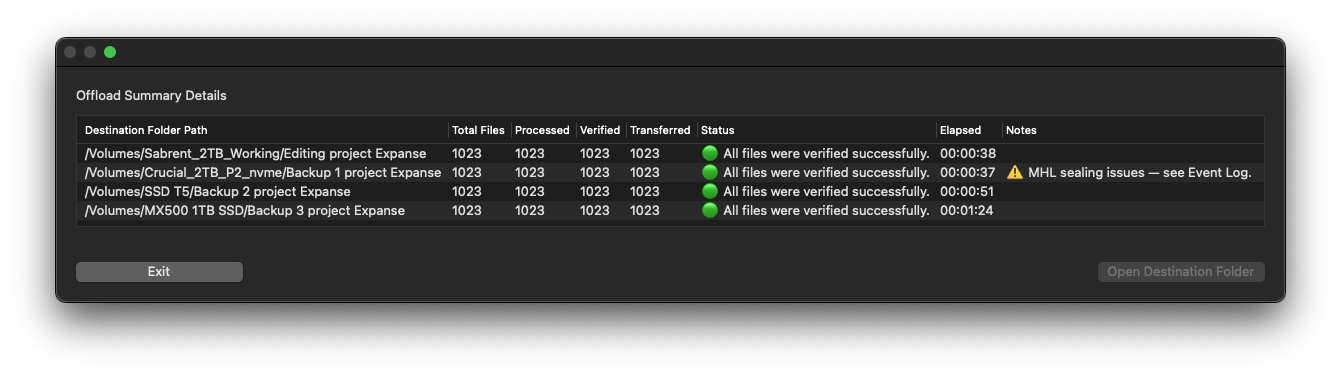
Tip: In multi-destination setups, this summary helps confirm that each target location received the full file set, and flags any inconsistencies for quick follow-up.
Detailed Transfer Report
If "Save the Transfer Report to the destination" is enabled, evrExpanse generates a detailed report alongside the offloaded files. This report provides a comprehensive record of the transfer process.
You’ll receive a confirmation notification when the process completes, ensuring every transfer is documented for enhanced data integrity and transparency.

File Integrity Check & Duplication Handling
When a file already exists at the destination, evrExpanse performs a full checksum comparison—ignoring file size or modification date—to ensure both files are truly identical.
- If the checksums match, the file is considered verified.
- If the checksums differ, evrExpanse saves the source file as a duplicate at the destination, appending "2 (evrE copy)" to the file name.
- The checksums are then recalculated and compared again for complete accuracy.
This process ensures secure, incremental transfers and reliable duplication handling, maintaining bulletproof file integrity.
Apply Finder Tags
The Apply Finder Tags process in evrExpanse enables you to batch-apply macOS Finder Tags—including both color tags and custom labels—to your media files. This makes it easy to organize, group, and locate your content directly in Finder.
Apply Finder Tags integrates seamlessly with the following metadata sources:
- DaVinci Resolve (
.csv): exports multiple metadata fields includingKEYWORDS,SCENE,SHOT,TAKE,PEOPLE, and more. - Final Cut Pro (
.fcpxml/.fcpxmld): reads metadata from Library or Event exports containingKEYWORDSandNOTES. - evrExpanse (
.tsv) or by scanning metadata directly from a selected folder: extracts metadata embedded in the media files themselves, includingXMP,EXIF, andProduction / Clipinformation.

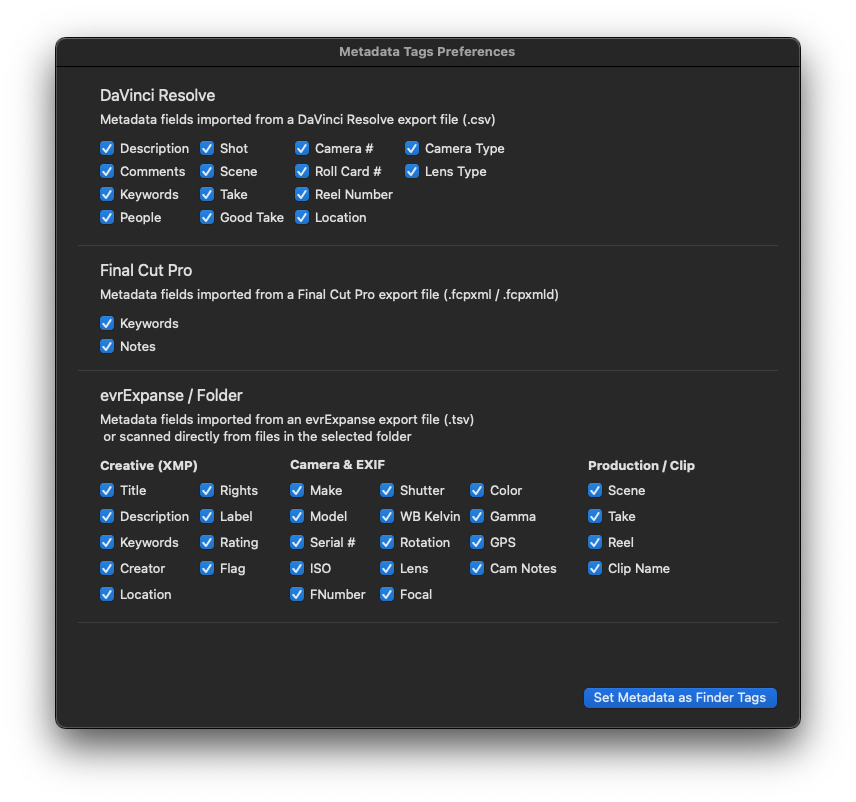
The Metadata Tags Preferences window lets you select which metadata fields are read from each supported export type. This gives you precise control over which metadata fields are included during tagging and how information is sourced from different workflows.
Finder Tags are automatically created from the selected metadata fields. Some tags include a short prefix to make them easier to identify and group in Finder: Scene-, Shot-, Take-, Reel-, Card-, Cam-, Clip-, Lens-, SN-, ISO-, f/, Shutter-, WB-, Rot-, Focal-, Color-, Gamma-, Loc-, Creator-, and Rights-.
💡 Beyond greatly enhancing the potential of Finder as a true Media Asset Manager (MAM), evrExpanse now supports an even wider metadata exchange ecosystem.
You can not only transfer Keywords and other metadata between DaVinci Resolve and Final Cut Pro, but also read XMP metadata embedded directly in media files such as JPEG, TIF, and DNG.
This makes it possible to extract and tag Finder metadata from applications like Adobe Lightroom, Photoshop, and other tools that write embedded XMP data—turning macOS Finder into a unified, cross-application metadata bridge.
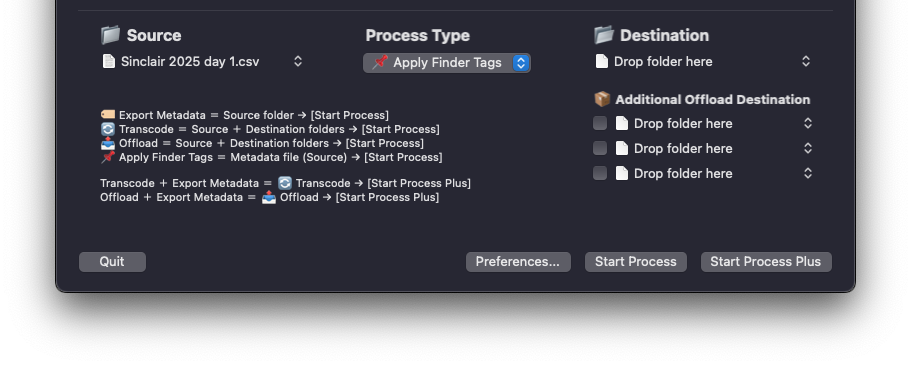
Apply Finder Tags Workflow
- Export Metadata Source
— From DaVinci Resolve: Go to File ▸ Export Metadata From ▸ Media Pool... or Selected Media Pool Clips..., then name and save the.csvfile.
— From Final Cut Pro: Select a Library or Event, then go to File ▸ Export XML..., name the.fcpxmldfile as you prefer, and save it.
— From evrExpanse: Run the Export Metadata process for the desired source folder. evrExpanse will create a.tsvfile containing all extracted metadata from the files in that folder. - Import Metadata File
You can start the Apply Finder Tags process using either a metadata file or a source folder:
① Metadata File Input: drag and drop the exported metadata file (.csv,.tsv,.fcpxml, or.fcpxmld) into the Source area of evrExpanse.
② Folder Input: drag and drop a folder directly. When you click Start Process, evrExpanse will automatically scan the folder for media files, generate an internal.tsvmetadata export, and then process it — saving time when a pre-exported metadata file isn’t available. During the scan, evrExpanse includes files based on your Media Format settings.
— To include duplicates, enable the Include Duplicate Files option in Preferences..
- Select Metadata Fields
In the Apply Finder Tags Options panel (Main Window), choose which metadata fields should be converted into Finder Tags.
— DaVinci Resolve:Description,Comments,Keywords,Scene,Shot,Take,People,Camera #,Location, and more.
— Final Cut Pro:Keywords,Notes.
— evrExpanse / Folder: metadata fields organized into Creative (XMP), Camera & EXIF, and Production / Clip categories.
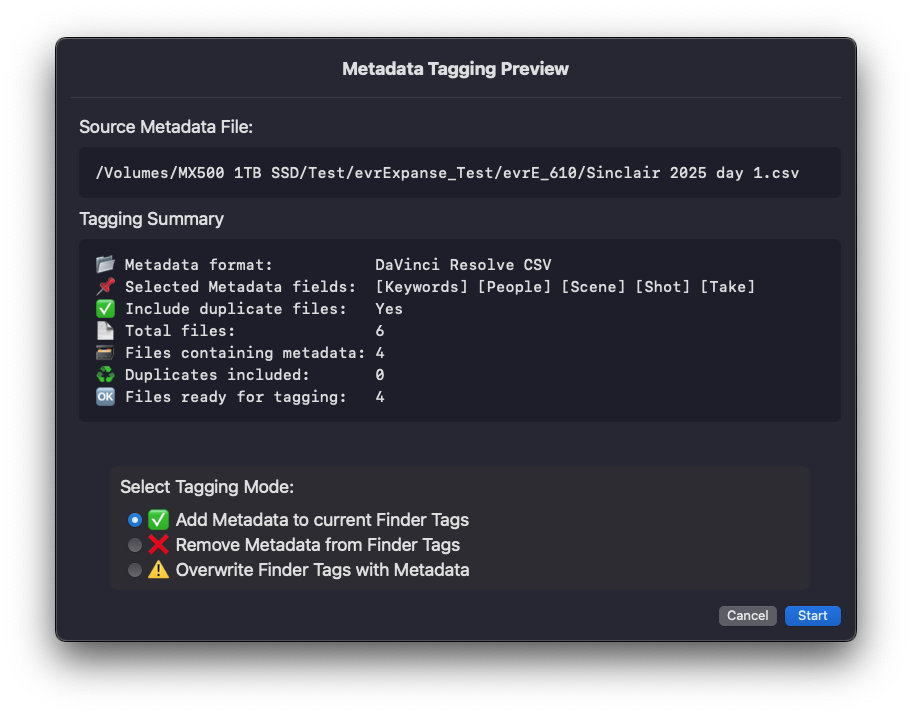
- Start Process
Click Start Process to begin tagging. evrExpanse will generate a Metadata Tagging Preview displaying:
— The detected metadata format and selected tag fields
— Total files found and files ready for tagging
— Any duplicate files automatically (see the 🔎 Duplicate Note)
— Warnings for issues such as missing columns or encoding problems
🔎 Duplicate Note:
If a file appears more than once (for example, in multiple Resolve bins or FCP events), evrExpanse will skip or include it depending on the Include Duplicate Files option.
A list of any skipped duplicates is saved in the Duplicates Log. - Choose Tagging Mode
— Append: Add new tags without removing existing Finder Tags.
— Overwrite: Replace all existing Finder Tags with those from metadata.
— Remove: Remove the tags specified in metadata (useful for undoing previous batches).
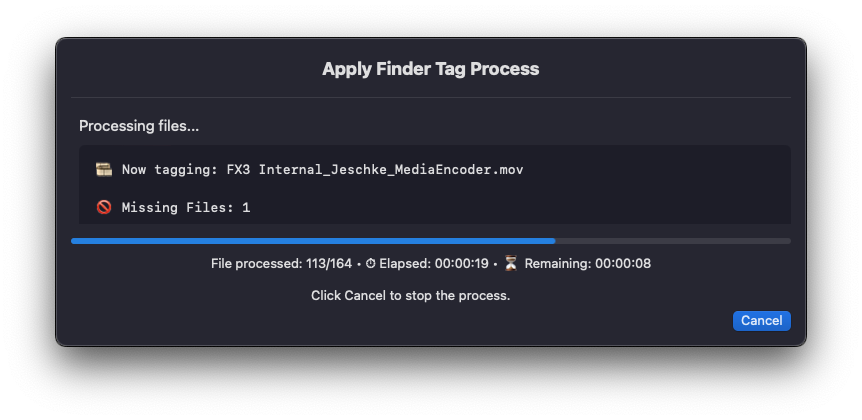
Only Append operations can be reversed using Remove mode. Overwrite cannot be undone. - Monitor Progress
— A real-time progress bar displays the tagging status for each file.
— Missing files are flagged directly in the progress window.
— A detailed missing-file list is saved in the report folder.
You can cancel the operation at any time.
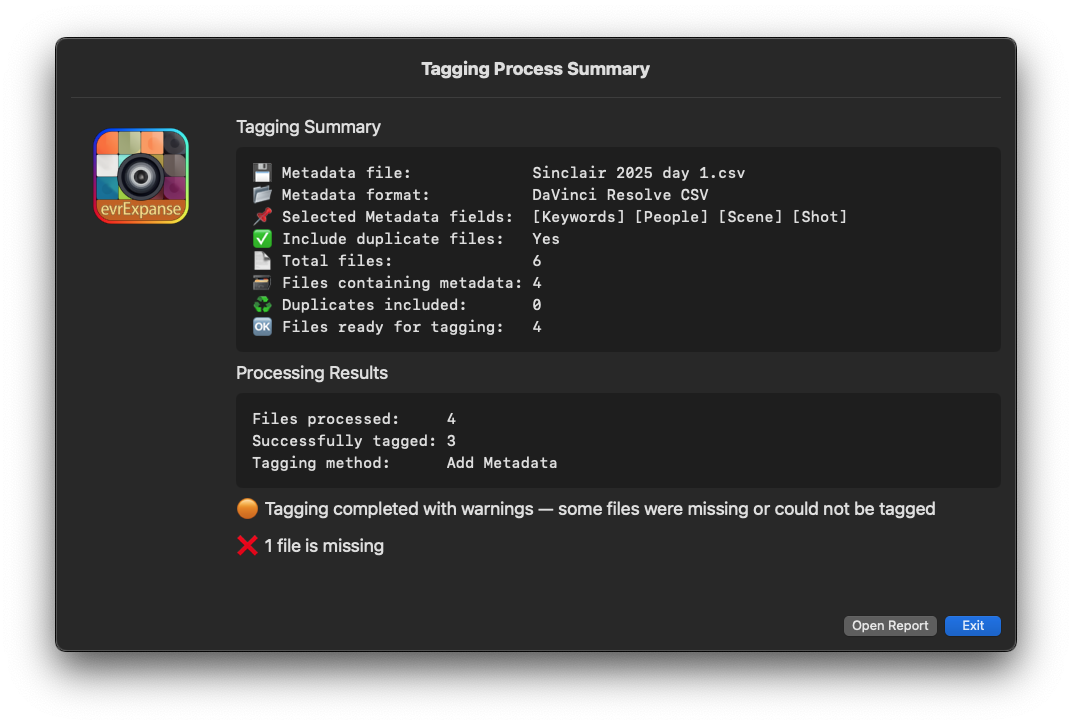
- View Final Report
After processing, a summary window appears with detailed logs:
— Lists of missing or duplicate files
— Color-coded status indicators (green = success,orange = warnings, etc.)
— Reports are saved automatically in a folder next to your metadata file for easy reference.
Log & Report Locations
After every Apply Finder Tags operation, evrExpanse creates a dedicated log/report folder next to your metadata file.
The folder is named [YourMetadataFile]_tag_report and contains:
evrE_log_events_[YourMetadataFile]_[timestamp].log— Main event and result logevrE_missing_files_[YourMetadataFile]_[timestamp].txt— List of any missing filesevrE_duplicate_files_[YourMetadataFile]_[timestamp].tsv— List of duplicate file references excluded from tagging
Example:
If your metadata file is at /Volumes/MyDrive/Project/metadata.csv,
the report folder will be: /Volumes/MyDrive/Project/metadata.csv_tag_report/
You can open this folder directly from the final report dialog in evrExpanse (Open Report button), or locate it manually via Finder.
Always check the report folder after tagging to review the process details and resolve any issues.
Duplicates Detection
Duplicate file paths in the metadata (e.g., the same clip listed multiple times in DaVinci Resolve or Final Cut Pro) generate a Duplicates Log for your reference and are, by default, automatically excluded from tagging. In the Apply Finder Tags preferences, you can adjust this behavior by enabling or disabling the Include Duplicate Files option.
Missing Files
If a file listed in the metadata does not exist on disk, it is skipped and recorded in the Missing Files Log. In addition, the progress window will display a warning so you can decide whether to cancel the process.
Known Issues & Limitations
⚠️ DaVinci Resolve CSV Export Bug – Double Quotes in Metadata Fields
Due to a known bug in DaVinci Resolve’s CSV export, using double quotes (") inside any metadata field (for example, in Keywords, Description, or GPS fields) can corrupt the exported CSV file.
This may result in errors, skipped entries, or incorrect Finder Tags during the Apply Finder Tags process in evrExpanse.To avoid problems, do not use double quotes in metadata fields within Resolve — replace them with single quotes or remove them before exporting.
evrExpanse will attempt to detect and flag problematic entries during the pre-check stage, but complete detection cannot be guaranteed.
⚠️ Localized Finder Color Tags
When applying Finder color tags (such as Green, Red, or Yellow), be aware that color tag names are localized based on your macOS system language.
Using the wrong language will prevent the color label from being applied — it will instead appear as a plain text tag.Examples:
- English →
Green- Italian →
Verde- French →
Vert- German →
Grün- Spanish →
Verde- ...and so on for other languages.
There is no universal color tag name that works across all languages.
Recommendation: Always use the color tag name that matches your macOS system language.
Results
During each process, a progress bar displays the current status.
To stop a batch, click Stop. When prompted, click End and wait for the current file to finish. For best results, always allow the process to shut down properly—this usually takes just a few seconds.
Once finished, a completion window appears, with options to access processed files, review the event log, or view a detailed report.
Metadata Export Process
- After exporting metadata, a folder named
evrE_FolderNameis created in your destination. - This folder contains the exported metadata in your chosen formats, ready for use in NLEs (Non-Linear Editing systems).

Transcode Process
- Transcoded files are saved in the destination folder.
- If Preserve Folder Structure is enabled, a subfolder named after the source folder will hold the transcoded files.
- A folder named
evrE_FolderNamewill also appear in the destination, containing the event log and details about the transcoding process.
![]()
Offload Process
- A folder named
FolderName_offload_reportis created alongside the offloaded folder in the destination directory. - This folder contains a report detailing the transferred files.
- For all processes, if media integrity verification is required, you’ll find a folder named
ascmhlwith ASC MHL files, or a single MHL file inside the offloaded folder.

Event Log
For every process, evrExpanse generates log files to help you track activities and troubleshoot if needed.
- For Metadata Export and Transcode processes, a log file named
evrExpanse.logis created inside a sub-folder called evrE_FolderName within the processed folder. - For the Offload process, a folder named FolderName_offload_report is created next to the offloaded folder in the destination directory. This contains a detailed log of the offload operation.
In addition to these “local” log files, evrExpanse also maintains a global Event Log. This Event Log collects and records all events from every process run on your machine, providing a comprehensive overview. You can easily access the Event Log at any time from the Preferences panel.
This dual logging system ensures you have both detailed, folder-specific logs for each operation and a centralized record of all activity for complete traceability.
![]()
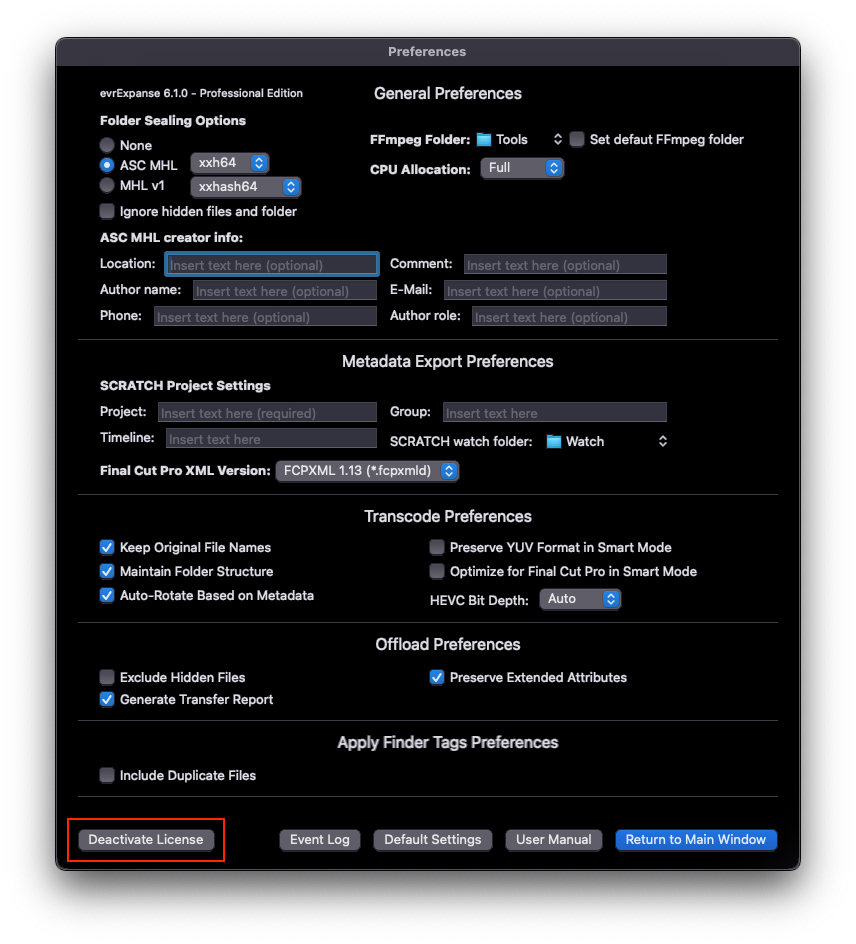
Preferences
Before starting any process in evrExpanse, review the Preferences to confirm or adjust default settings.
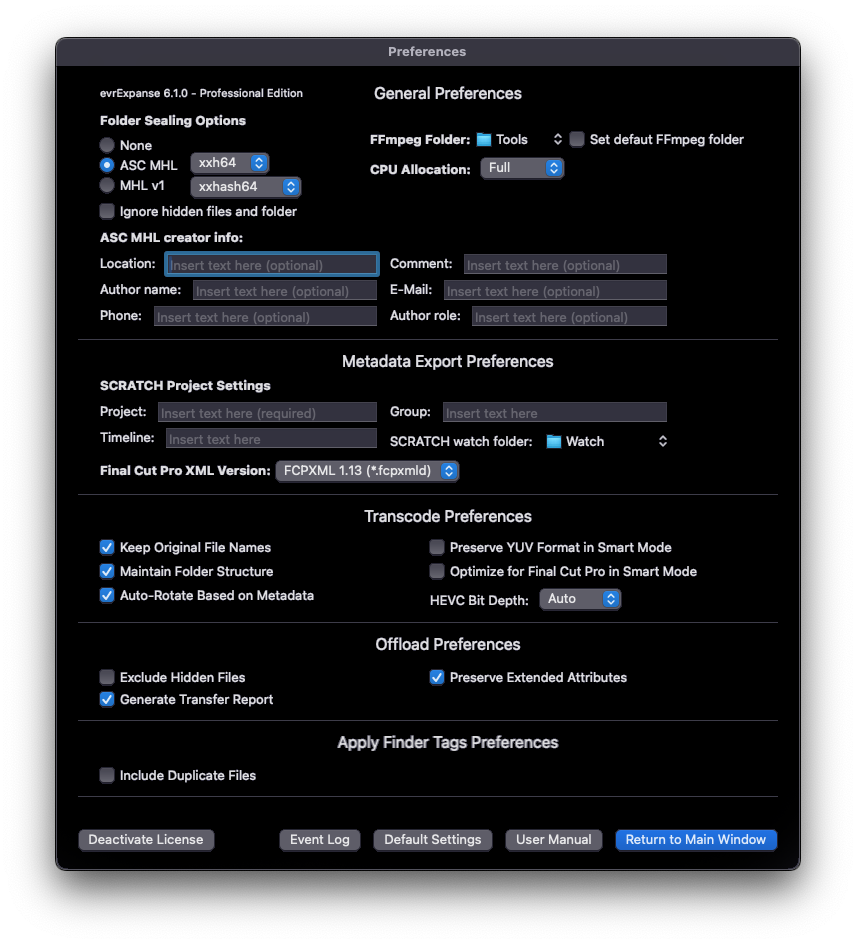
General Preferences
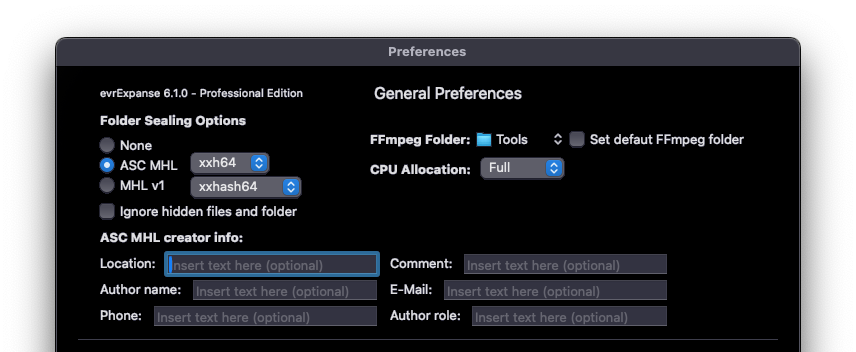
Seal processed folder (MHLs)
Sealing a folder with an MHL (Media Hash List) creates a digital fingerprint of your files using hashes, allowing later verification of file integrity.
Supported MHL formats:
- ASC MHL – Modern standard by the American Society of Cinematographers (ASC) for reliable media workflows.
- MHL v1 – The original format developed by Pomfort.
When enabled, folder sealing applies to Metadata Export, Transcode, and Offload processes.
Select MHL type and Hash Format
Choose whether to generate ASC MHL or MHL v1 files and select the hash format for each.
You can disable MHL creation when not need it.
MHL v1
| UI Label | Hash Format | XML Tag |
|---|---|---|
| MD5 | MD5 | <md5> |
| SHA-1 | SHA-1 | <sha1> |
| xxHash32 | 32-bit xxHash | <xxhash> |
| xxHash64BE | 64-bit xxHash (big-endian) | <xxhash64be> |
| xxHash64LE | 64-bit xxHash (little-endian) | <xxhash64> |
ASC MHL
| UI Label | Hash Format | XML Tag(s) |
|---|---|---|
| MD5 | MD5 | <md5> |
| SHA-1 | SHA-1 | <sha1> |
| C4 | 32-bit C4 | <c4> |
| XXH64 | 64-bit xxHash | <xxh64> |
| XXH3 64-bit | XXH3 (64-bit) | <xxh3>, plus <xxh64> |
| XXH3 128-bit | XXH3 (128-bit) | <xxh128>, plus <xxh64> |
File Inclusion and Exclusion Rules
evrExpanse automatically excludes non-essential items to ensure clean and reliable MHL generation.
- ASC MHL automatically excludes any ascmhl folder, any log file inside an evrE_FolderName sub-folder within the processed folder, and all hidden files or folders (including system files such as .DS_Store).
- MHL v1 excludes any log file inside an evrE_FolderName sub-folder within the processed folder and all hidden files or folders (including system files such as .DS_Store).
evrExpanse also checks for older MHL (ASCMHL and MHL v1) files and verifies that all referenced files exist. Any issues are logged in the Event Log.


💡 To start a Metadata Export, you must enable at least one export format, SCRATCH integration, or folder sealing using your chosen MHL type.
ASC MHL Creator Info
In the ASC MHL settings, you can add Creator Info — including author, contact, location, or comments — to improve documentation and traceability.
You can also select your preferred hash format to match your workflow standards.
CPU Allocation
The CPU Allocation setting manages how much processing power is dedicated to Transcoding, Metadata Export, and Offload operations.
Profiles:
- Full: Uses all CPU threads for maximum performance.
- High: Uses ~75% for balanced speed and system stability.
- Medium: Uses ~50% to reduce heat and avoid throttling.
- Low: Uses ~25%, ideal for multitasking or lower-end systems.
Hardware-accelerated codecs rely less on CPU allocation, but these settings still affect software-based tasks.
For most users, High or Medium is recommended to maintain consistent performance during long operations.
Custom FFmpeg Binary Folder
You can specify a custom FFmpeg binary folder in the Preferences panel.
Simply drag and drop the folder containing your preferred FFmpeg build into the field.
To restore the default binaries, enable Reset to Default, which reverts evrExpanse to its original FFmpeg configuration.
Export Metadata Preferences
SCRATCH Integration
In the Metadata Export Preferences section of evrExpanse, you can configure settings for seamless integration with Assimilate SCRATCH.
Specify the SCRATCH Watch Folder, which is pre-filled with a default location where evrExpanse automatically sends media files and their associated metadata for import into SCRATCH.
You can also define the Project Name, Group, and Timeline.
⚠️ Ensure the Project Name matches exactly with the existing name in SCRATCH.
An incorrect or misspelled name may cause the upload or import process to fail.
Final Cut Pro XML
In the Metadata Export Settings panel, accessible via the Preferences… button in the main window, you can select the desired Final Cut Pro XML format:
FCPXML v1.9, FCPXMLD v1.10, FCPXMLD v1.11, FCPXMLD v1.12, or FCPXMLD v1.13.
This flexibility ensures compatibility across different Final Cut Pro versions and workflows.


Process Transcode Preferences
YUV Format Preservation in Smart Mode
The Preserve YUV Format option gives you greater control when transcoding in Smart Mode.
When enabled, evrExpanse analyzes the input file and, if it is already in YUV format, bypasses transcoding and directly copies the video stream to the output.
This saves time and system resources by avoiding unnecessary processing and helps preserve the original image quality and characteristics.
Maintain Final Cut Pro Compatibility in Smart Mode
When Smart Mode and Optimize for Final Cut Pro are enabled, evrExpanse automatically transcodes media encoded with CineForm or DNx codecs to Apple ProRes.
This ensures full compatibility with Final Cut Pro, which does not natively support those codecs.
With this setting active, only ProRes profiles are used, guaranteeing seamless import, playback, and editing in Final Cut Pro while eliminating codec-related workflow issues.
Rotate Transcoded Files According to Source Metadata.
When enabled, evrExpanse automatically applies rotation to transcoded files based on the source file’s metadata, ensuring the correct orientation in the output.
This Auto-Rotation feature is available only during transcoding in Manual or Smart Mode.
It does not apply when using Rewrap Mode or when no transcoding occurs. Because rotation depends on metadata extraction during transcoding, it is skipped if transcoding is not performed.
![]()
![]()
Preserve Source File Name in Transcoded File
The Keep Original File Name option ensures that transcoded files retain the same name as the source file, simplifying file tracking and project organization.
For example:
example_video.mp4 → example_video.mov
When disabled, evrExpanse applies its default naming convention:
example_video.mp4 → example_video_evrE_ProRes_422.mov
This option is ideal for workflows requiring consistent naming. Additional customization options are available in the evrExpanse Settings panel.
Maintain Folder Structure
The Maintain Folder Structure option ensures that transcoded files mirror the original directory organization of your source media.
This is particularly useful for workflows that rely on structured folder hierarchies for project management, collaboration, or archival.
HEVC Bit Depth
evrExpanse allows you to define the bit depth used when transcoding to HEVC (H.265).
Available options:
- Auto: Matches the bit depth of the source file.
- 8-bit: Applies 8-bit depth to all files in the batch.
- 10-bit: Applies 10-bit depth to all files in the batch.
This flexibility ensures precise control over output quality and file size, allowing you to tailor the process to your project’s requirements.
Process Offload Preferences
Ignore hidden files and folders
The Ignore Hidden Files and Folders option excludes hidden items within the source directory—such as system files or configuration data—from the offload process.
These files are typically unnecessary for media workflows and can clutter the destination if transferred.
When enabled, evrExpanse focuses only on visible, user-relevant media, ensuring a clean and efficient offload.

Include extended attributes
The Include Extended Attributes option preserves Finder Tags and other macOS metadata—such as color-coded labels—during the offload process.
This ensures that your file organization, tagging, and categorization remain intact at the destination.
Save the transfer report to the destination
When enabled, evrExpanse saves a detailed Transfer Report directly to the destination folder alongside the offloaded files.
The report includes file names, timestamps, verification results, and any detected issues, providing complete transparency and easy post-transfer review.
Process Apply Finder Tags Preferences
Include Duplicate Files
The Include Duplicate Files option determines whether evrExpanse processes duplicate files found in the metadata.

When disabled, duplicates—such as the same clip listed in multiple DaVinci Resolve bins or Final Cut Pro events—are skipped to prevent redundant or conflicting Finder Tags. A Duplicates Log is saved in the report folder.
When enabled, duplicates are also tagged, allowing flexibility for workflows where multiple references are intentional.
If metadata differs between duplicates, the resulting Finder Tags are merged, which may overwrite file-specific tag variations.
Tagging Behavior:
All tagging modes process duplicates sequentially, in the order they appear in the metadata file.Add / Append: Merges all unique tags from each occurrence.
Example:FileA.movwith(X,Z)and(D,E,V)→ final tags:(A,B,X,Z,D,E,V).Overwrite: Each duplicate replaces the previous Finder Tags; the last duplicate processed defines the final tag set.
Remove: Removes tags listed in metadata. If duplicates exist, all referenced tags across them are cumulatively removed.
Example:Remove: (X,Z)andRemove: (D)→ final tags:(A,B,E,V).
The Preferences Buttons
In the preferences panel there are three buttons (from left to right): Deactivate Licence, Event Log, Default Settings, User Manual and Return to Main Window

Deactivate Licence
Event Log
The Event Log records all processes executed in evrExpanse, providing a complete history of application activity.
- Clicking Browse All Past Months Logs opens the folder containing all logs since the first run on the host machine. Logs are saved monthly using the format:
Event Log YYYY-MM.log - Clicking View Current Month Log opens the current month’s log in a viewer window, where you can also browse older entries.
- In addition, each processed folder includes a local log file in its report subfolder, containing detailed logs specific to that process.

💡 Use Event Logs to review past operations or troubleshoot workflow issues.
Reset to Default Settings
If you encounter issues with the software or simply want to restore the original configuration, you can reset all settings to their factory defaults.
Click the Reset Settings button located in the Preferences panel of evrExpanse. This action will revert all application settings to their default values.

User Manual
The User Manual button provides quick access to the User Manual at this page.
Return to Main Window
Click Return to Main Window to instantly go back to evrExpanse’s main interface and continue your work.
Media Files and Camera Specifications
evrExpanse supports a wide range of media formats and It is compatible with cameras from leading manufacturers.
For the latest and most complete list of supported cameras, please refer to the Camera Compatibility Tables on the website.
How to import CSV file in DaVinci Resolve
1. Open Your Project:
Start DaVinci Resolve and open your project. Make sure the Media Pool is selected (indicated by a red line).
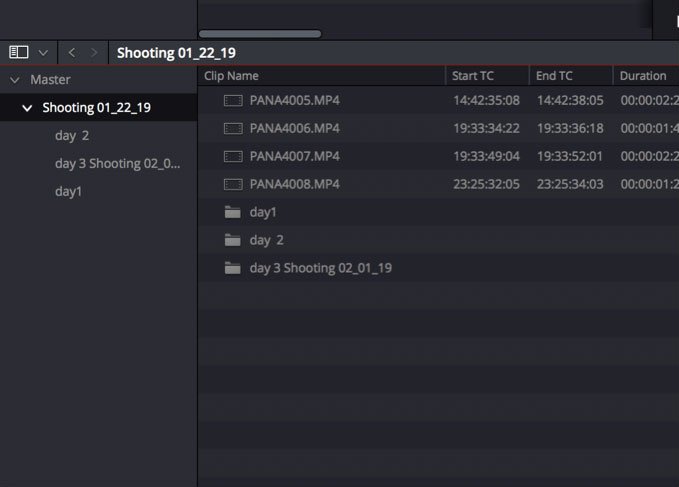
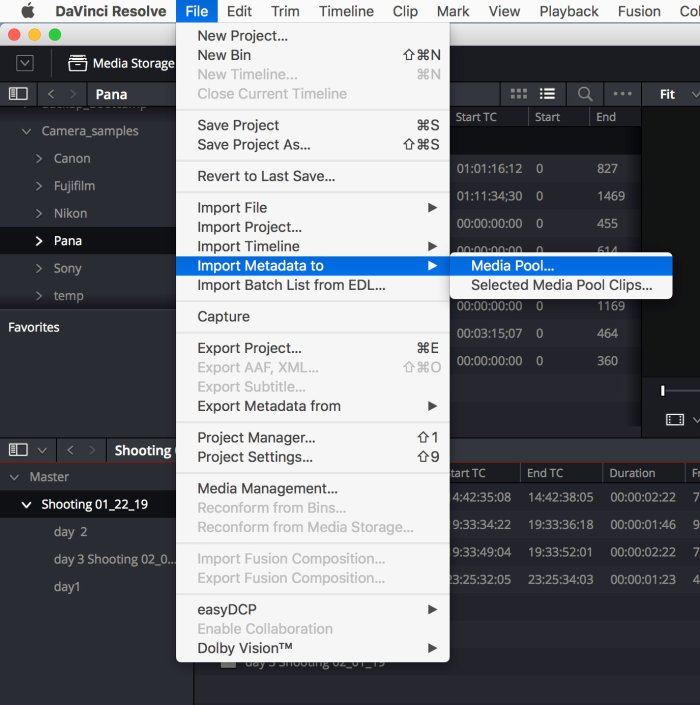
2. Import Metadata:
- To import metadata for all clips, go to File > Import Metadata To > Media Pool...
- To import metadata only for selected clips, choose File > Import Metadata To > Selected Clips...
3. Select the CSV File:
In the Import Metadata dialog, select the CSV file generated by evrExpanse and click Open.
4. Set Matching Options:
By default, DaVinci Resolve tries to match using both filename and clip start/end timecode.
- Uncheck “Match using clip start and end Timecode”
- Check “Match using source file paths”
This ensures clips are matched correctly, since imported metadata may not include timecode.
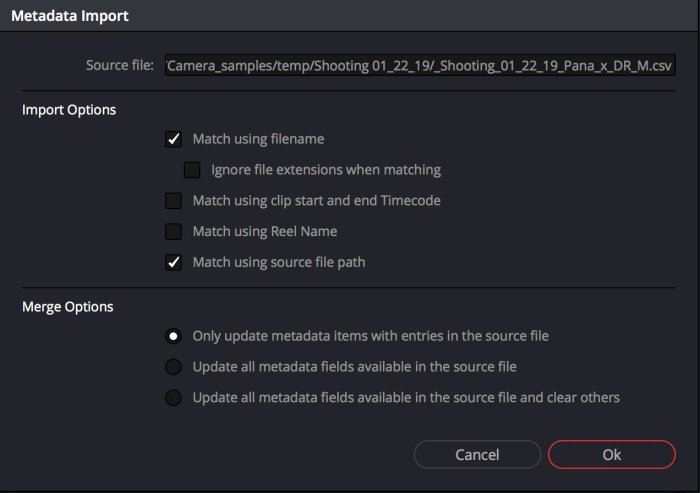
5. Choose Merge Options:
Select how you want metadata to be updated:
- Only update metadata items with entries in the source file (recommended): Only updates metadata fields with valid entries in the CSV; all other fields remain unchanged.
- Update all metadata fields available in the source file: Overwrites all referenced fields for matching clips, regardless of value.
- Update all metadata fields available in the source file and clear others: Overwrites referenced fields and clears any other metadata fields not included in the CSV.
6. Complete the Import:
Click OK. Metadata from your CSV will be imported to the selected clips.

Finder Tag Integration:
If your media files are tagged in macOS with Finder Tags, these will appear in the Keywords and Flags sections within DaVinci Resolve. This makes it easy to organize, categorize, and locate tagged assets within your project.
How to import in Final Cut Pro
Importing media and metadata into Final Cut Pro using FCPXML is simple:
- Double-click the exported
.FCPXMLor.FCPXMLDfile. Final Cut Pro will open automatically and prompt you to choose the library for import. - Alternatively, you can import the FCPXML file directly from within Final Cut Pro via the application's import options.

Once imported, select your media in the browser.
- Metadata will appear in the information inspector, grouped under a new Metadata View called evrExpanse.

Note:
Any media files already present in an FCP event or timeline will inherit the imported metadata from the processed files.
You can further customize metadata views by opening the Metadata Views window and selecting "evrApp Properties" to add the imported metadata to any view as you prefer.

Creating a Smart Collection in Final Cut Pro Using evrExpanse Metadata
- Export FCPXML from evrExpanse
Export your media with embedded metadata in FCPXML format. - Import the FCPXML into Final Cut Pro
- Via Menu: Go to File > Import > XML and select your exported FCPXML file.
- Via Finder: Double-click the FCPXML file to open it directly in Final Cut Pro.
- Verify Metadata
Select a clip and check the Inspector to confirm metadata fields are populated. - Create a New Smart Collection
Right-click your library in the sidebar or click New Smart Collection at the bottom. - Set Smart Collection Criteria
Use dropdowns to set your filter (e.g., Text > All Text) and enter your desired metadata string. - Add Additional Criteria (Optional)
Click "+" to refine filters. Add more Text > All Text conditions as needed. - Save the Smart Collection
Close the window. The Smart Collection will now automatically update to include all clips that match your criteria.
Troubleshooting
Activating evrExpanse Metadata View in Final Cut Pro
If you’ve upgraded to evrExpanse from an earlier version or are importing metadata for the first time, you might not immediately see the new metadata in Final Cut Pro’s Inspector after importing your XML file. Don’t worry—your metadata is still there! You just need to activate or refresh the enhanced evrExpanse Metadata View. This is a one-time setup, and future projects will inherit the new view automatically.
How to Activate the Metadata View
1. Export Metadata from evrExpanse
- Launch evrExpanse and select your media’s source folder.
- Export metadata in Final Cut Pro format.
2. Import Metadata into Final Cut Pro
- Open Final Cut Pro.
- Double-click the exported
.FCPXMLor.FCPXMLDfile to import both media and metadata.
3. Access Metadata View
- Select a clip in the timeline or browser.
- In the Info Inspector, open the Metadata View dropdown.
Activate Metadata View
- Choose Edit Metadata View… from the dropdown.
- In the list, find and select evrExpanse.
- Click OK to confirm and activate.
Note:
Steps 1 and 2 are required to "wake up" the enhanced evrExpanse Metadata View. Once completed, the new view and imported metadata will be available for all projects.
Refreshing Metadata Labels in Final Cut Pro
If your custom metadata fields don’t show updated names or labels after upgrading evrExpanse, follow these steps:
- Open Final Cut Pro.
- In the Info Inspector, open the Metadata View menu and choose Edit Metadata Views…
- Select any old evrExpanse fields (e.g., Record date) and delete them
(Right-click > Delete Custom Metadata Field). - Close and reopen Final Cut Pro.
- Import the updated FCPXML exported by evrExpanse.
Your updated metadata labels will now display correctly in the Info Inspector.
How to import in Assimilate Scratch
Importing multimedia files and metadata into Assimilate SCRATCH is even easier than with Final Cut Pro. Once evrExpanse completes the export, the XML file is placed in SCRATCH’s Watch folder and automatically loaded when the app and project are opened.
Just ensure the project name in evrExpanse matches the one in SCRATCH—done! The media and metadata appear in the right panel.
A backup XML is also saved in the processed folder (evrE_FolderName) for use on other workstations.
After processing, SCRATCH logs the import in Scratch_insert_log_FolderName.log within the same folder.

How to import ALE file in Avid Media Composer
After having created the .ale file in evrExpanse, go to the Avid Media Composer and import the clips if not done so far. They should thereon be available as master clips.

Select the bin in the Avid Media Composer which contains the relevant clips.
Select those clips and choose “Input > Import Media…” from the context menu in the bin.

Open the “Options”, then click on “Options…” navigate to the Shot Log tab and select
“Merge events with known master clips”.
Navigate to the ALE file you created before and click “Open”.

Avid Media Composer now matches master clips and metadata information from the .ale file according to their TimeCode, Bin Name and Name of clip.
The information from the .ale file is attached within additional columns in the bin table. Some of the columns are already known by the Avid Media Composer, all unknown information will be added as custom columns.

If you cannot see any custom columns, perform the following steps:
- Close and re-open the bin
- Right-click in the free space of the bin window and click on “Choose columns…” in the context menu.
- Then select and unselect columns, the custom columns from the imported .ale file you will find at the end of the list.
How to import CSV file in Silverstack
After having created the .csv file in evrExpanse, go to the Silverstack Composer and import the clips if not done so far.

To be able to import metadata evrExpanse will use the Drylab CSV import feature in Silverstack.
Select the folder or bin in the library of Silverstack that you want to import metadata for.
Then, in the “Import” menu button in the toolbar select the option Drylab CSV:

When the Finder dialog points you to select a file, choose the CSV file exported from evrExpanse and select “Open”.
There are two options to match the events in the CSV to the clips in the library:
- by Clip Name
- by Creation Date

Select Clip Name and Creation Date (Date only) and click “Continue”.
Import Section: In this step you can select or unselect the metadata that should be imported from the CSV to the Silverstack library.
evrExpanse metadata are under the sections:
- Camera Settings
- Lens and Filter
- Comment and Caption
- Append Tags
- Day Number + Day Date (as Custom 1)
Insert/Update Behavior: Choose if you only want to insert new metadata if a fields is empty or you want to force an overwrite.

Select the option in bold and click "Finish"

If the media files have been tagged using the macOS Finder Tag, the information will be reported in Tags column in Silverstack.
Canon XF Utility Integration Workflow
📌 Applicable to Canon EOS Cinema cameras prior to the C80 and C400 series, including: C300 / C500 / C200 / C700 / C70 / R5 C and others.
Note: Canon C80 and C400 (2024) embed metadata directly in the MXF files — evrExpanse natively supports those without this integration.
Prerequisites:
- Download Canon XF Utility from Canon’s official site.
- Install Canon XF Utility and the latest evrExpanse on your macOS system.
- Store your
.MXFclips in their original folder structure, including theINDEX.MIFfile. - Ensure you have write permissions for creating symlinks (if needed).
Workflow Steps
1. Open Canon XF Utility
- Launch Canon XF Utility.
- Load the card or folder containing your .MXF files.
- Important: The INDEX.MIF file must be present. Without it, Canon XF Utility will not recognize or load the clips or metadata.
2. Set Preferences in XF Utility
- Frame Grab 1 tab:
- File Type: Set to JPEG
- Image Quality: Set to 1 (metadata is preserved at any quality)
- Folder for Frame Grabs: Set your export path
(Default: /Users/username/Documents/Canon/XFUtility/Photo)
- Frame Grab 2 tab:
- File naming is not critical; evrExpanse matches by folder structure, not filename.
3. Manually Grab a Frame for Each Clip
- Select each clip in Canon XF Utility.
- Click "Grab a Single Still Frame" at the bottom of the interface.
- Note: Batch frame grab export is not supported. This step must be done manually for each clip.
4. Make JPGs Accessible to evrExpanse
Option A: Copy/Move JPGs
- Place the JPGs inside any folder or subfolder within your selected Source Folder in evrExpanse.
Option B: Create a Symlink
ℹ️ Note: A symlink (symbolic link) is not the same as a macOS Alias. Symlinks behave like actual folder paths at the system level, which evrExpanse can follow reliably. In contrast, Aliases are macOS-specific pointers that may not work correctly in automated workflows.
- Create a symbolic link (not a macOS Alias) from the XF Utility’s frame grab folder.
- Move the symlink into the Source Folder you will use in evrExpanse.
- Tip: This is a one-time setup if your XF Utility export path stays the same.
- A Quick Action is available to download to automate this symlink creation.
5. Run Export or Transcode in evrExpanse
- In evrExpanse, select the Source Folder containing your Canon MXF footage and either the actual .JPG files or the symlink folder.
- Run Export Metadata or Transcode as needed.
What evrExpanse Does
- Automatically matches .JPG frame grabs with corresponding .MXF clips.
- Extracts enhanced metadata using these matched pairs.
- Embeds enhanced metadata into transcoded files (when transcoding is performed).