evrExpanse Instruction Manual 2.3.0 - updated December 08, 2022
Table of Contents
Installation and how to use
How to Install
Install evrExpanse. Open the DMG file and drag & drop evrExpanse.app to the Applications folder.

 On the first run a pop up window will show up. If you have to activate any paid licence key then insert it into the corresponding field and click Activate. For Demo just click on Try out button (no need of insert any licence key).
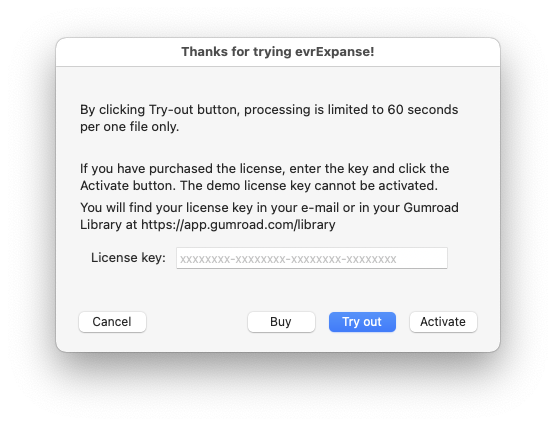
On the first run also, if not yet done, it's required to install Python 3. A message will be displayed with a button to download the installation package if evrExpanse detects that is not present on your system.

How to uninstall
Delete (Move to Trash) the /Applications/ evrExpanse.app
How to use
Click Run button to select a folder with camera files to be processed.

After clicking the Run button the configuration windows will pop up.
evrExpanse has two main functions: Metadata Export and Master Files Transcoding and they work independently, which means that you can choose which one you want to perform.
Depending of the workflow, they can be used individually or sequentially. For example: Metadata Export is used to import the metadata of the Master files which will go directly to the editing system; Alternatively, if the master files must first be transcoded to an intermediate codec before being imported into the editing system, Master Files Transcoding is used first and then Export Metadata on transcoded files so that the transcoded files can be imported to the NLEs with the metadata inherited from Master files.
![]()
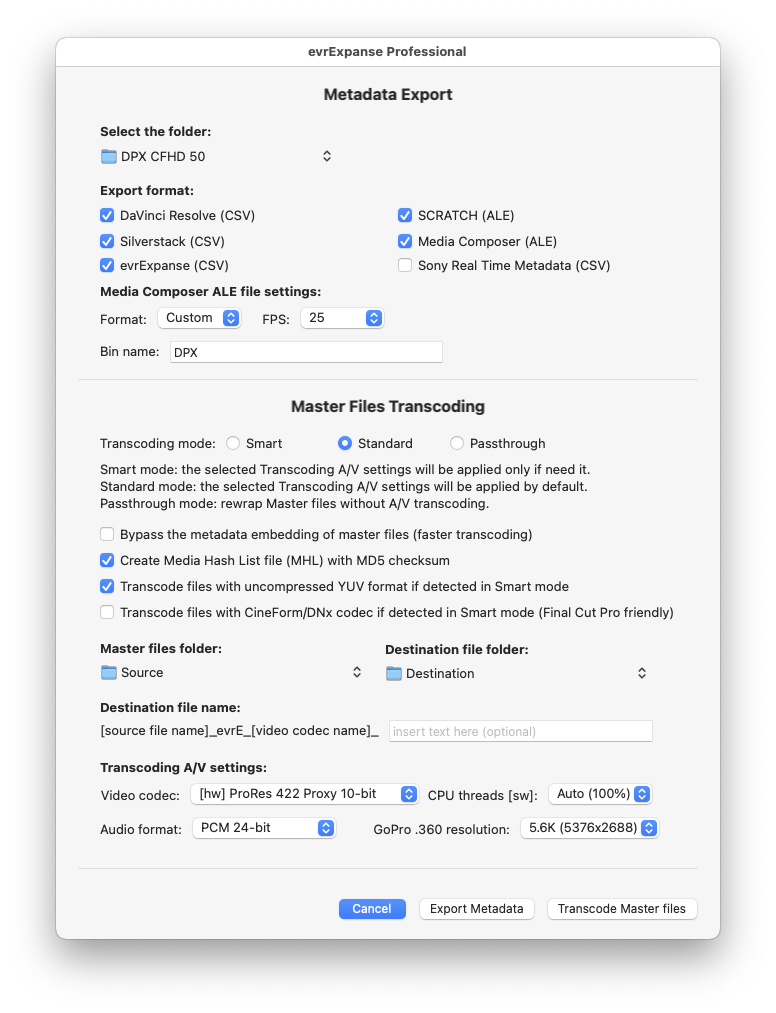
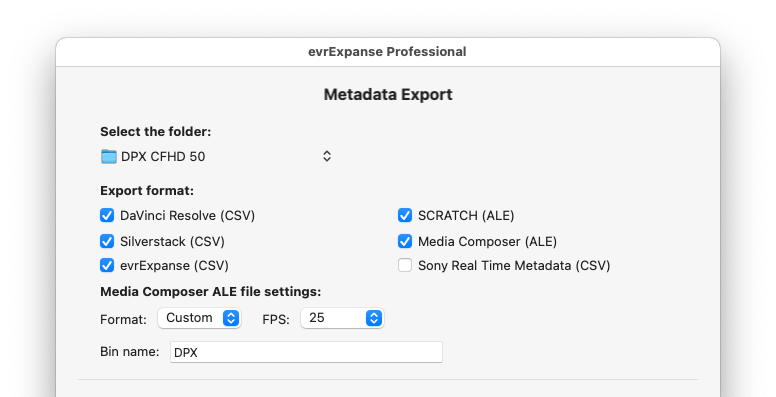
Export Metadata
Select the folder:
The selected folder is the one chosen after clicking the Run button in the start window. It can be left as is or you can choose another folder. Drag and drop folder from Finder is supported.
Export format:
Select the export format for the metadata file.
The available options are: SCRATCH (ale), DaVinci Resolve (csv), Media Composer (ale), Silverstack (csv), evrExpanse (csv), Sony Real Time Metadata (csv)
For the Media Composer (ALE) format, check the default values of Format, FPS or Bin Name. By default, the value of Bin Name is automatically filled with the name of the selected folder, but can be changed.
Master Files Transcoding
Smart mode:
This option will perform smart transcoding consisting of checking the Master video codec and audio format and deciding whether to transcode or pass-thru the stream. If the Master video codec is already an intermediate or mezzanine codec such as ProRes, DNx or CineForm, a pass-thru will be performed instead of re-transcoding. If the source audio codec is PCM (16 bit / 24 bit / 32 bit), then the Master audio stream will be pass-thru. If it is not PCM, a transcoding will be performed at the set value (16 bit / 24 bit / 32 bit).
Audio and video streams are treated independently and they can be transcoded to the desired format or passthrough. Audio streams are mapped 1:1, meaning that the transcoded files will have the same number of audio channels as the master ones.
From tests performed with Smart Transcode enabled, the whole process is up to 7x faster (2x to 7x depending on the codec profile and storage speed) on media already encoded in ProRes / DNxHR / CineForm.

Standard mode:
The Standard mode is the classic transcoding with audio and video streams transcoded at the selected settings.
Passthru mode:
The Passthru transcoding option enables 100% quality pass-through of Master audio and video streams, embedding metadata in native format and in XMP format (supported by Adobe Premiere Pro). In this mode the output container is set to quicktime except for MP4 input files which is maintained as MP4 for codec compatibility.
Although one of the peculiarities of evrExpanse is to embed the metadata of the Master files in the transcoded copies, there is an option for those times you want to speed up the transcoding: Bypass embedding of the Master file metadata.
Note that by enabling this option the transcoded file does not have all the metadata of the master file.
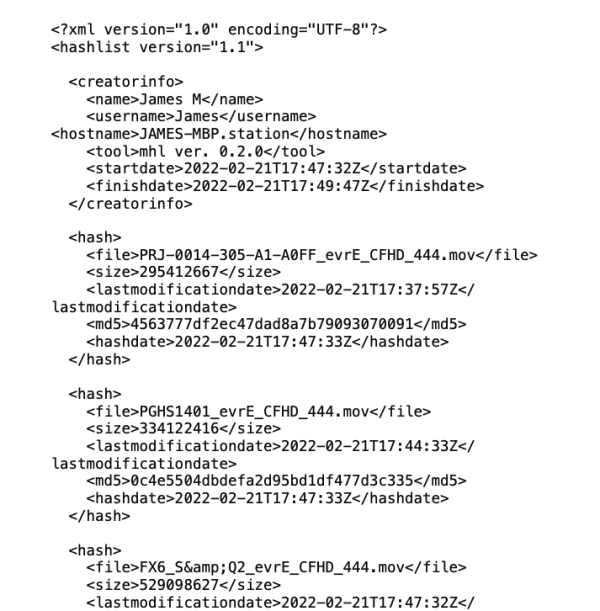
When checked evrExpanse create Media Hash List file (MHL) with MD5 checksum, a standard file format containing an inventory of all the transcoded files and their respective hash values. MHL is an XML format, that basically lists all the files in a folder and all of its subfolders as well as the corresponding checksums and comprehends all the information necessary to tell if the folder structure or any of the contained files was modified since the MHL file was created. The MHL file name is DestinationFolderNameYYYY-MM-ddhhmmss.mhl
Note that the MHL file will contain all the media files (MP4 / MOV) inside the destination folder not just the ones being processed at that time. this is because it is possible to perform multiple transcodes in the same destination folder and each MHL file created will contain the files present at that moment.
Most production houses and editing / FX studios require you to provide the MHL file for quality assurance when delivering files to them. To verify if the information of the MHL file match the folder structure and file contents a free tool SealVerify made by Pomfort can be used.
If Smart mode is selected, checking the box:
- Transcode uncompressed video (YUV) enable or disable the transcoding of uncompressed YUV files if detected in source file.
- Transcode CineForm/DNx enable or disable the transcoding of CineForm or DNx codec if detected in source file. This option is Final Cut Pro friendly as it does not support media with CineForm or DNx codecs. When checking this option selected codec for transcoding should be only ProRes profiles.
Master files folder:
Select the Master folder to be transcoded. The default folder is the same that has been selected on the very first step of the process (after clicking the Run button at the startup window). Drag and drop folder from Finder is also supported.
![]()
Destination files folder:
Select the destination folder of the transcoded media file. The default folder is the same that has been selected on the very first step of the process (after clicking the Run button at the startup window). Drag and drop folder from Finder is supported.
Destination file name:
In this box you can customize the name of the transcoded files by adding a text at the end of the name (optional).
The applied name will be: SourceFineNameevrECodecName_YourText.mov (es. A005C039_201101OZ_evrE_DNxHR_CamA.mov)
Video codec:
Select the ProRes / DNxHR / CineForm / DPX / EXR profiles of your choice. Available profile are those specified in the Apple ProRes white paper and in the Avid DNxHR specification.
- Apple ProRes
Codec type: hardware accelerated (CPU+GPU)
Pixel format:- YUV 4:2:2 - 10-bit (ProRes 422 Proxy, ProRes 422 LT, ProRes 422, ProRes 422 HQ)
- YUV 4:4:4:4 - 10-bit (ProRes 4444, ProRes 4444 XQ) with support for alpha channel
- Avid DNxHR
Codec type: software accelerated (CPU)
Pixel format:- YUV 4:2:2 - 8-bit (DNxHR LB, DNxHR SQ, DNxHR HQ)
- YUV 4:2:2 - 10-bit (DNxHR HQX), YUV 4:4:4 - 10-bit (DNxHR 444)
- GoPro CineForm:
Codec type: software accelerated (CPU)
Pixel format:- YUV 4:2:2 - 10-bit (low, medium, high, film1, film2, film3+ )
- RGB 4:4:4 - 12-bit (RGB 444)
- DPX:
Codec type: software accelerated (CPU)
Pixel format:- RGB 10/12/16 bit per channel
- RGBA 8 bit per channel
- EXR:
Codec type: software accelerated (CPU)
Compression: Uncompressed/Zip1/RLE
Pixel format:- RGB half/float (16/32 bit)
- RGBA half/float (16/32 bit)
Audio codec:
Available audio formats are: PCM 16/24/32 bit. When DPX or EXR codec is selected, the audio tracks of the master file (if any) will be transcoded/exported into a separate WAV file from the DPX/EXR file sequence. Each audio track can be mono/stereo/multichannel depending on how the audio tracks are formatted in the master file.
CPU load (only for software accelerated codecs):
This option is designed to balance the load on CPU threads to leave room for other processes to run during the transcoding process.
Hardware-accelerated codecs are less affected by this option as the transcoding process relies on the balance between CPU and GPU.
Available audio formats are: Auto (full), High, Medium, Low
evrExpanse is a multi-threaded application and the selected CPU load profiles will help to balance the workload for your needs. On Auto (full), evrExpanse will decide the best CPU load balancing which can go up to 100%. The other options will force to use the selected CPU load.
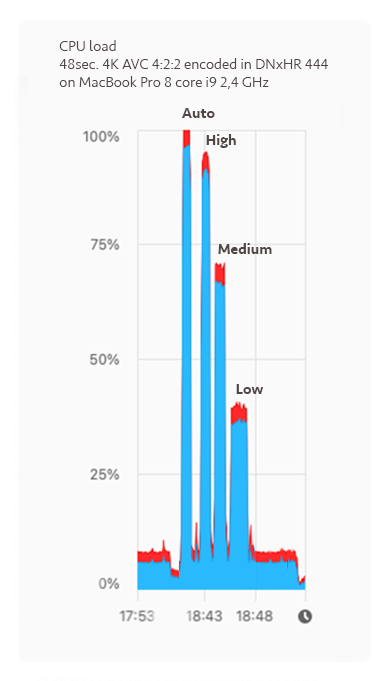
From the tests performed, the best performance is achieved with Auto or High profiles on systems up to 8 cores. On systems with a higher number of CPU cores it is better to try less extreme profiles such as High or Medium. However, you must also take into account the dissipation capacity of your Mac as the CPU performance is heavily affected by overheating (Thermal Throttling).
GoPro .360 resolution:
Available audio formats are: 4K (4096x2048), 5.6K (5376x2688). This option is designed to select the preferred Equirectangular resolution of the exported 360 video if any raw GoPro .360 video is processed.
everExpanse can also process the GoPro 360 proprietary file format which uses a 360-degree video projection type (Equi-Angular Cubemap projection or EAC) not directly compatible with the type of projection (Equirectangular) supported by streaming platforms or video editing applications. evrExpanse is able to converts these raw .360 files to equirectangular projection video and transcodes them to intermediate codecs embedding the master file EXIF metadata for uploading to YouTube or 360 editors, such as DaVinci Resolve, Adobe Premiere Pro, or Final Cut Pro.
When ready, click the Export Metadata or the Transcode Master files buttons to start the batch process.
During the Export process or the Transcoding process a progress bar will be displayed.

If you need to stop the batch process, click the Stop button. When clicking the End button in the following warning message, wait for the current file to be processed.

When the process is finished, the exported/transcoded files will be available inside the selected folder.

A log file with details of the performed process will be generated inside the elaborated/transcoded folder (Export/Transcode).
![]()
Media files and Camera specifications
File type: MOV, MP4, MXF
Camera supported: Panasonic, Nikon, Sony Alpha, Fujifilm, Canon, Sony XDCAM*, Z Cam, Kinefinity**, Atomos (Ninja & Inferno), McPRO24fps, GoPro, FiLMIC PRO, Apple iPhone.
While Export Metadata support are restricted to the list of cameras above, Transcoding is supported for every file type supported (MOV/MP4/MXF).
Note: to be able to extract all the metadata possible, the XML sidecar file should be present in the same folder of the media file.
Kinefinity support is conditioned by the presence of the slate.txt or XXXX-slate.txt** (where XXXX is the exact name of the MOV file) which must be present in the same folder as the MOV file and there must be no other MOV files inside the folder. It is highly recommended to process the folder structure in the original format as written by the camera.
How to import CSV file in Davinci Resolve
Open a project containing clips you want to populate with imported metadata, click the media pool (make sure a red line will be visible if not point n.3 will be not possible)
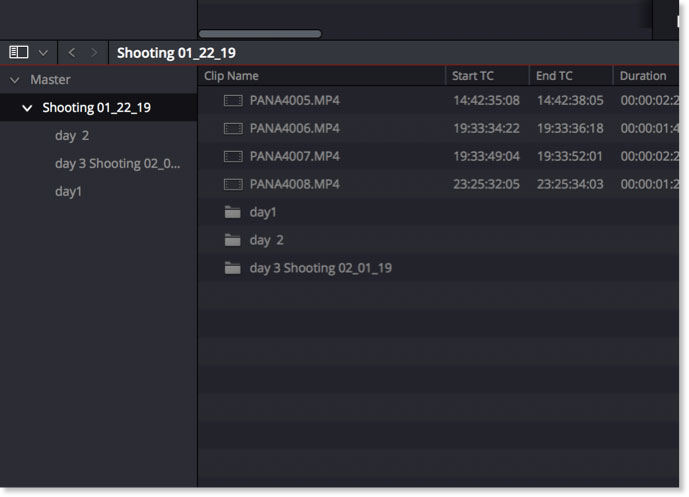
Optionally, select which clips in the Media Pool you want to import metadata to.
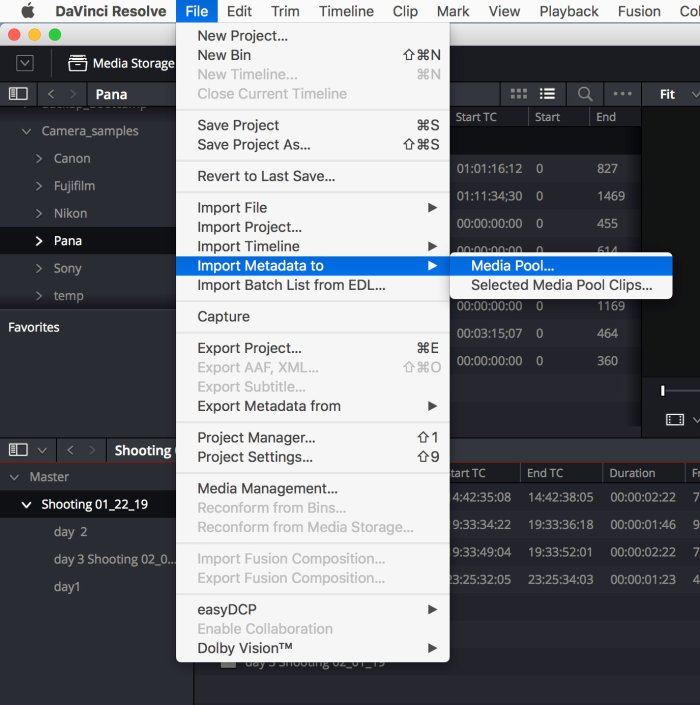
Choose File > Import Metadata To > Media Pool to import metadata to potentially every
Choose File > Import Metadata To > Media Pool to import metadata to potentially every clip in the Media Pool, or choose File > Import Metadata To > Selected Clips to only import metadata to clips you selected in step 2.
When the Import Metadata dialog appears, choose a metadata CSV file to import, and click Open.
When the Metadata Import dialog appears, by default, DaVinci Resolve tries to use “Match using filename” and “Match using clip start and end Timecode” to match each line of metadata in the CSV file with a clip in the Media Pool, but because "clip start and end Timecode" are not present in imported metadata you have to uncheck “Match using clip start and end Timecode” and (optionally) check “Match using source file paths".
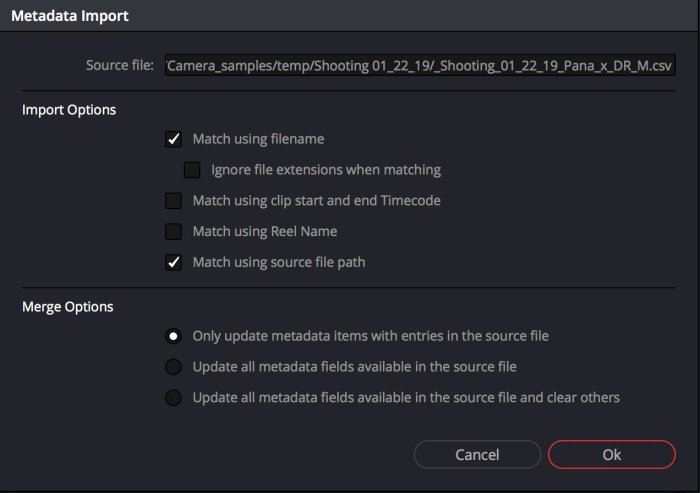
Next, choose which Merge Option you want to use in the Metadata Import dialog.
There are three options:
- Only update metadata items with entries in the source file (recommended).
The default setting. Only updates a clip’s metadata if there’s a valid entry in the imported CSV file. Other clip metadata fields are left as they were before the import. - Update all metadata fields available in the source file: For each clip that corresponds to a line of metadata in the imported CSV file, every single metadata field referenced by the CSV file is overwritten, regardless of whether or not there’s a valid entry for that field.
- Update all metadata fields available in the source file and clear others: For each clip that corresponds to a line of metadata in the imported CSV file, every single metadata field referenced by the CSV file is overwritten, regardless of whether or not there’s a valid entry for that field.
Furthermore, metadata fields that aren’t referenced by the imported CSV file are cleared of
When you’re finished choosing options, click OK and all available metadata from the source CSV file will be imported.
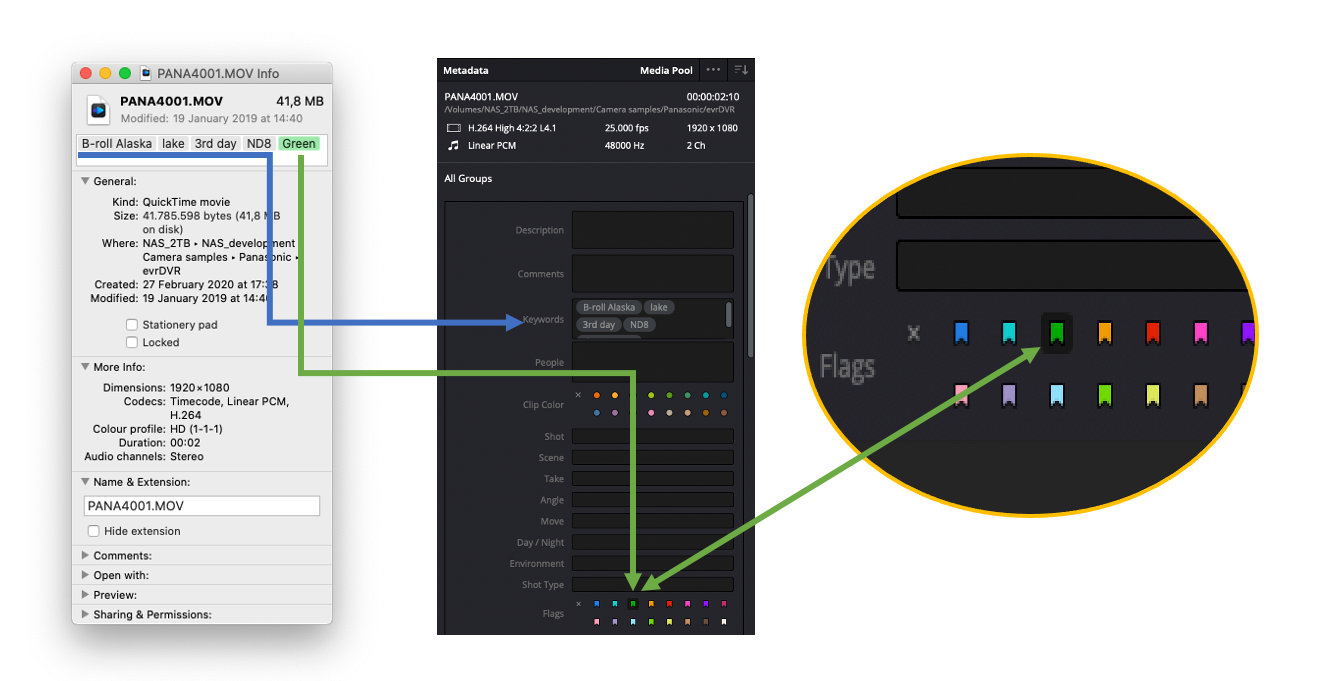
If the media files have been tagged using the macOS Finder Tag, the information will be reported in Keyword window and in the Flags section in DaVinci Resolve.
How to import ALE file in Assimilate Scratch
To import .ale files exported by evrExpanse that contain metadata information in Scratch you have to follow 4 consecutive steps:
- Import the clips into Scratch that you want to apply the metadata information to.
- Import the .ale file from evrExpanse.
- Check settings for matching and import.
- Go to the clip view and enable the imported metadata.
Importing the Clips
Click the “Import Clips” button from the lower left side of the interface:

Choose the clips you exported the ALE for to add them to the Scratch project:

Importing the ALE File
Go to the “Conform”, click the “Import” button to open the ALE:

Navigate to the exported ALE and click “Open”.

Check Settings for Matching and Import
You will see the matching user interface where now the ALE data will be matched to the clips:

At the top of the the columns from the .ale you can select the action that should be performed for each column. Make sure you have all the columns set to “Import”. Matching on TC or File Name will be easiest so make sure to that at least one of those columns, or any other you want to match based on, is set to “Match on…”. You can make that selection from the drop down on top of every column. "Match on Name" is already selected by default and "Match on TimeCode Start" it's a good choice.

Click “Start Matching” to match the metadata to the clips according to your settings.
While then selecting the different rows in the ALE you will see the clips the data will be matched to in the right bar of the wizard.

Click “Execute” when you are happy with the match and want the metadata to be taken over to the clips.
Clip view and enable the imported metadata
Go to the Media Browser, "Metadata" section and after selecting one file in the table, select all the imported metadata.

And they will be shown as the below figure.

How to import ALE file in Avid Media Composer
After having created the .ale file in evrExpanse, go to the Avid Media Composer and import the clips if not done so far. They should thereon be available as master clips.
Select the bin in the Avid Media Composer which contains the relevant clips.
Select those clips and choose “Input > Import Media…” from the context menu in the bin.
Open the “Options”, then click on “Options…” navigate to the Shot Log tab and select
“Merge events with known master clips”.
Navigate to the ALE file you created before and click “Open”.
Avid Media Composer now matches master clips and metadata information from the .ale file according to their TimeCode, Bin Name and Name of clip.
The information from the .ale file is attached within additional columns in the bin table. Some of the columns are already known by the Avid Media Composer, all unknown information will be added as custom columns.
If you cannot see any custom columns, perform the following steps:
- Close and re-open the bin
- Right-click in the free space of the bin window and click on “Choose columns…” in the context menu.
- Then select and unselect columns, the custom columns from the imported .ale file you will find at the end of the list.
How to import CSV file in Silverstack
After having created the .csv file in evrExpanse, go to the Silverstack Composer and import the clips if not done so far.
To be able to import metadata evrExpanse will use the Drylab CSV import feature in Silverstack.
Select the folder or bin in the library of Silverstack that you want to import metadata for.
Then, in the “Import” menu button in the toolbar select the option Drylab CSV:
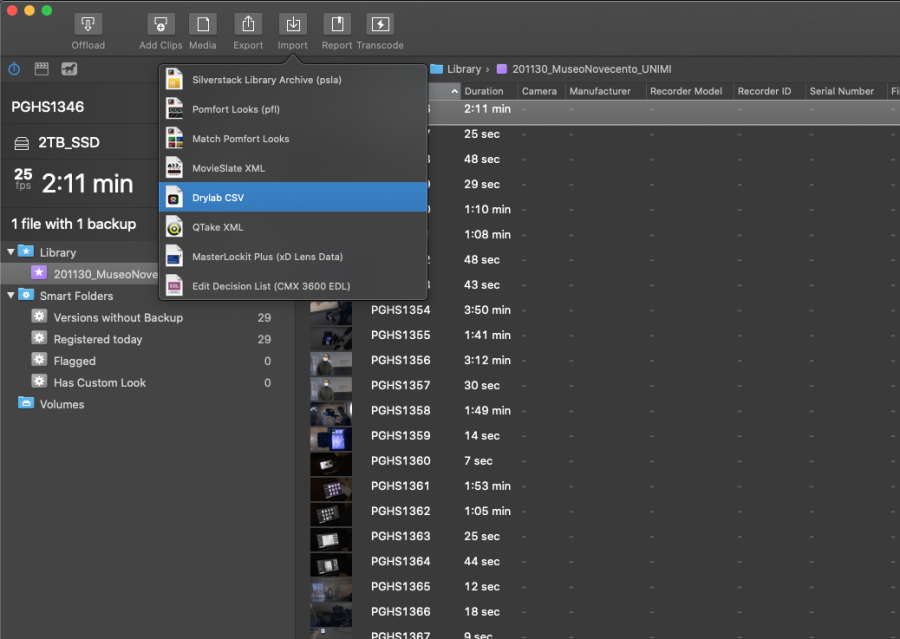
When the Finder dialog points you to select a file, choose the CSV file exported from evrExpanse and select “Open”.
There are two options to match the events in the CSV to the clips in the library:
- by Clip Name
- by Creation Date
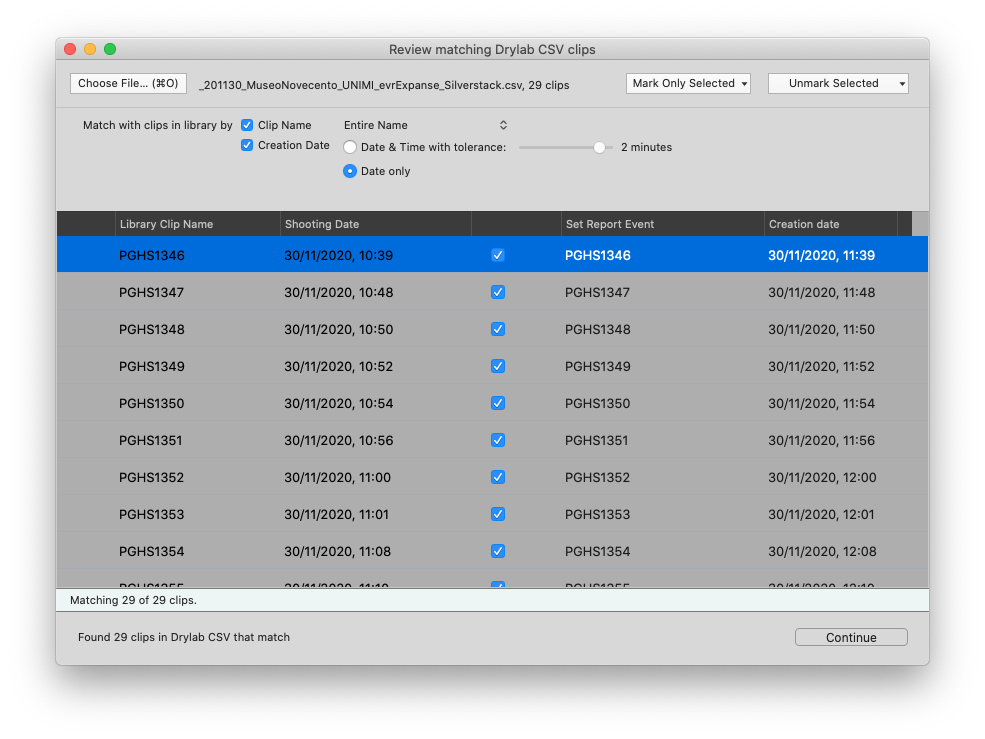
Select Clip Name and Creation Date (Date only) and click “Continue”.
Import Section: In this step you can select or unselect the metadata that should be imported from the CSV to the Silverstack library.
evrExpanse metadata are under the sections:
- Camera Settings
- Lens and Filter
- Comment and Caption
- Append Tags
- Day Number + Day Date (as Custom 1)
Insert/Update Behavior: Choose if you only want to insert new metadata if a fields is empty or you want to force an overwrite.
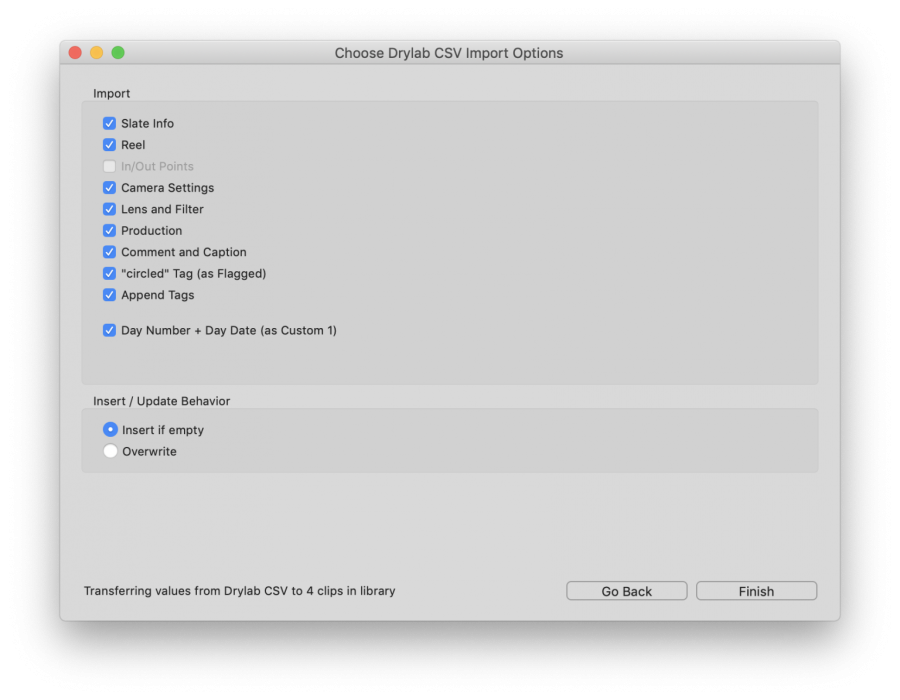
Select the option in bold and click "Finish"
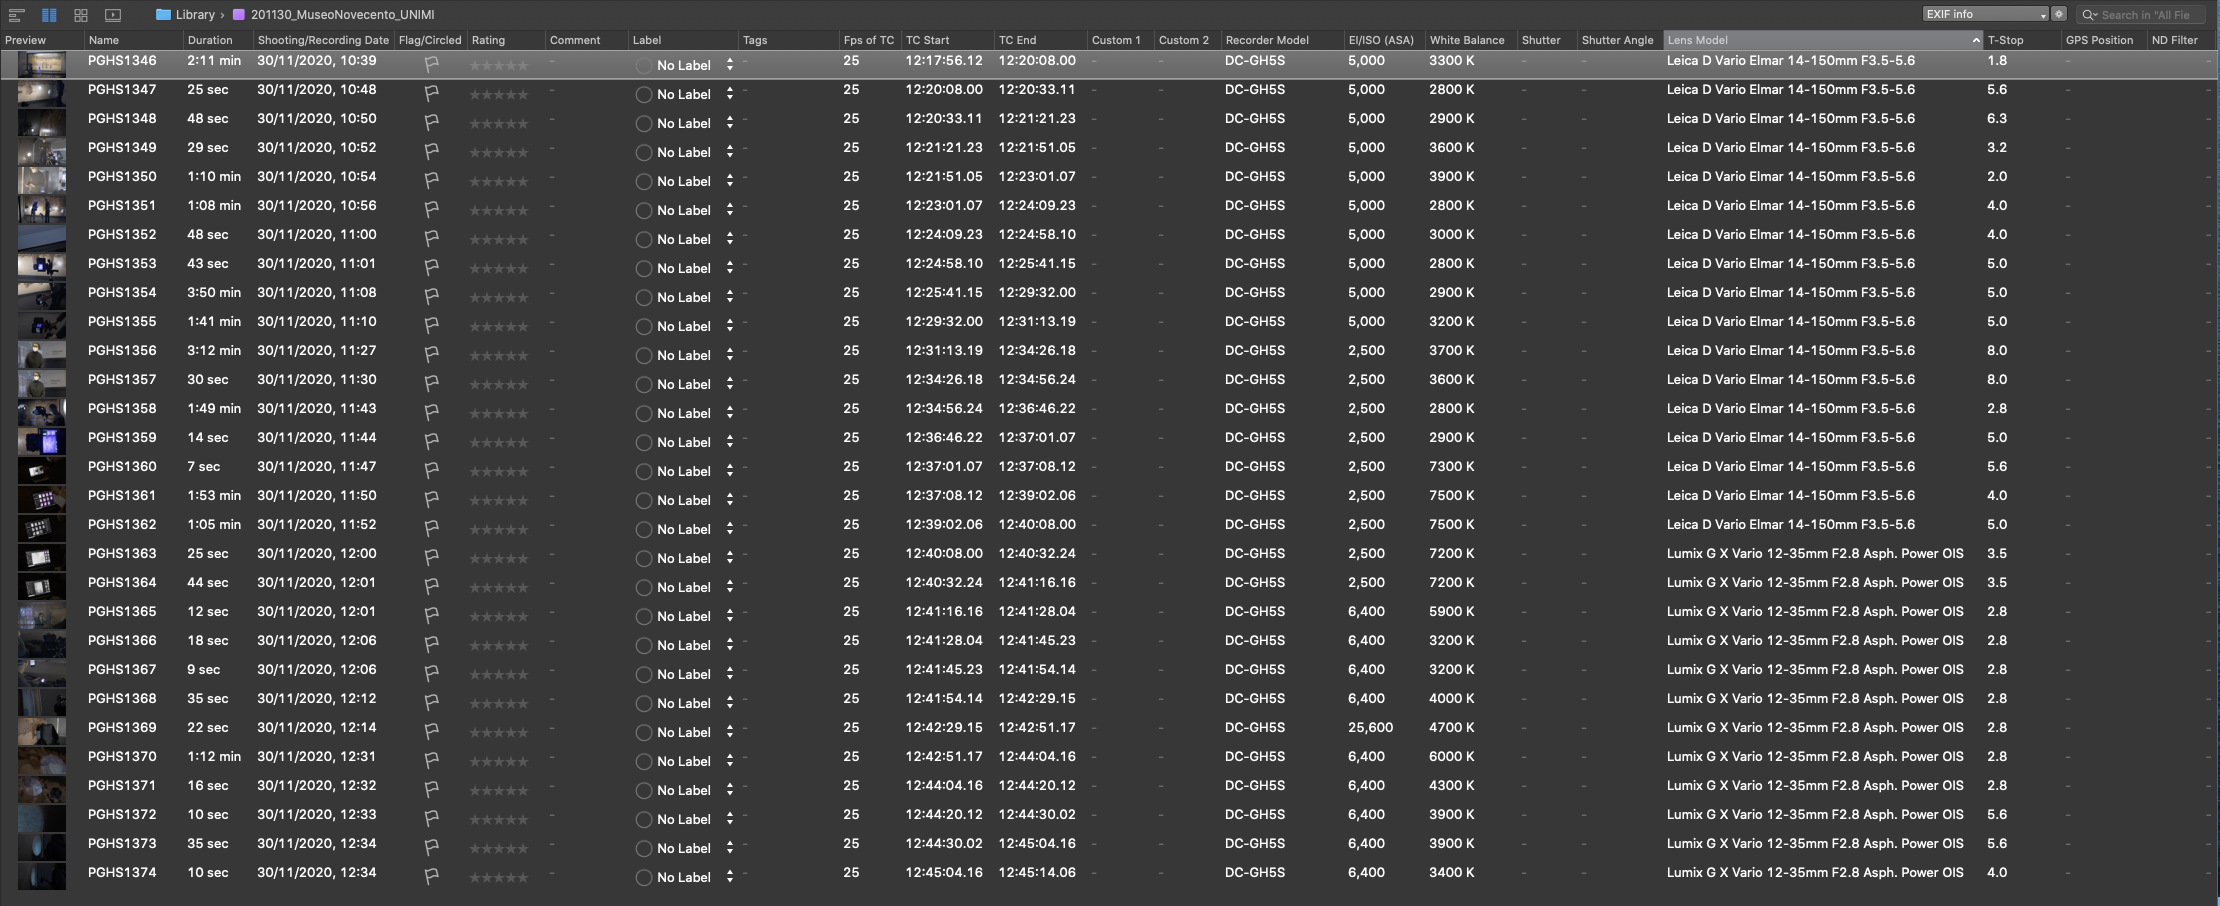
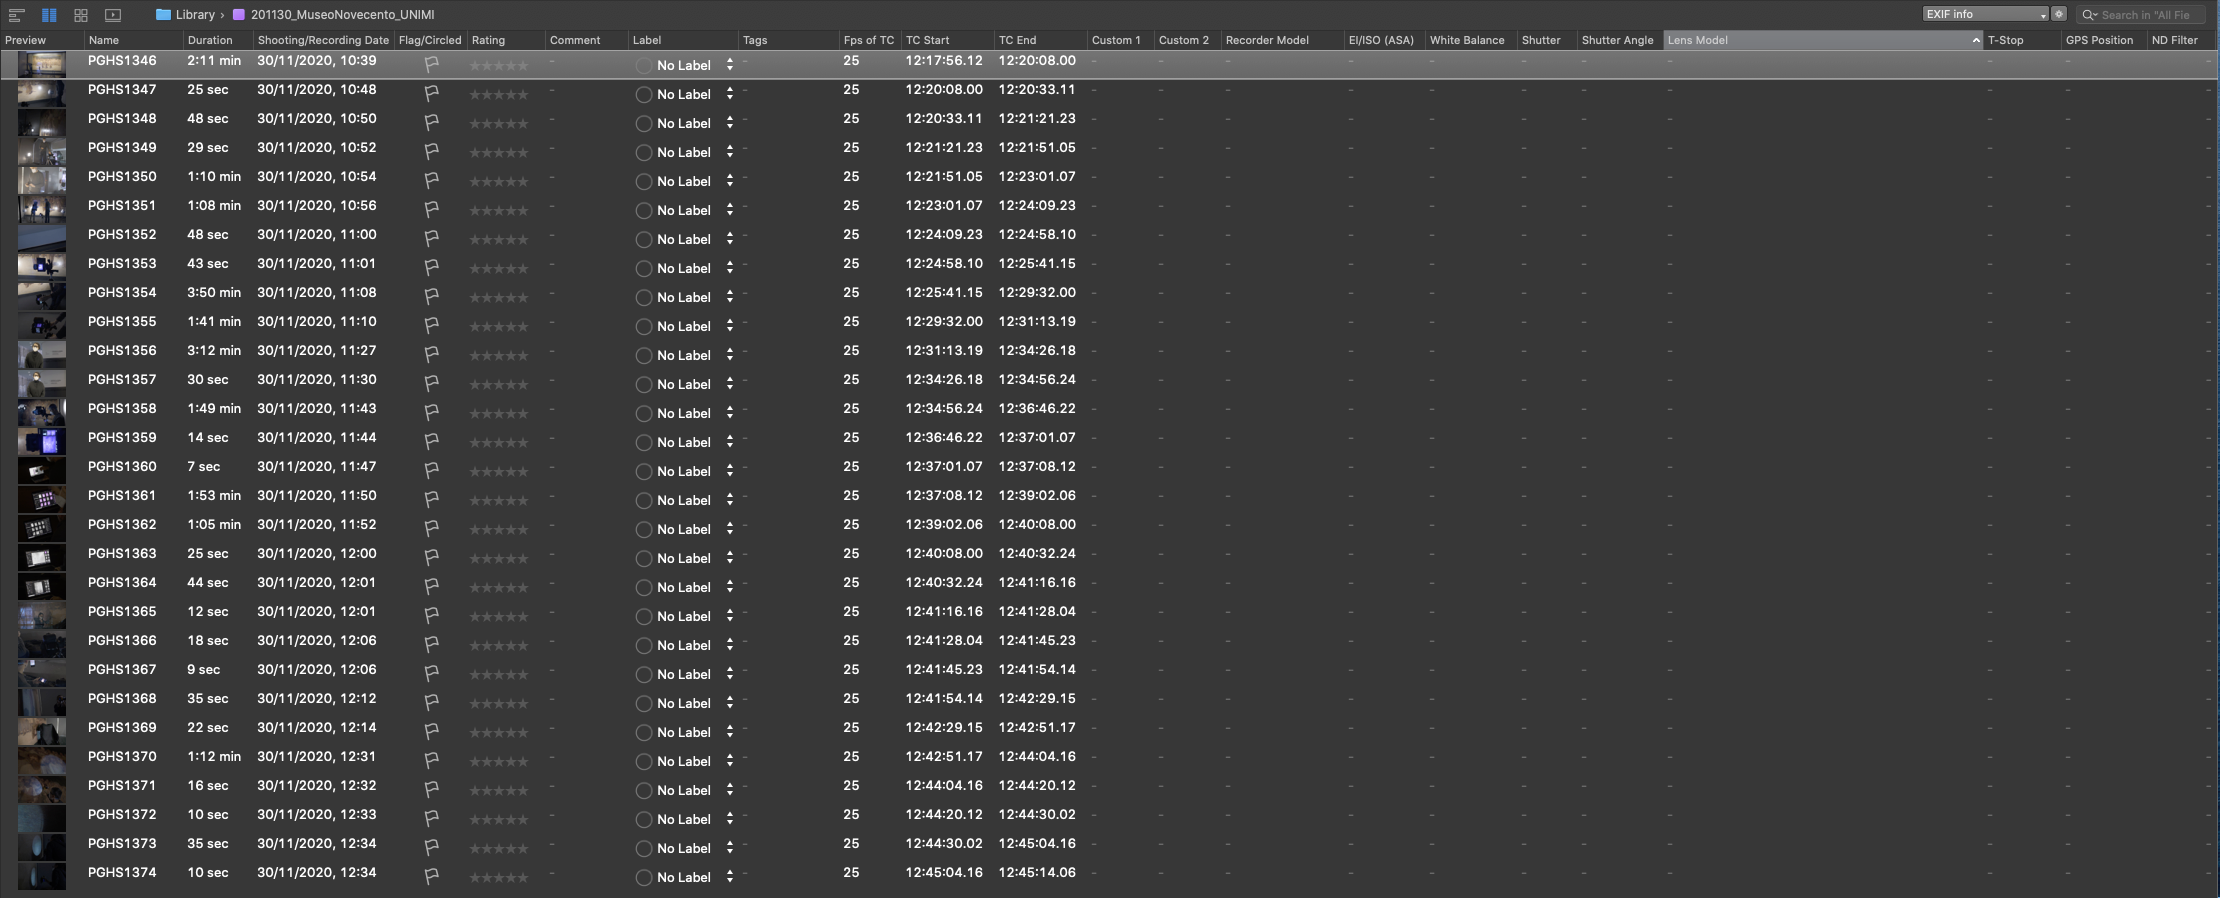
If the media files have been tagged using the macOS Finder Tag, the information will be reported in Tags column in Silverstack.
This is the list of metadata (in bold those exportable by evrExpanse) whose fields are mapped in the Silverstack library (sorted by Silvertack metadata section):
| DryLab/evrExpanse CSV | Silverstack | |
| Field | Section | Field |
| tStop | Camera Settings | T-Stop |
| iso | Camera Settings | ISO |
| colorTemperature | Camera Settings | White Balance |
| latitude | Camera Settings | GPS Position |
| longitude | Camera Settings | GPS Position |
| cameraName | Camera Settings | Model |
| lens | Lens and Filter | Model |
| shotNotes | Comment and Caption | Comment |
| cameraTakeNotes | Comment and Caption | Comment |
| tags | Append Tags | Tags |
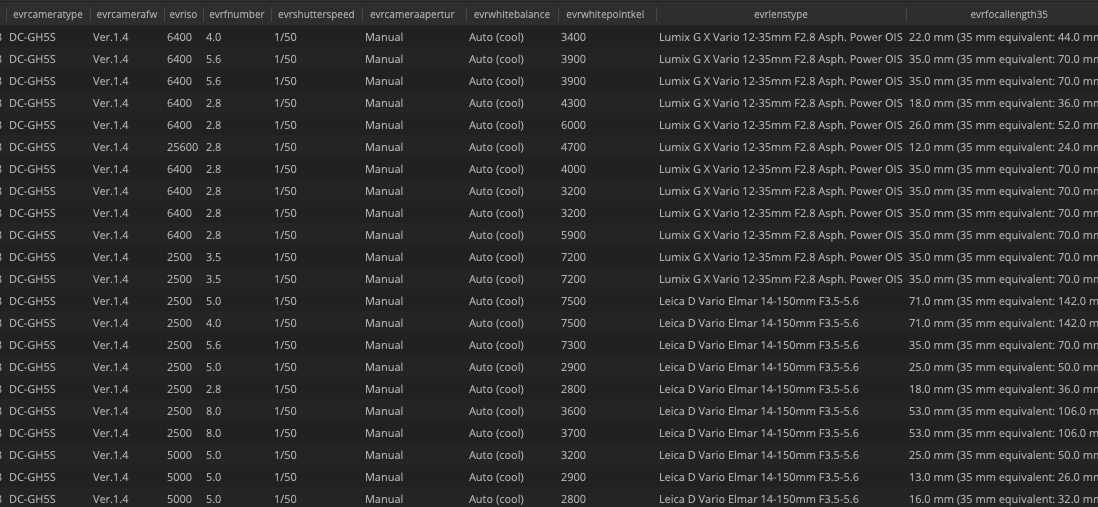
Metadata mapping
In the following table there are the metadata tag exported.
